Headlamp Aiming Deville
Proper road illumination and safety require headlamp aiming.
All states have requirements for headlamp aiming. Follow the state requirements.
Use the low beam lamps in order to aim the headlamps. The high beam lamps
aim correctly if the low beam lamps are aimed properly.
Important: If the vehicle regularly carries an unusual load in the rear compartment,
or if the vehicle regularly pulls a trailer, inspect the aim of the headlamps
with these loads on the vehicle.
- Ensure that the vehicle is at the normal weight with fuel, oil, water
and the spare tire.
- Ensure that the tires are uniformly inflated to the specified
pressure.
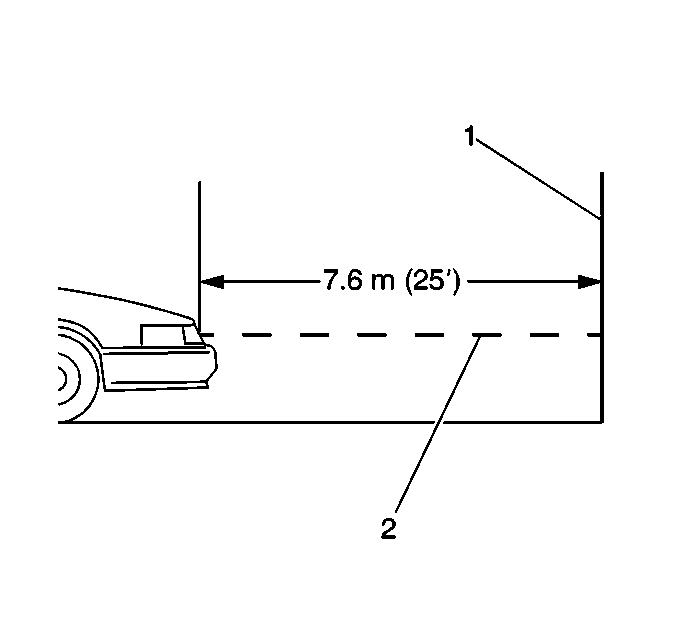
- Place the vehicle on a
level surface so that the headlamps are 7.6 m (25 ft) from a
wall or other flat surface (1).
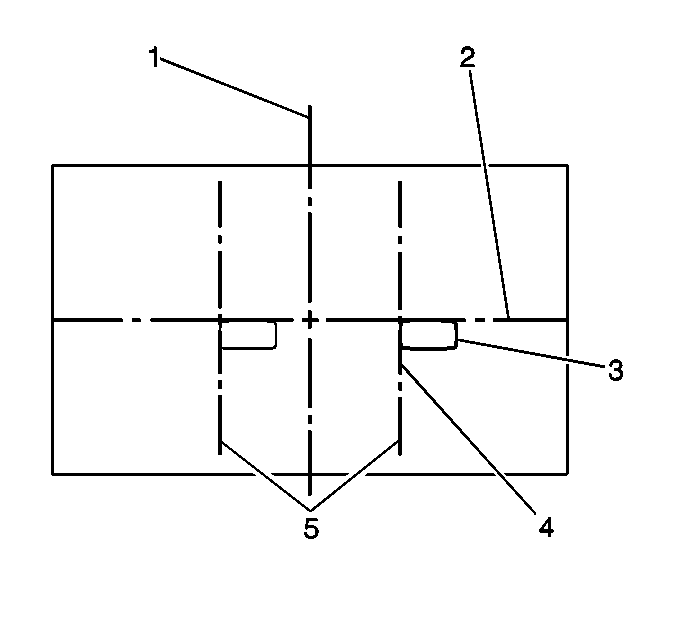
- Locate the center line on the aiming surface. The center line of the
aiming surface is in-line with the center of the vehicle.
| 4.1. | Mark the center of the front window with a narrow strip of masking
tape. |
| 4.2. | Mark the center of the rear window with a narrow strip of masking
tape. |
| 4.3. | Use the strips of masking tape to locate the center (1)
of the aiming surface through the center line of the vehicle. |
- Mark the horizontal center line of the headlamps (2) on
the flat surface directly in front of the vehicle.
- Measure from the floor to the horizontal center line on the headlamp (2).
- Measure from the center of the vehicle to center of the headlamp.
- Using this measurement, mark the vertical center lines of the
headlamps (5) on the aiming surface along the horizontal center line
of the headlamps (3).
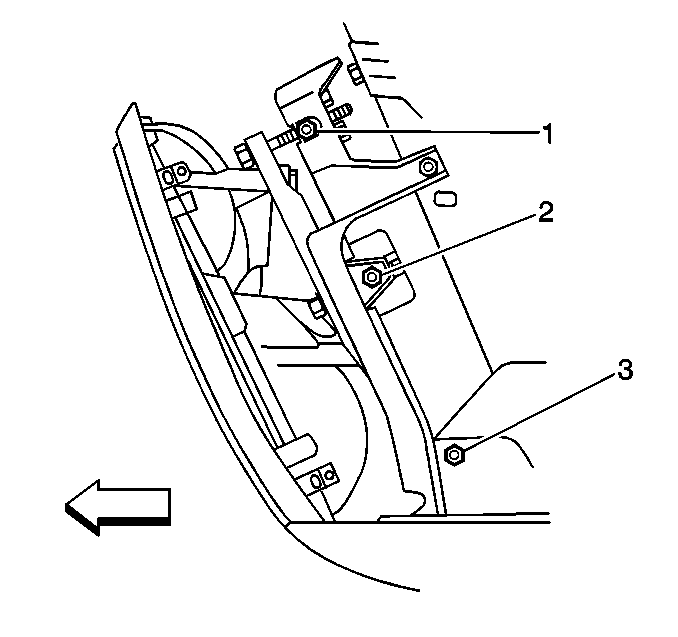
- Loosen the cornering lamp
adjustment screw (3).

- Turn on the low beam headlamps
- Observe the low beam lamp pattern (3) on the aiming surface.
A correct pattern location is slightly below the horizontal center line (2)
and slightly to the right of the vertical center lines (5).

- Turn the horizontal adjustment
screw (1) and the vertical adjustment screw (2) in order to
reposition the low beam lamp pattern as necessary.
Notice: Use the correct fastener in the correct location. Replacement fasteners
must be the correct part number for that application. Fasteners requiring
replacement or fasteners requiring the use of thread locking compound or sealant
are identified in the service procedure. Do not use paints, lubricants, or
corrosion inhibitors on fasteners or fastener joint surfaces unless specified.
These coatings affect fastener torque and joint clamping force and may damage
the fastener. Use the correct tightening sequence and specifications when
installing fasteners in order to avoid damage to parts and systems.
- Tighten the cornering
adjustment screw.
Tighten
Tighten the screw to 2 N·m (18 lb in).
Headlamp Aiming Eldorado
Proper road illumination and safety require headlamp aiming.
All states have requirements for headlamp aiming. Follow the state requirements.
Use the low beam lamps in order to aim the headlamps. The high beam lamps
aim correctly if the low beam lamps are aimed properly.
Important: If the vehicle regularly carries an unusual load in the rear compartment,
or if the vehicle regularly pulls a trailer, inspect the aim of the headlamps
with these loads on the vehicle.
- Ensure that the vehicle is at the normal weight with fuel, oil, water,
and the spare tire.
- Ensure that the tires are uniformly inflated to the specified
pressure.

- Place the vehicle on a
level surface so that the headlamps are 7.6 m (25 ft) from a
wall or other flat surface (1).

- Locate the center line (1) on the aiming suface. The center line
of the aiming surface is in-line with the center of the vehicle.
| 4.1. | Mark the center of the front window with a narrow strip of masking
tape. |
| 4.2. | Mark the center of the rear window with a narrow strip of masking
tape. |
| 4.3. | Use the strips of masking tape to locate the center (1)
of the aiming surface through the center line of the vehicle. |
- Mark the horizontal center line of the headlamps (2) on
the flat surface directly in front of the vehicle.
- Measure from the floor to the horizontal center line on the headlamp (2).
- Measure from the center of the vehicle to center of the headlamp.
- Using this measurement, mark the vertical center lines of the
headlamps (5) on the aiming surface along the horizontal center line
of the headlamps (3).

- Turn on the low beam headlamps.
- Observe the low beam lamp pattern (3) on the aiming suface.
A correct pattern location is slightly below the horizontal center line (2)
and slightly to the right of the vertical center lines (5).
- Turn the horizontal adjustment screw and the vertical adjustment
screw in order to reposition the low beam lamp pattern as necessary.
Headlamp Aiming T85
Proper road illumination and safety require headlamp aiming.
Use the low beam lamps in order to aim the headlamps.The high beam lamps aim
correctly if the low beam lamps are aimed properly.
Important: If the vehicle regularly carries an unusual load in the rear compartment,
or if the vehicle regularly pulls a trailer, inspect the aim of the headlamps
with these loads on the vehicle.
- Ensure that the vehicle is at the normal weight with fuel, oil, water
and the spare tire.
- Ensure that the tires are uniformly inflated to the specified
pressure.
- Place the vehicle on a level surface so that the headlamps are
10 m (33 ft) from a wall or other flat surface.
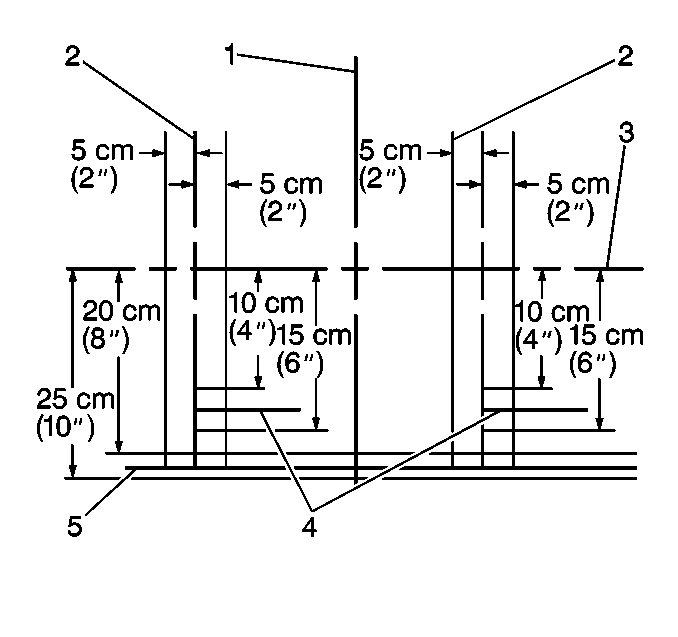
- Locate the center line (1) on the aiming suface. The center line
of the aiming surface is in-line with the center of the vehicle.
| 4.1. | Mark the center of the front window with a narrow strip of masking
tape. |
| 4.2. | Mark the center of the rear window with a narrow strip of masking
tape. |
| 4.3. | Using the strips of masking tape, locate the center (1)
of the aiming surface through the center line of the vehicle. |
- Mark the horizontal center line of the headlamps (3) on
the flat surface directly in front of the vehicle.
- Measure from the floor to the horizontal center line on the headlamp (3).
- Measure from the center of the vehicle to center of the headlamp.
- Using this measurement, mark the vertical center lines of the
headlamps (4) on the aiming surface along the horizontal center line
of the headlamps (3).

- Turn on the low beam headlamps.
- Determine the top edge of the low beam cut-off line (4)
on the aiming surface. A correct low beam cut off line is 10-15 cm
(4-6 in) below the horizontal center line (3).
- Observe the low beam lamp pattern (3) on the aiming suface.
A correct pattern location is slightly below the horizontal center line (3)
and slightly to the right of the vertical center lines (4).
- Turn the horizontal adjustment screw and the vertical adjustment
screw in order to reposition the low beam lamp pattern as necessary.
Headlamp Aiming T84
Proper road illumination and safety require headlamp aiming.
Use the low beams lamps in order to aim the headlamps. The high beam lamps
aim correctly if the low beam lamps are aimed properly.
Important: If the vehicle regularly carries an unusual load in the rear compartment,
or if the vehicle regularly pulls a trailer, inspect the aim of the headlamps
with these loads on the vehicle.
- Ensure that the vehicle is at the normal weight with fuel, oil, water,
and the spare tire.
- Ensure that the tires are uniformly inflated to the specified
pressure.
- Place the vehicle on a level surface so that the headlamps are
10 m (33 ft) from a wall or other flat surface.
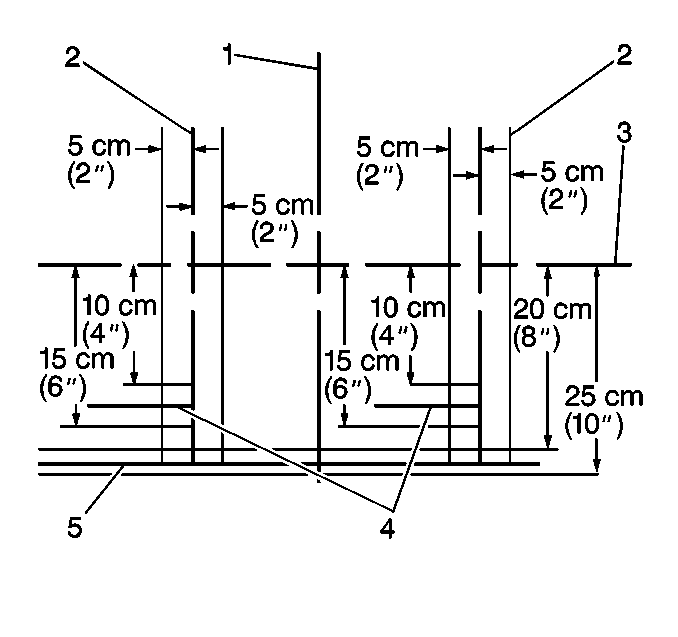
- Locate the center line (1) on the aiming suface. The center line
of the aiming surface is in-line with the center of the vehicle.
| 4.1. | Mark the center of the front window with a narrow strip of masking
tape. |
| 4.2. | Mark the center of the rear window with a narrow strip of masking
tape. |
| 4.3. | Use the strips of masking tape to locate the center (1)
of the aiming surface through the center line of the vehicle. |
- Mark the horizontal center line of the headlamps (3) on
the flat surface directly in front of the vehicle.
- Measure from the floor to the horizontal center line on the headlamp (3).
- Measure from the center of the vehicle to center of the headlamp.
- Using this measurement, mark the vertical center lines of the
headlamps (4) on the aiming surface along the horizontal center line
of the headlamps (3).

- Turn on the low beam lamps.
- Determine the top edge of the low beam cut-off line (4)
on the aiming surface. A correct low beam cut off line is 10-15 cm
(4-6 in) below the horizontal center line (3).
- Observe the low beam lamp pattern (3) on the aiming suface.
A correct pattern location is slightly below the horizontal center line (3)
and slightly to the right of the vertical center lines (4).
- Turn the horizontal adjustment screw and the vertical adjustment
screw in order to reposition the low beam lamp pattern as necessary.


