Removal Procedure
Notice: Always turn the ignition off when installing or removing the ECM connectors
in order to prevent damage to the components.
- Turn OFF the ignition.
- Remove the under hood fuse/relay cover.

Notice: In order to prevent any possible electrostatic discharge damage to the
ECM, do not touch the connector pins.
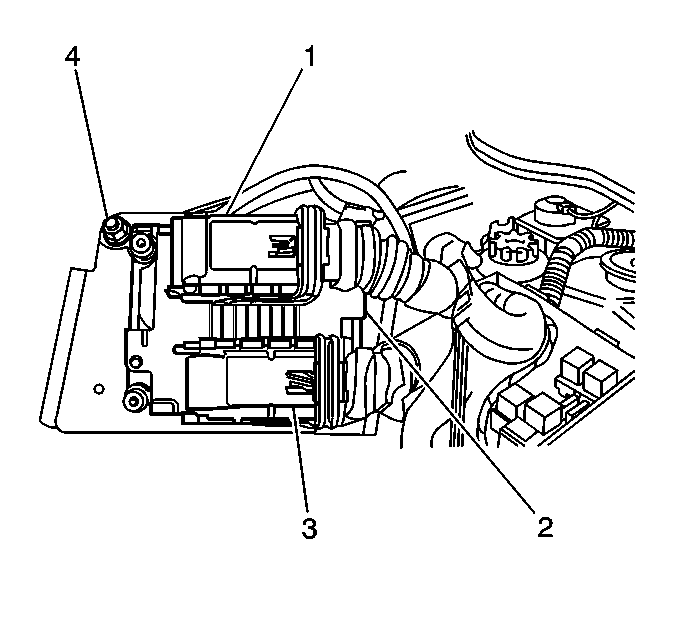
- Grasp the ECM (2) and slide the unit straight up and out of the underhood
relay center.
- Flip the release lever and disconnect the ECM connectors (1, 3)
from the ECM.
- Remove the fastener retaining the ECM ground wire to the ECM.
- Remove the fasteners that retain the ECM to the backing plate.
- Remove the ECM from the backing plate.
Installation Procedure
- The ignition must be OFF.

Notice: Use the correct fastener in the correct location. Replacement fasteners
must be the correct part number for that application. Fasteners requiring
replacement or fasteners requiring the use of thread locking compound or sealant
are identified in the service procedure. Do not use paints, lubricants, or
corrosion inhibitors on fasteners or fastener joint surfaces unless specified.
These coatings affect fastener torque and joint clamping force and may damage
the fastener. Use the correct tightening sequence and specifications when
installing fasteners in order to avoid damage to parts and systems.
- Install the ECM
(2) to the backing plate with the ECM mounting nuts.
Tighten
Tighten the nuts to 4 N·m (35 lb in).
- Install the ECM ground wire screw.
Tighten
Tighten the screw to 4 N·m (35 lb in).
- Carefully align the harness connector with the ECM connector.
- Guide the connector into place while moving the release lever
to the locked position.
- Align the backing plate of the ECM with the slots in the relay
center and slide the unit into the underhood relay center.
- Program the frequency code of the new ECM with the frequency of
the theft deterrent module using the following procedure:
| 7.1. | Connect the scan tool to the vehicle. |
| 7.2. | Turn ON the ignition, with the engine OFF. |
| 7.3. | Select Service Programming on the scan tool. |
| 7.4. | Program the vehicle configuration as required. |
| 7.5. | Follow the instruction on the scan tool to request the information
from the controller. |
| 7.6. | Remove the scan tool from the vehicle. |
| 7.7. | Connect the scan tool to the Techline terminal. |
| 7.8. | Follow the instructions on the Techline terminal to perform the
vehicle theft deterrent learn function using the Service Programming System. |
| 7.9. | Turn OFF the scan tool. |
| 7.10. | Disconnect the scan tool from the Techline terminal. |
| 7.11. | Reconnect the scan tool to the vehicle. |
| 7.12. | Turn ON the ignition, with the engine OFF. |
| 7.13. | Return to the Service Programming menu and follow the instructions
to program the frequency code. |
| 7.14. | After the programming is complete, clear any DTCs that may have
set in the ECM prior to learning the correct theft frequency code. |
- Perform the idle learn procedure. Refer to
Idle Learn
.
- Install the under hood fuse/relay cover.


