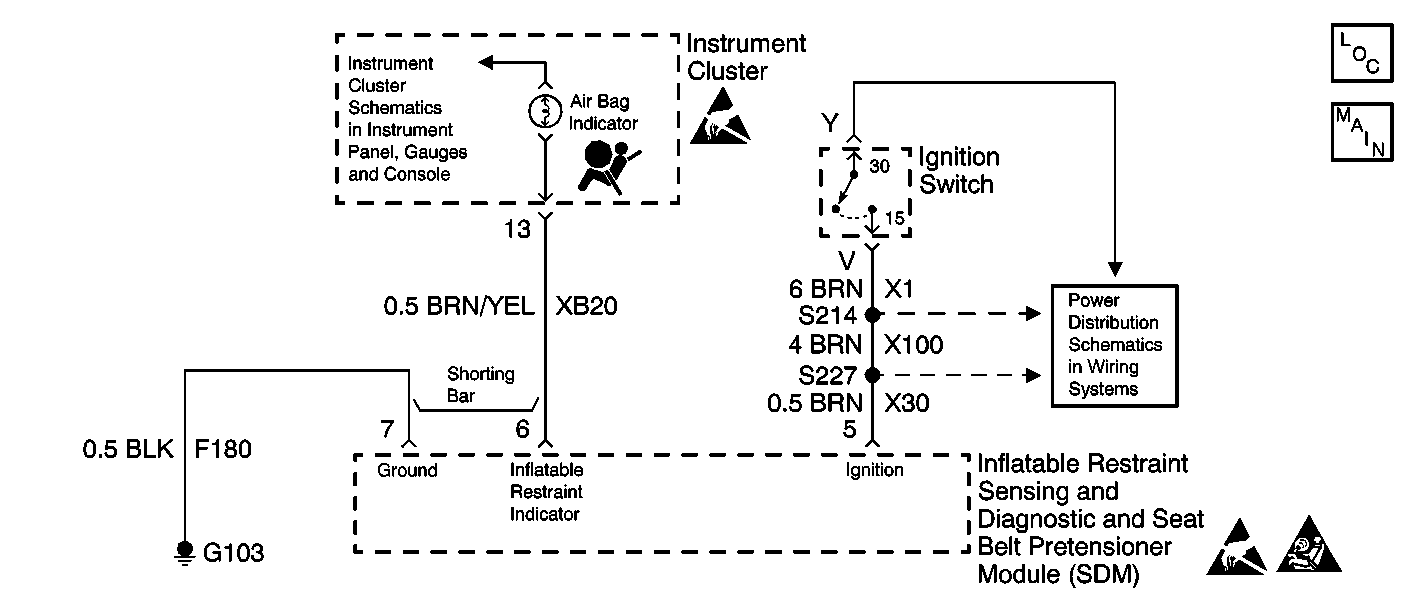
Circuit Description
When you first turn ON the ignition, the CLAMP 15 CRUISE Fuse applies battery voltage to the AIR BAG warning lamp. The AIR BAG warning lamp is controlled by the inflatable restraint sensing and diagnostic and seat belt pretensioner module (SDM). The ignition switch supplies battery voltage to the SDM, at terminal 5. The SDM responds by flashing the AIR BAG warning lamp seven times and then turning it OFF. The SDM monitors the AIR BAG warning lamp control circuit by comparing the output state of the AIR BAG warning lamp control circuit, at terminal 6 of the SDM, to the microprocessor commanded state.
Conditions for Running the DTC
When the ignition voltage is within the normal operating voltage range, the SDM monitors the output state of the AIR BAG warning lamp control circuit, at terminal 6 of the SDM, to determine a mismatch between the output state and the commanded state.
Conditions for Setting the DTC
The output state of the AIR BAG warning lamp control circuit, at terminal 6 of the SDM, does not match the commanded state for 1.25 seconds.
Action Taken When the DTC Sets
The SDM attempts to turn ON the AIR BAG warning lamp.
Conditions for Clearing the DTC
| • | You can issue a CLEAR CODES command |
| • | A history DTC will clear once 255 malfunction free ignition cycles have occurred. |
Diagnostic Aids
These malfunctions are addressed in A Diagnostic System Check - SIR. Perform Diagnostic System Check - SIR before continuing with this table.
Test Description
-
This step checks the instrument cluster wiring harness connector.
-
This step checks the instrument cluster terminals.
-
This step checks the AIR BAG warning lamp.
-
This step checks the AIR BAG warning lamp socket within the instrument cluster.
-
This step checks the SDM wiring harness connector.
-
This step checks the SDM terminals.
-
This step checks for a short to ground in the AIR BAG warning lamp control circuit.
-
This step determines if there is an open in the AIR BAG warning lamp control circuit or if there is a malfunctioning SDM.
Step | Action | Value(s) | Yes | No | ||||||
|---|---|---|---|---|---|---|---|---|---|---|
1 | Did you perform A Diagnostic System Check - SIR? | -- | Go to Step 2 | |||||||
Does the instrument cluster wiring harness connector exhibit signs of corrosion, terminal damage, or poor connections? | -- | Go to Step 3 | Go to Step 4 | |||||||
3 | Replace the instrument cluster wiring harness connector. Refer to Connector Repairs in Wiring Systems. Did you complete the repair? | -- | Go to Step 4 | -- | ||||||
Inspect the instrument cluster for the following conditions:
Does the instrument cluster exhibit signs of corrosion or poor terminal tension? | -- | Go to Step 5 | Go to Step 6 | |||||||
5 | Replace the instrument cluster. Refer to Instrument Cluster Replacement in Instrument Panel, Gauges and Console. Did you complete the replacement? | -- | Go to Step 17 | -- | ||||||
Remove and inspect the AIR BAG warning lamp. Is the AIR BAG warning lamp OK? | -- | Go to Step 8 | Go to Step 7 | |||||||
7 | Replace the AIR BAG warning lamp. Did you complete the replacement? | -- | Go to Step 17 | -- | ||||||
Inspect the AIR BAG warning lamp socket within the instrument cluster for the following conditions:
Does the AIR BAG warning lamp socket exhibit signs of corrosion, terminal damage, or poor connections? | -- | Go to Step 5 | Go to Step 9 | |||||||
Does the SDM wiring harness connector exhibit signs of corrosion, terminal damage, or poor connections? | -- | Go to Step 10 | Go to Step 11 | |||||||
10 | Use the J 42250 Catera Terminal Repair Kit to repair or replace the SDM wiring harness connector. Refer to Connector Repairs in Wiring Systems. Did you complete the repair? | -- | Go to Step 17 | -- | ||||||
Inspect the SDM for the following conditions:
Does the SDM exhibit signs of corrosion or poor terminal tension? | -- | Go to Step 12 | Go to Step 13 | |||||||
12 | Replace the SDM. Refer to Inflatable Restraint Sensing and Diagnostic and Seat Belt Pretensioner Module Replacement . Did you complete the replacement? | -- | Go to Step 17 | -- | ||||||
Use the J 39200 Digital Multimeter (DMM) to measure the resistance between the AIR BAG warning lamp control circuit and a known good ground. Does the resistance measure less than the specified value? | OL | Go to Step 14 | Go to Step 15 | |||||||
14 | Locate and repair the short to ground in the AIR BAG warning lamp control circuit. Refer to Circuit Testing and Wiring Repairs in Wiring Systems. Did you complete the repair? | -- | Go to Step 17 | -- | ||||||
Use the DMM to measure the resistance of the AIR BAG warning lamp control circuit. Does the resistance measure less than the specified value? | 0.5 ohms | Go to Step 12 | Go to Step 16 | |||||||
16 | Locate and repair an open or a high resistance in the AIR BAG warning lamp circuit. Refer to Circuit Testing and Wiring Repairs in Wiring Systems. Did you complete the repair? | -- | Go to Step 17 | -- | ||||||
17 |
Did you complete the action? | -- | -- |
