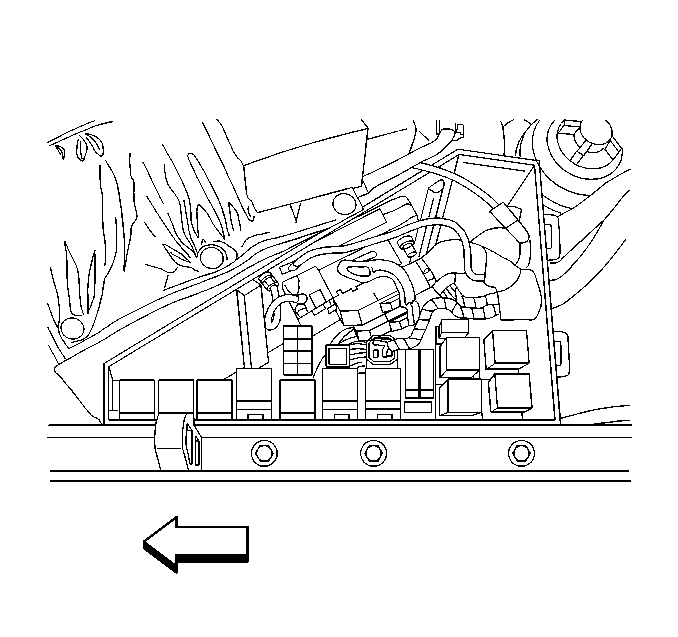
Engine Control Module (ECM)
Notice: In order to prevent any possible electrostatic discharge damage to the
ECM, do not touch the connector pins.
Service of the engine control module (ECM) normally consists
of either replacement or reprogramming. If the diagnosis indicates a replacement
is needed, make sure that the replacement ECM is the correct
part. If the new ECM is correct, remove the malfunctioning ECM
and install the new service ECM. Reprogram the new ECM with
the frequency code of the theft deterrent module currently on
the vehicle. Before programming the new ECM, ensure that the following
conditions exist:
| • | The battery is fully charged. |
| • | The ignition switch is in the RUN position. |
| • | The connection at the data link connector (DLC) is secure. |
Follow the instructions on the Tech Line terminal and the scan tool
when programming the ECM. If the ECM fails to accept the program, check the
following conditions:
| • | Inspect all of the ECM connections. |
| • | Verify that the scan tool has the latest version of the software. |
ECM Location

Notice: Always turn the ignition off when installing or removing the ECM connectors
in order to prevent damage to the components.
Important: In order to prevent any internal ECM damage, the ignition must be turned
OFF when disconnecting or reconnecting the power to the ECM. This includes
disconnecting or reconnecting the battery cables, the ECM fuse, the
jumper cables, etc.
Removal Procedure
- Turn OFF the ignition.
- Remove the under hood fuse/relay cover.

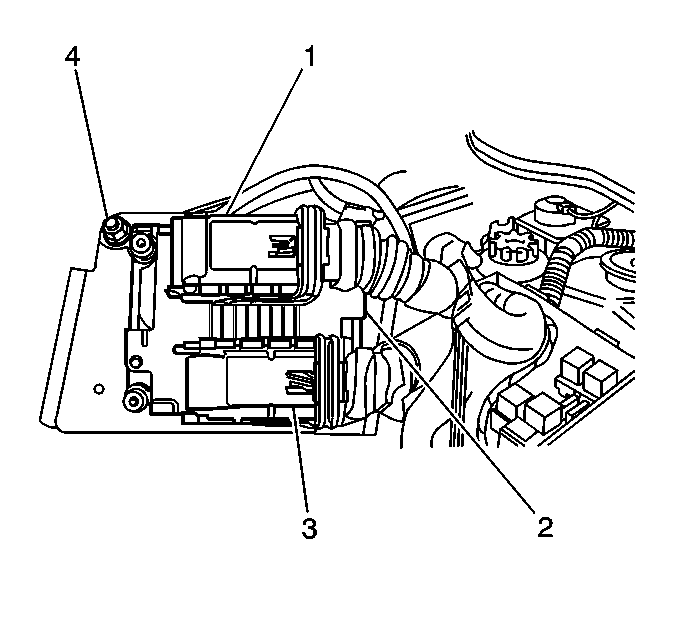
- Grasp the ECM (2) and
slide the unit straight up and out of the underhood relay center.
- Flip the release lever and disconnect the ECM connectors (1,3)
from the ECM.
- Remove the fastener retaining the ECM ground wire to the ECM.
- Remove the fasteners that retain the ECM to the backing plate.
- Remove the ECM from the backing plate.
Installation Procedure
- The ignition must be OFF.

- Install the ECM (2) to
the backing plate with the fasteners.
Tighten
Tighten the fasteners to 4 N·m (35 lb in).
- Install the fastener that retains the ECM ground wire to the ECM.
Tighten
Tighten the fastener to 4 N·m (35 lb in).
- Carefully align the harness connector with the ECM connector.
- Guide the connector into place while moving the release lever
to the locked position.
- Align the backing plate of the ECM with the slots in the relay
center and slide the unit into the underhood relay center.
- Program the frequency code of the new ECM with the frequency of
the theft deterrent module using the following procedure:
| 7.1. | Connect the scan tool to the vehicle. |
| 7.2. | Turn ON the ignition with the engine OFF. |
| 7.3. | Select Service Programming on the scan tool. |
| 7.4. | Program the vehicle configuration as required. |
| 7.5. | Follow the instruction on the scan tool to request the information
from the controller. |
| 7.6. | Remove the scan tool from the vehicle. |
| 7.7. | Connect the scan tool to the Techline terminal. |
| 7.8. | Follow the instructions on the Techline terminal to perform the
Vehicle Theft Deterrent Learn function using the Service Programming System. |
| 7.9. | Turn OFF the scan tool. |
| 7.10. | Disconnect the scan tool from the Techline terminal. |
| 7.11. | Reconnect the scan tool to the vehicle. |
| 7.12. | Turn ON the ignition with the engine OFF. |
| 7.13. | Return to the Service Programming menu and follow the instructions
to program the frequency code. |
| 7.14. | After the programming is complete, clear any DTCs that may have
set in the ECM prior to learning the correct theft frequency code. |
- Perform the Idle Learn Procedure. Refer to
Idle Learn
.
- Install the under hood fuse/relay cover.


