DTC 171 Outside Temperature Sensor Open Circuit 2nd Design
Circuit Description
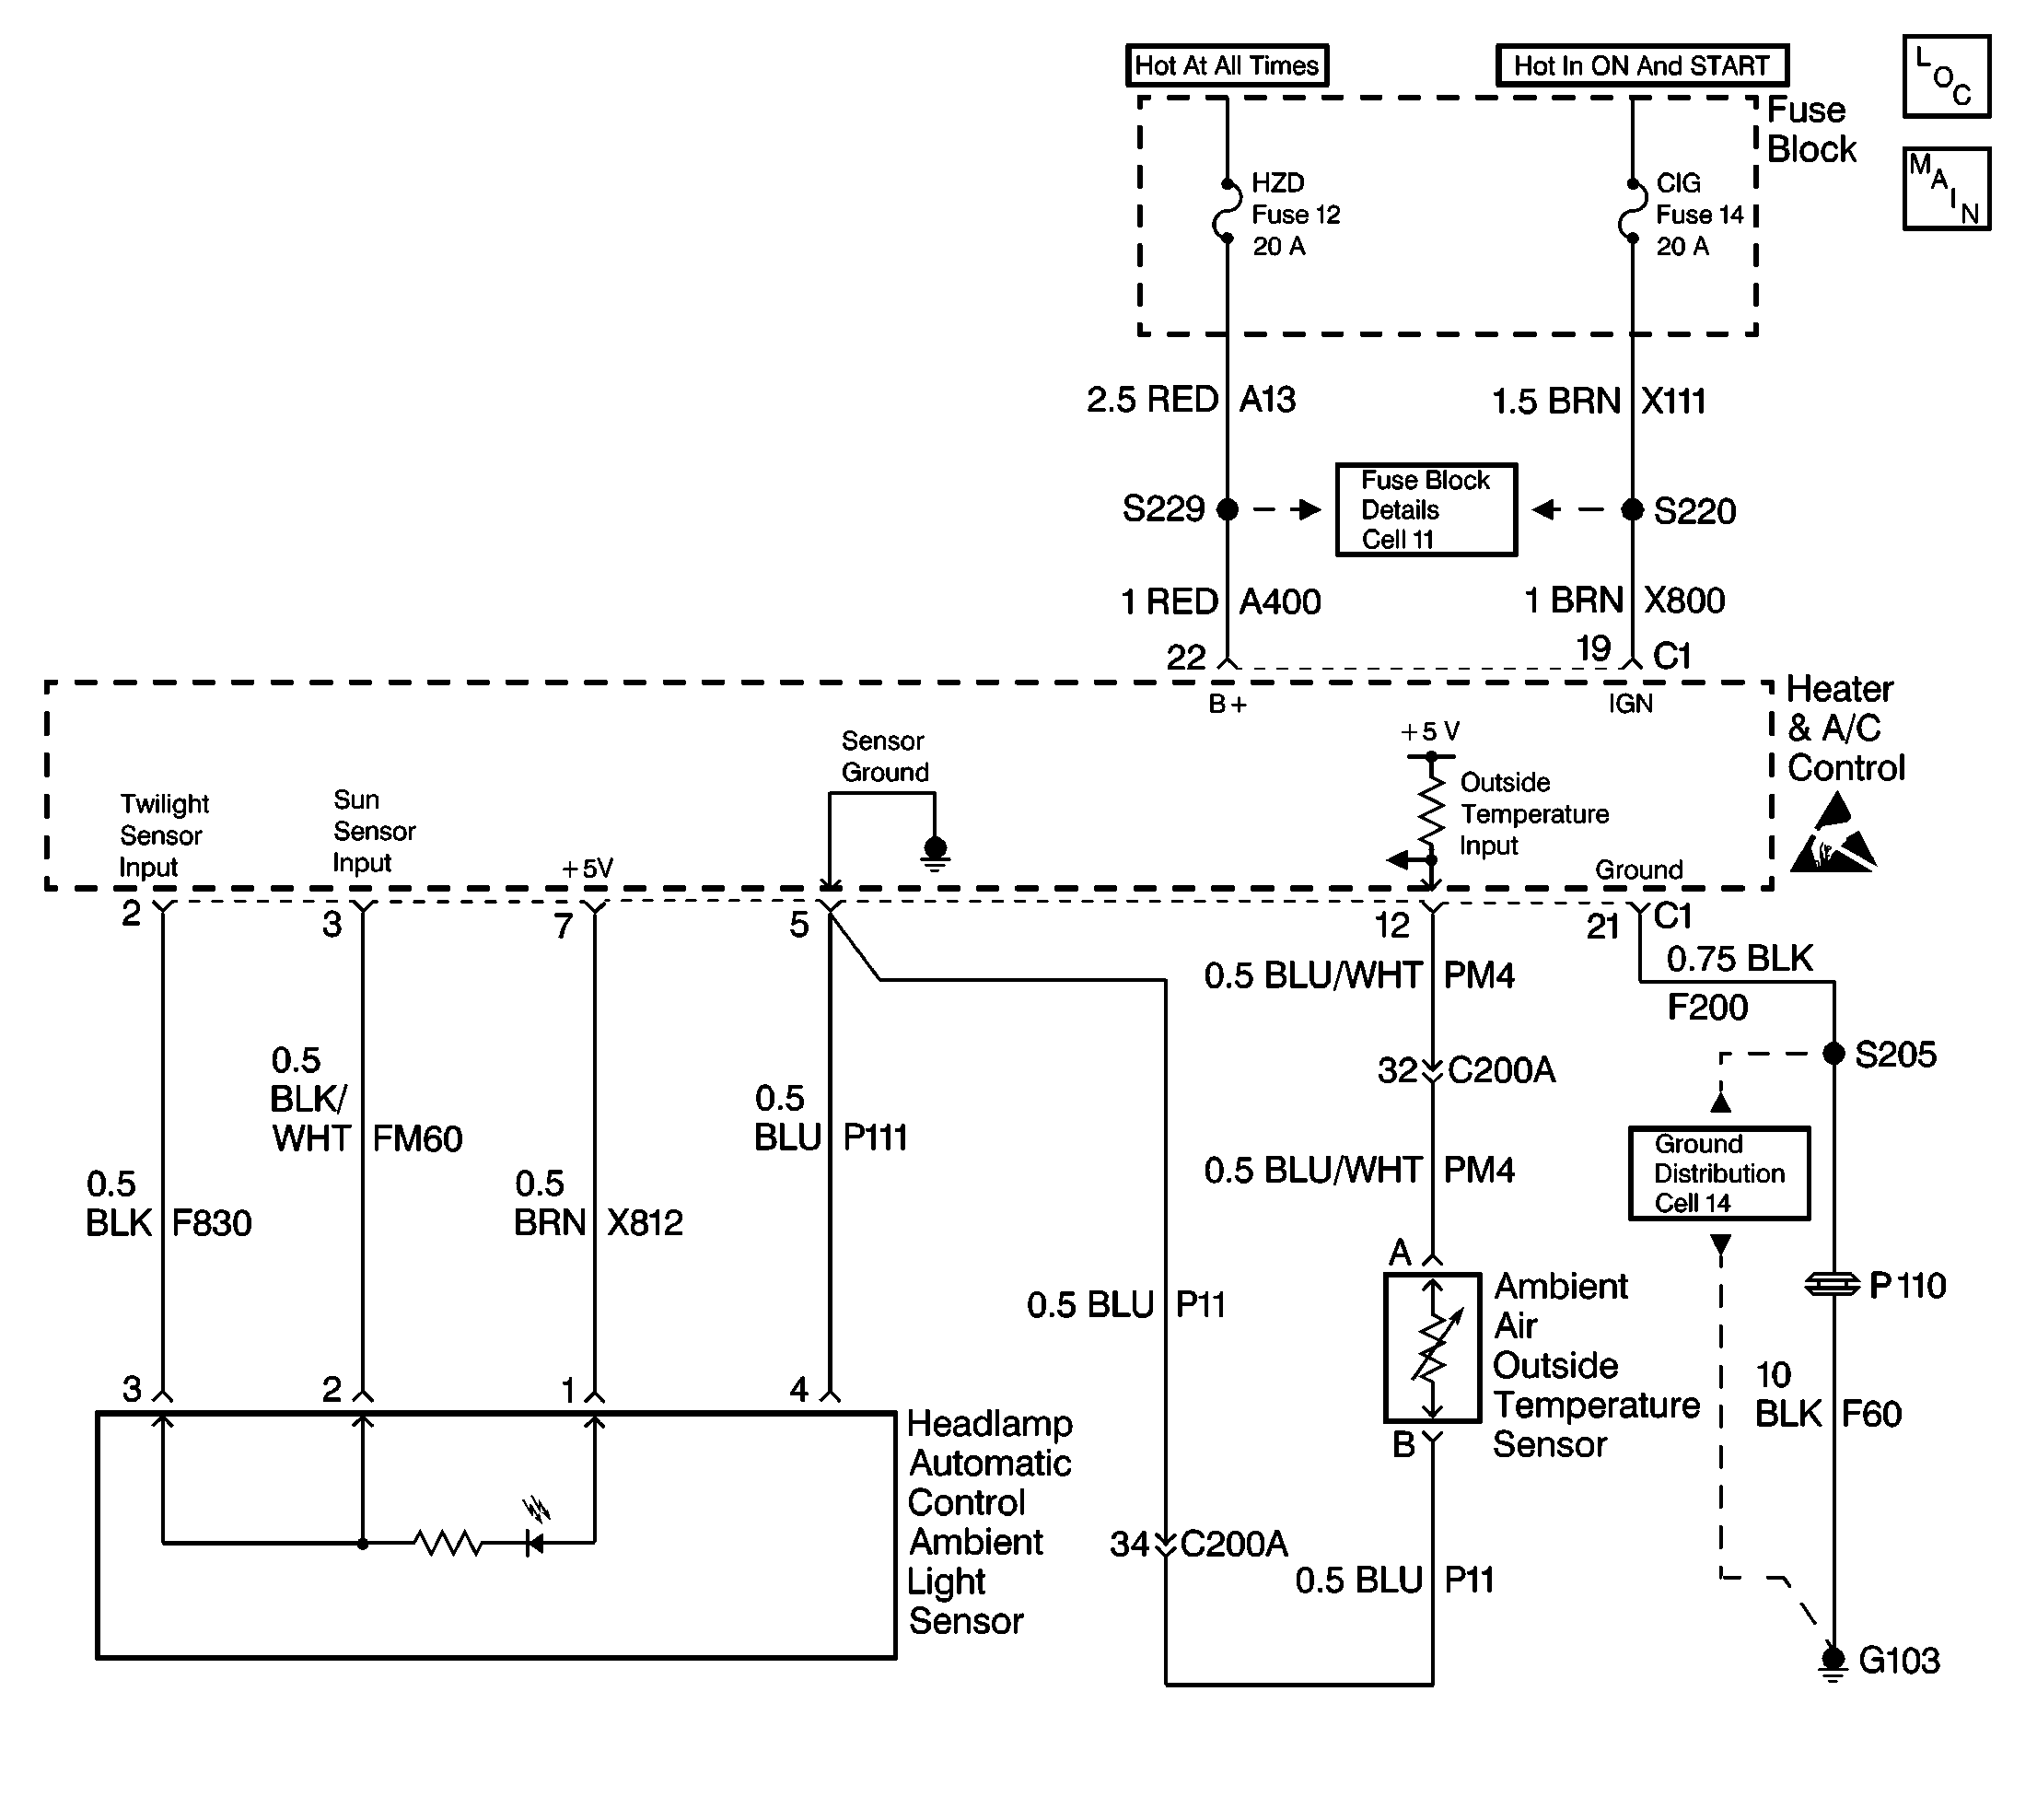
The outside air temperature sensor is located behind the lower grille of the front fascia on the left side of the vehicle. In this position, it is exposed at airflow through the grill before the air enters the radiator. This provides a sample of the outside (ambient) air temperature.
The sensor is a thermistor used to control the signal voltage to the heater and A/C control. The heater and A/C control supplies a reference voltage (about 5 volts) on circuit PM 4 to the sensor and measures the voltage drop in the circuit to obtain a temperature signal. This signal is an input that tells the heater and A/C control how much cooling or heating will be required to deliver to the passenger compartment. It also affects the mode and blower motor speed.
Resistance of the sensor varies from 169,400 ohms at -40°C (-40°F) to 1,245 ohms at 60°C (140°F). When the outside (ambient) air temperature is cold, the thermistor resistance is high; therefore, the Heater and A/C control will receive a high signal voltage input. If the air temperature is hot, the thermistor resistance is low, the Heater and A/C control will receive a low signal voltage input.
The outside temperature is displayed on the display panel of the heater and A/C control. The displayed temperature value is derived from a series of calculations performed by a processor in the heater and A/C control. When the measured outside temperature is less than the displayed value, the processor filters less of the input signal, stores it in EEPROM, and rapidly updates the display. If the measured outside temperature is greater than the displayed value and the vehicle is moving, the processor filters more of the input signal, stores it in EEPROM, and updates the display at a much slower rate.
Conditions for Setting the DTC
| • | With the ignition in the ON position, circuit PM4 is checked continuously every 200 ms. |
| • | Circuit PM4 stays at 4.5 V or higher. |
Action Taken When the DTC Sets
| • | The heater and A/C control displays the outside temperature as F |
| • | The system uses 10°C (50°F) as a default value. |
Conditions for Clearing the DTC
| • | The conditions for the fault are no longer present |
| • | Using a scan tool. |
| • | A history DTC will clear after 20 consecutive ignition cycles if the condition for the fault is no longer present. |
Diagnostic Aids
| • | If the DTC is a history or an intermittent. Try to perform the tests shown while "wiggling" wiring and connectors, this can often cause the malfunction to appear. |
| • | Visually inspect sensor connector and harness for damage, corrosion or water intrusion. |
| • | Check connector halves for poor mating or a terminal not fully seated in the connector body (backed out). |
| • | Check for adequate terminal tension, mis-routed harness, rubbed through wire insulation, and broken wire inside the insulation. |
| • | Check for improperly formed or damaged terminals. All connector terminals in the related circuit should be carefully reformed or replaced to insure proper contact tension. |
| • | If using the chart below, the resistance value of the sensor must be close to the ohmic values given in the chart. If not the sensor is considered skewed and must be replaced. |
°C | °F | Ohmsohms |
|---|---|---|
Temperature vs. Resistance Values (Approximate) | ||
-40 | -40 | 169,400 |
-30 | -22 | 88,740 |
-20 | -4 | 48,580 |
-10 | 14 | 27,670 |
0 | 32 | 16,330 |
10 | 50 | 9,951 |
20 | 68 | 6,246 |
30 | 86 | 4,028 |
40 | 104 | 2,663 |
50 | 122 | 1,801 |
60 | 140 | 1,245 |
Test Description
The number(s) below refer to the step number(s) on the diagnostic table.
-
This step checks for the available reference voltage from the heater and A/C control. Placing the DMM in series, checks the signal and ground circuits in one step.
-
This step replaces the sensor. If the reference voltage was measured in the previous step, this would indicate the heater and A/C control and the wiring are OK.
-
This step replaces the heater and A/C control. If a DTC 169 continues to reset after a repair or no repair, the most likely cause is an internal malfunction in the heater and A/C control.
Step | Action | Value(s) | Yes | No |
|---|---|---|---|---|
1 | Was the Air Delivery System Check performed? | - | ||
Is the voltage reading within the specified value? | 4.5-5.5 V | |||
Replace the ambient air temperature sensor. Is the replacement complete? | -- | -- | ||
4 |
Is the voltage reading within the specified value? | 4.5-5.5 V | ||
5 | Locate and repair the open ground circuit. Is the circuit repair complete? | -- | -- | |
6 |
Is the voltage reading within the specified value? | 4.5-5.5 V | ||
7 | Locate and repair the open in CKT PM 4 between C200A and the ambient air temperature sensor. Is the circuit repair complete? | -- | -- | |
8 |
Is the resistance reading within the specified value? | Less than 5 ohms | ||
9 |
Is a current DTC 171 present? | -- | System OK | |
Replace and program the heater and A/C control. Refer to Control Assembly Replacement for the programming procedure. Is the replacement and programming complete? | -- | -- | ||
11 | Locate and repair the open in CKT PM 4 between connector C1 and C200A. Is the circuit repair complete? | -- | -- |
DTC 171 Outside Temperature Sensor Open Circuit Latest Software Version
Test Description
The number(s) below refer to the step number(s) on the diagnostic table.
-
Determines if the malfunction is present.
-
If the outside temperature is at or near zero volts, indicates the heater and A/C control and the outside temperature sensor wiring are OK.
-
When removing related harnesses and harness connectors, visually/physically inspect wiring and connectors for the following:
| • | Wire insulation that is rubbed through, causing an intermittent short. |
| • | Wiring broken inside the insulation. |
| • | Poor mating of the connector halves or a terminal not fully seated in the connector body (backed out). |
| • | Improperly formed or damaged terminals. All connector terminals in the related circuits should be carefully reformed or replaced to insure proper contact tension. |
| • | Poor terminal to wire connection. Inspect connector seals for being there and for being damaged. |
-
If the voltage measurement is at 4.5 V-5.0 V, indicated the signal circuit is OK.
-
Disconnecting the heater and A/C control will allow using the DMM to check continuity of the circuits. This will aid in locating a shorted circuit.
Step | Action | Value(s) | Yes | No |
|---|---|---|---|---|
1 | Was the Air Delivery System Check performed? | - | Go to Air Delivery System Check | |
2 |
Does the scan tool display the specified value? | More than 4.5 V | ||
3 |
Does the scan tool display the specified value? | Les than 0.2 V | ||
4 | While monitoring the scan tool, move related harnesses and harness connectors at the component and the heater and A/C control. Does the sensor value change while a related harness or connector is being moved? | -- | Refer to Diagnostic Aids | |
5 | Replace the outside temperature sensor. Is the replacement complete? | -- | -- | |
6 | Jumper sensor signal circuit PM4 to ground. Is the outside temperature sensor voltage within the specified value? | Less than 0.2 V | ||
7 | Locate and repair damaged connector or wiring harness. Is the repair complete? | -- | -- | |
8 |
Is the ground circuit open? | -- | ||
9 |
Is the signal circuit open? | -- | ||
10 |
Does the DTC reset? | -- | Go to Air Delivery System Check | |
11 | Repair sensor open circuit. Is the repair complete? | -- | -- | |
12 | Replace and program the heater and A/C control. Refer to Heater and A/C Control Replacement for the programming procedure. Is the replacement and programming complete? | -- | -- | |
13 | Repair open sensor signal wire. Is the repair complete? | -- | -- |
