Engine Oil and Oil Filter Replacement

Look for the Starburst
symbol for recommended oils for this engine. The Starburst symbol indicates
that the oil is certified by the American Petroleum Institute (API). Do not
use any oil which does not carry the Starburst symbol.
The engine oil viscosity (thickness) effects the following operations:
| • | The engine oil viscosity effects the fuel economy. |
| • | The engine oil viscosity effects the cold-weather operation (starting
and oil flow). |
Lower viscosity engine oils provide better fuel economy and provide
better cold-weather performance. Higher temperature weather conditions require
higher viscosity engine oils for satisfactory lubrication. Using oils of any
viscosity other than those recommended could result in engine damage. Consider
the range of temperatures the vehicle will be operating in before the next
oil change. Select the recommended oil viscosity.
Tire Rotation
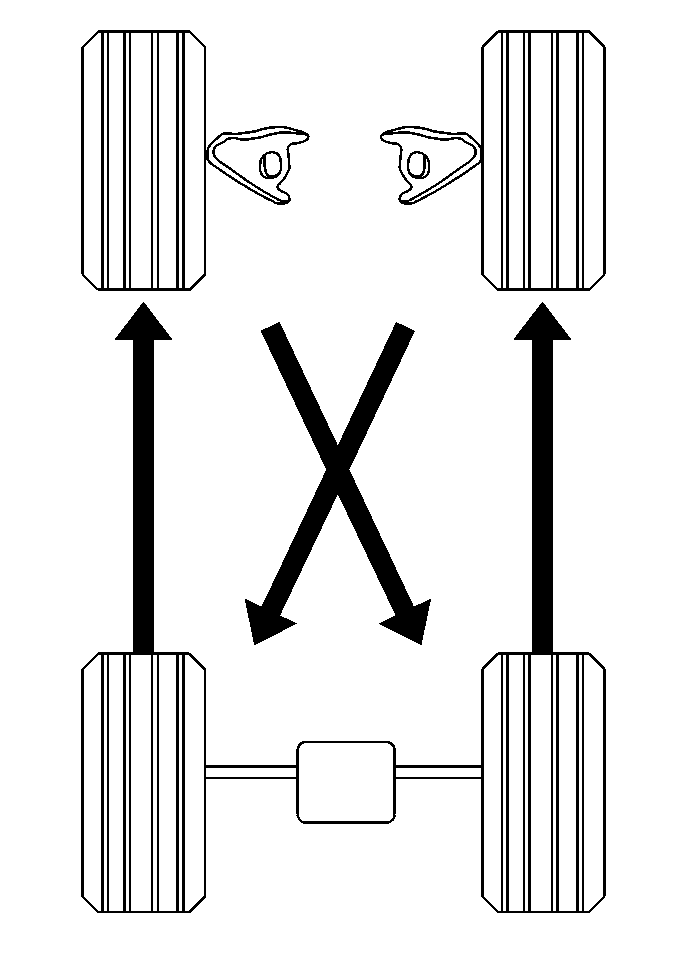
Check the tires for abnormal
wear. Check the tires for abnormal damage. Rotate the tires to equalize wear
and to obtain maximum tire life. Check the wheel alignment if irregular and/or
premature wear exists. Check for damaged tires. Do not include the compact
spare tire in the tire rotation.
Perform the Brake System Inspection while the tires and wheels are removed.
Refer to
Brake Pad Inspection
in Disc
Brakes.
Brake System Inspection
The front brake linings have electronic wear indicators. The electronic
wear indicators illuminate the Brake indicator lamp when replacement is needed.
Inspect the lining during the tire rotation. The rear brake linings do not
have a wear indicator system. Visually inspect the rear brake linings as follows:
Brake Lining Inspection Procedure

- Inspect the front brake
inner linings for wear through the opening on the top of the brake caliper.
Note that the pad linings are slightly beveled.
- View from the end of the caliper to inspect the front brake outer
linings for wear.
- Replace the front linings if one of the following conditions is
present:
| 3.1. | Replace the front linings if the Brake indicator lamp is on. The
brake indicator lamp indicates worn linings. |
| 3.2. | Replace the front linings if either the inner or the outer linings
are worn to within 0.030 inch (0.76 mm) of the lining plate
or the rivets. |
| 3.3. | Replace the front linings if worn unevenly. |
| 3.4. | Replace the front linings if the wear surface is worn beveled. |

- Inspect the rear brake
linings for wear through the opening on the top of the rear caliper.
- Replace the rear linings if one of the following conditions is
present:
| 5.1. | Replace the rear linings if either the inner or the outer linings
are worn to within 0.030 inch (0.76 mm) of the lining plate
or the rivets. |
| 5.2. | Replace the rear linings if worn unevenly. |
| 5.3. | Replace the rear linings if the wear surface is worn beveled. |
- Inspect the front rotor surface and inspect the rear rotor surface
for the following conditions:
| • | Inspect the surface for excessive rust. |
| • | If excessive rust is evident, refinish or replace the rotor. |
| • | Inspect the surface for variation in color. Variation in color
indicates a warped rotor. |
| • | If variation in color is evident, refinish or replace the rotor. |
- Inspect the front wear indicator sensors and inspect the wire
leads for the following conditions:
| • | Inspect for broken leads. |
| • | Inspect for poor connection to the inner pads. |
| • | Replace the wear indicator and/or replace the wire leads if any
of the above is evident. |
- Inspect the hoses for the following conditions:
| • | Inspect the hoses for twisted hook up. |
| • | Properly attach the hose(s) if twisted. |
| • | Inspect the hoses for cuts. |
| • | Replace the hose(s) if cut. |
| • | Inspect the hoses for nicks. |
| • | Replace the hose(s) if nicked. |
- Inspect the pipe fitting and inspect the hose connections for
leaks. Wet spots around the fittings indicates leakage. Tighten or replace
the components as necessary.
- Inspect the parking brake system. Inspect the parking brake shoes
for wear, the hardware for corrosion and damage, the integral brake drum for
scoring and rust, the brake cables for kinking and damaged corrosion protection,
and the brake cable mounts for damage and missing pieces.
Air Cleaner Filter Inspection and Replacement
Important: Improper installation of the air cleaner filter may affect vehicle emissions.
Only qualified individuals are authorized to service the air cleaner
filter.
Replace the air cleaner filter every 96 000 km (60,000 miles).
- Disconnect the air intake hose from the air cleaner cover.
- Remove the air cleaner cover retaining screws (or clips, if equipped).
- Remove the air cleaner cover.
- Remove the air cleaner filter.
- Inspect the air cleaner filter condition.
- Replace the air cleaner filter if any of the following conditions
are evident:
| • | Replace a damaged filter. |
| • | Replace a heavily soiled filter. |
- Install the air cleaner filter in the air cleaner cover.
- Install the air cleaner cover to the air cleaner housing.
- Install the air cleaner cover retaining screws (or clips, if equipped).
Tighten
Tighten the air cleaner cover retaining screws until fully seated and
not stripped.
- Connect the air intake hose to the air cleaner cover.
Passenger Compartment Air Filter (Pollen Filter) Replacement
The passenger compartment air filter is located in the air inlet for
the heater and air conditioning module, under the passenger side air inlet
grille (leaf screen). Refer to
Passenger Compartment Air Filter Replacement
in HVAC with Automatic A/C.
Fuel Tank, Cap and Lines Inspection
Inspect the following for damage and/or leaks:
| • | Replace the fuel tank as necessary. |
| • | Replace the cap as necessary. |
| • | Replace the lines as necessary. |
Inspect fuel cap gasket for an even filler neck imprint or for any damage.
Replace as necessary.
Rear Axle Fluid Level Check
The vehicle must be level when inspecting fluid level. The vehicle does
not have to be supported by the suspension. Remove the inspection plug from
the side of the differential to inspect the fluid level. The fluid level should
be at the lower edge of inspection plug opening. Refer to
Fluid and Lubricant Recommendations
for proper fluid level if
additional fluid is needed.
Automatic Transmission Service
Use DEXRON® III fluid, GM P/N 12346143. Refer to
Changing Fluid and Oil Filter
for procedure. Change
both the fluid and the filter every 83 000 km (50,000 miles)
if used under one of the following conditions:
| • | If used in heavy traffic where the outside temperature regularly
reaches 32°C (90°F). |
| • | If used in hilly terrain. |
| • | If used in mountainous terrain. |
| • | If used when doing frequent trailer towing. |
| • | If used under high performance operation. |
The fluid and the filter does not require changing if the vehicle is
not used under any of these conditions.
Engine Accessory Drive Belt Inspection
Inspect the drive belt for wear. Cracks in the belt ribs will not impair
belt performance. Do not replace the drive belt if cracks in the belt ribs
are evident. Replace the belt if the following conditions are evident:
| • | Replace the belt if sections of the belt are missing. |
Spark Plug Replacement
The spark plugs have a platinum tip. Replace the spark plugs every 160 000 km
(100,000 miles), refer to
Spark Plug Replacement
in Engine Electrical. Use the J 42068 Spark Plug Adapter
Sleeve special tool to prevent possible crossthreading or cracking when removing
and installing spark plugs. Refer to
Maintenance Items
for replacement spark plugs and gap specifications.
Spark Plug Wire Inspection
- Clean the wires.
- Inspect for the following conditions:
- Check the wire boot fit at the ignition coils.
- Check the wire boot fit at the spark plugs.
- Replace the wires as necessary, refer to
Spark Plug Wire Harness Replacement
in Engine Electrical.
Timing Belt Replacement
Notice: Failure to follow the described timing belt inspection and maintenance
may result in a broken timing belt and cause severe engine damage.
Replace the timing belt at 60,000 miles (96 000 km)
if the vehicle was driven without an engine coolant heater and where temperatures
fall below -28 degrees C (-20 degrees F).
Reset the cold start counter after replacing the timing belt.
Replace the timing belt at 100,000 miles (160 000 km)
if the above condition does not apply.
The J 42069 Timing Belt Alignment Kit special tool must be used
to properly install and adjust the belt. If the belt is improperly installed
or if the belt is improperly adjusted the following will be seriously affected:
Engine damage will occur if the belt fails. Refer to
Timing Belt Replacement
in Engine Mechanical for belt replacement
and adjustment procedures.
Fuel Filter Replacement
Replace fuel filter every 100,000 miles (160 000 km).
Refer to
In-Line Fuel Filter Replacement
for Fuel Filter replacement procedure.
Cooling System Service
Notice: When adding coolant, use DEX-COOL® coolant. If silicated coolant
is added to the system, premature engine, heater core or radiator corrosion
may result. In addition, the engine coolant will require change sooner-at
50 000 km (30,000 mi) or 24 months.
This vehicle was manufactured with GM Goodwrench DEX-COOL™.
DEX-COOL™ was developed to last for 240 000 km (150,000 miles)
or 5 years, whichever occurs first. Use only GM Goodwrench DEX-COOL™
(orange colored, silicate free) when coolant is added or when coolant is changed.
Refer to
Cooling System Draining and Filling
in Engine Cooling for draining and refilling procedure. Add two engine coolant
supplement pellets (GM P/N 3634621 or equivalent) when refilling the
system.
