The Setup menu allows you to adjust the basic features of the Navigation System screen. To access the Setup menu, you must first enter the system's Main Menu. To access the Setup Menu, do the following:
- Press the MAIN button located below the PWR/VOL knob to the lower left of the navigation screen.
- Once the Main Menu appears on the screen, press the multi-function button located next to the Setup prompt.
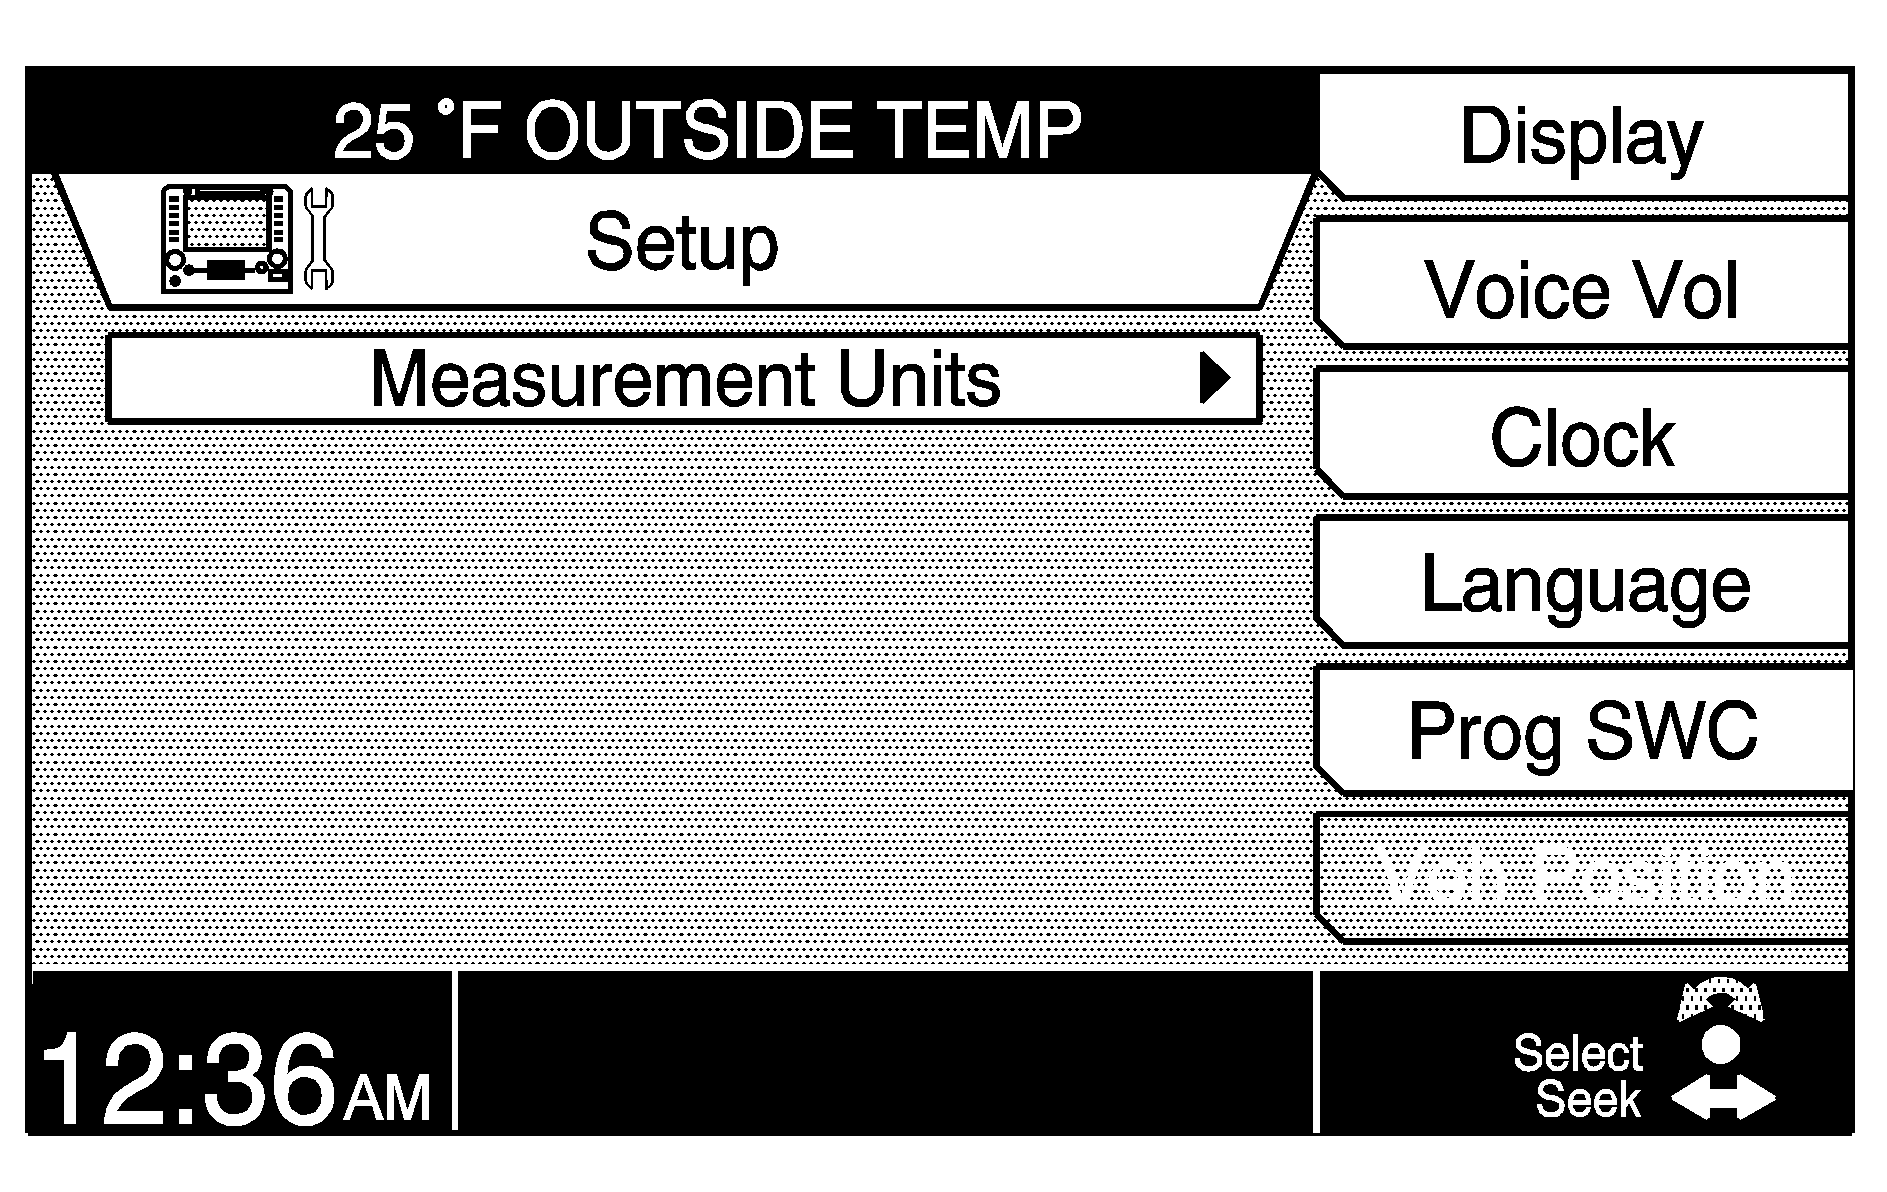
When Setup is selected from the Main Menu, the following menu item appears:
| • | Measurement Units |
The following multi-function buttons are also available:
| • | Display |
| • | Voice Volume |
| • | Clock |
| • | Language |
| • | Prog SWC |
| • | Veh Position |
Measurement Units
This menu item allows you to choose the units of measurement for the vehicle's systems. Press the TUNE/SEL knob once, then the following menu will appear on the screen:
| • | Mile/feet (Mi/ft) |
| • | Mile/yard (Mi/yd) |
| • | Kilometer/meter (Km/m) |
| • | Back |
Turn the TUNE/SEL knob to scroll through the choices. Once your choice is highlighted, press the knob once to select it. An X will appear in the box next to the item to show it's been selected. Only one item can be selected.
Once you set your choice, all vehicle systems will change to those units. For example, if you choose kilometers, the climate control panel will show degrees Celsius instead of degrees Fahrenheit.
Press the Back button to return to the main Setup screen.
Display
This menu item allows you to adjust the appearance of the screen. Only one mode can be selected at a time.
| • | Auto |
| • | Day |
| • | Night |
| • | Contrast |
| • | Brightness |
| • | Back |
If you select Auto mode, the screen will automatically adjust the display for day or night, depending upon the lighting conditions.
If you select Day mode, the screen will be in the mode best suited for daylight conditions. The displays on the screen are usually brighter with a lighter background so that you can see them better during the brighter daylight hours.
If you select Night mode, the screen will be in the mode best suited for nighttime conditions. The displays on the screen are usually dimmer with a darker background so that you can see them better during the darker nighttime hours.
To select one of these modes, press the button to the right of the screen with the dot on it that corresponds to the prompt. An X will appear in the box next to it to show it has been selected.
You can select day or night mode regardless of the lighting conditions.
In addition the contrast and brightness may be adjusted as desired.
To adjust contrast or brightness press the multi-function button that corresponds to the prompt at the right of the screen. Brightness is only available when dimming is active. It is not available when Auto is selected and it is daytime or when Day is selected. Turn the TUNE/SEL knob to increase or decrease the contrast or brightness. The bar graph on the screen will reflect the turning of the TUNE/SEL knob.
Press the Back button to return to the main Setup screen.
Voice Volume
This menu item allows you to turn on and off navigation voice prompts and to adjust the volume level of all the voice prompts you receive from the system. To learn how to adjust the voice volume, see "Interrupt Volume" under Navigation Audio System .
Clock
To set the time on the radio clock, do the following:
- Press the MAIN button located to the lower left of the display to access the system's Main Menu.
- Press the multi-function button next to the Setup prompt to access the Setup menu.
- Once the Setup menu is displayed, press the multi-function button next to the Clock prompt.
- Set the time using one of the menu items listed.
See the information following this list for a description of Clock menu items.
Min (Minute) +/-: Press the multi-function button next to Min+ or Min- to manually advance or reverse the minutes on the clock.
Auto GPS (Global Positioning System) Update: This menu item allows you to use the Navigation System's GPS to set the time automatically. The system acquires the information from the satellite used for the navigation system.
Daylight Savings Time: This menu item allows you to observe daylight savings time if you wish. When daylight savings time is turned on, the hour will advance by one. An X will appear in the box next to the menu item to show that the feature has been turned on.
Select Time Zone: This menu item allows you to choose the correct time based upon the time zone that you live in. The following submenu appears when this menu item is selected:
| • | Atlantic |
| • | Eastern |
| • | Central |
| • | Mountain |
| • | Pacific |
| • | Alaska |
| • | Hawaii |
You can scroll through the submenu by turning the TUNE/SEL knob. Press the knob to set your selection. Once selected, the current time for that time zone will appear on the display and an X will appear in the box next to the menu item to show that its been selected. Only one time zone can be selected at a time.
12h/24h (12 hour/24 hour): This menu item allows you to choose between a 12-hour clock or a 24-hour clock, also known as military time. Press the TUNE/SEL knob to switch back and forth between the two choices. Once your selection is made, press the multi-function button next to the OK prompt to set your choice. If the Ok button is not pressed the changes made will not be accepted and the user will not see a change in the displayed time. Press the multi-function button next to the Back prompt to exit the Clock menu without saving your changes.Language
This menu item allows you to select the language that you prefer for the information on the display, voice recognition and voice prompts. English is the default language, but you may also choose French or Spanish.
To select a language, press the multi-function button that is next to the language you prefer. An X will appear in the box next to the language you chose to show that your selection is complete, and all information on the display will appear in the selected language.
Your vehicle will have three pre-programmed language choices upon delivery at the dealership. The three languages vary depending upon region.
Prog SWC (Programmable Steering Wheel Controls)
This menu item allows you to program steering wheel controls 1, 2, 3 and 4. See "Reconfigurable Steering Wheel Controls (SWC)" in the Instrument Panel section of your CTS owner's manual for more information.
Veh (Vehicle) Position
This menu item is used to correct any error in your vehicle's position or direction. Use the scroll arrows to adjust the vehicle's position. After adjusting, the Set multi-function button must be pressed. See "Map Scroll" under Navigation Menu for more information.
This menu item is only available if the map DVD is loaded and the vehicle is in PARK (P) for an automatic transmission, or the parking brake is engaged and the vehicle speed is less than 5 mph (8 km/h) for a manual transmission.
Press the SETUP hard key to display the following menu. Under the Setup menu, you can make adjustments to the functions listed on the menu using the touch-sensitive buttons on the screen.
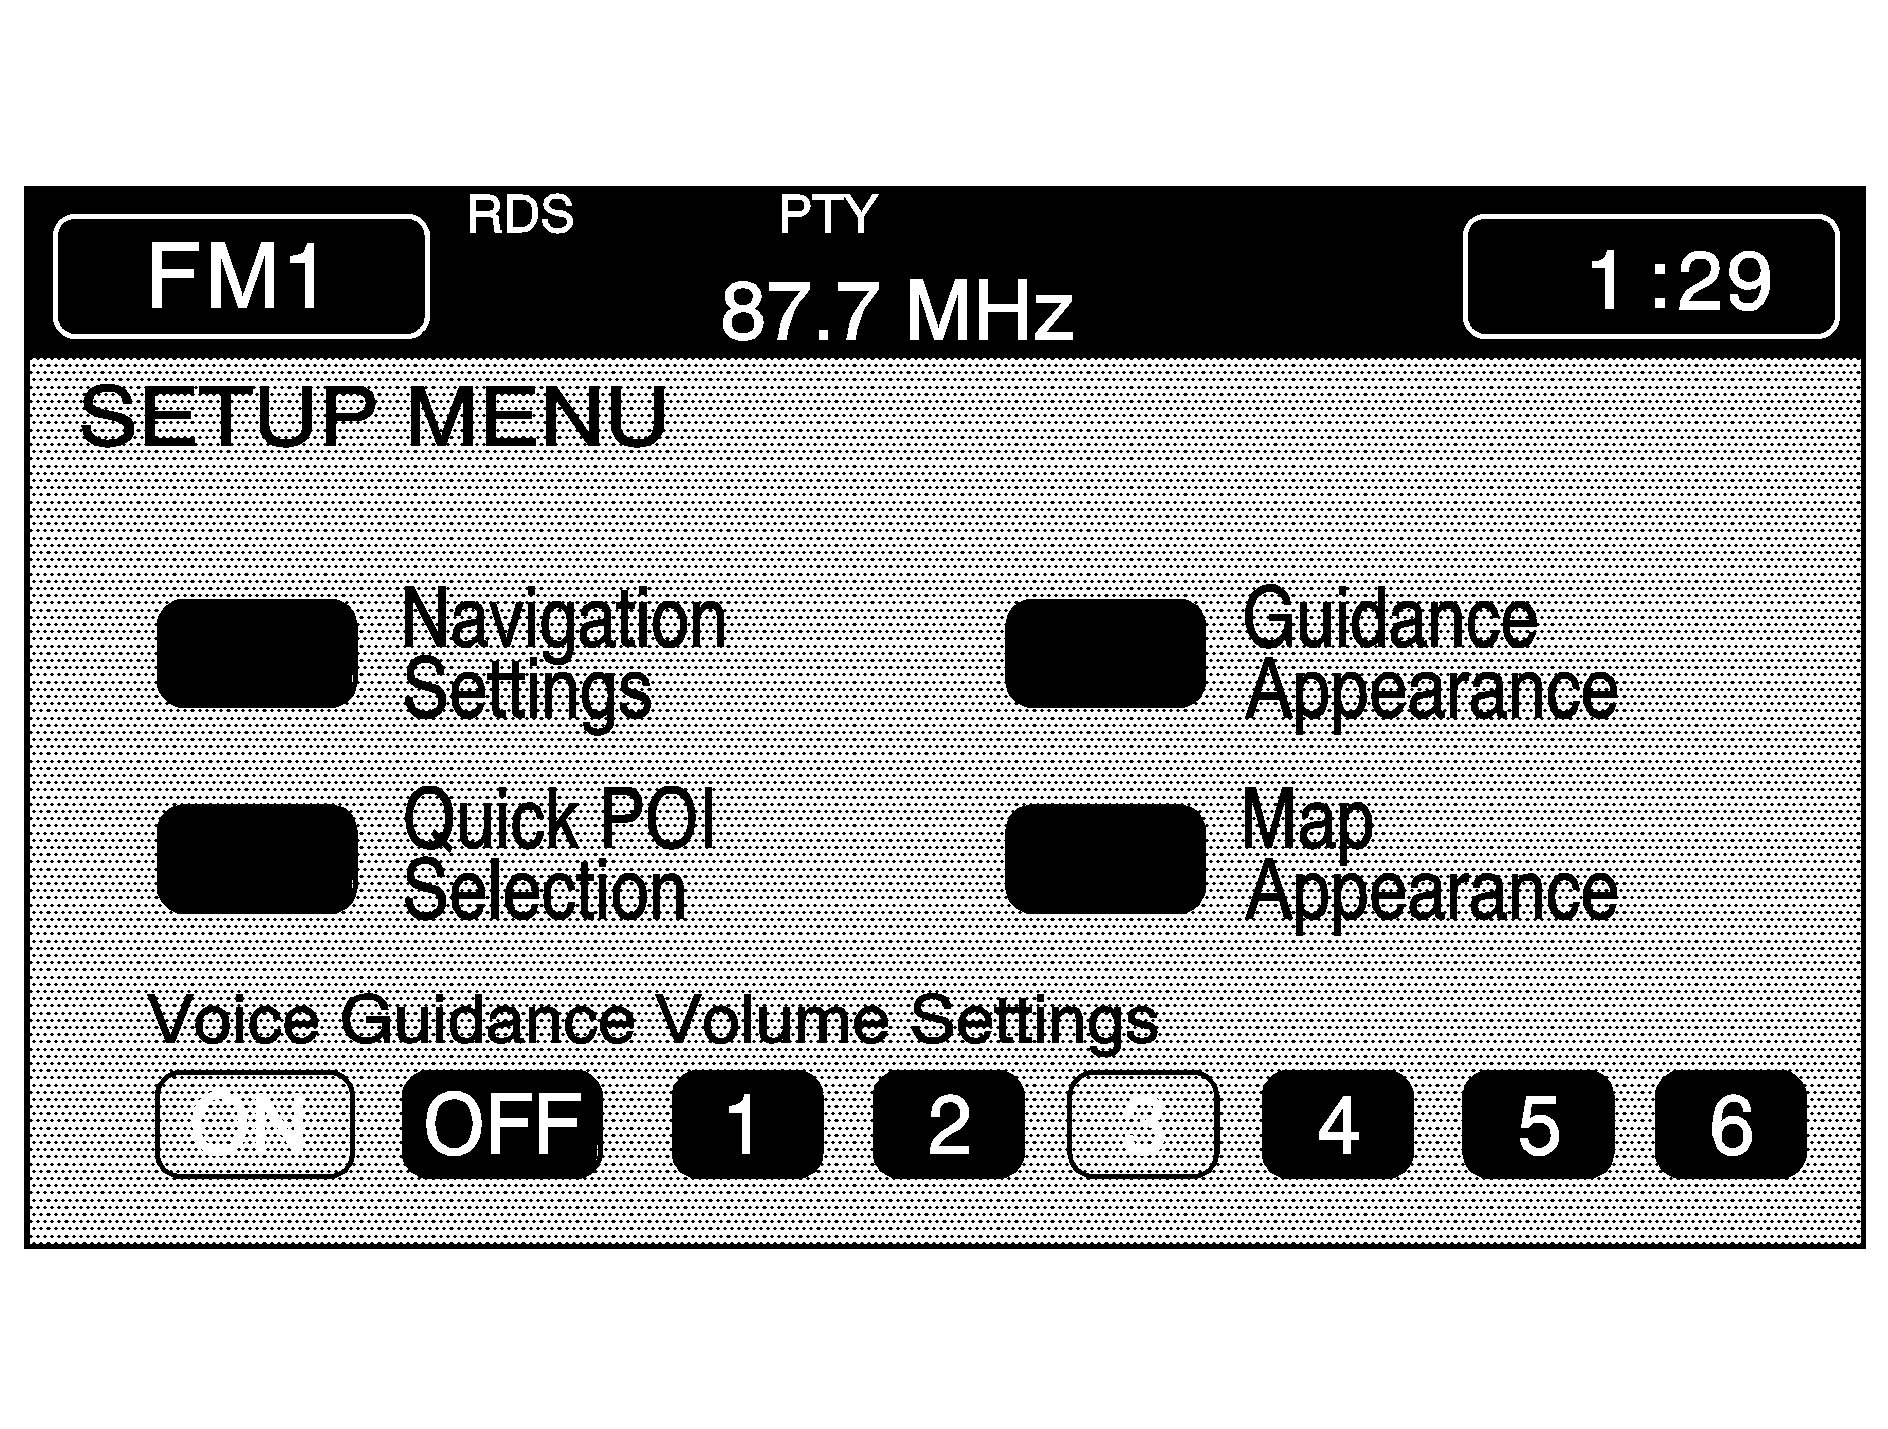
Navigation Settings
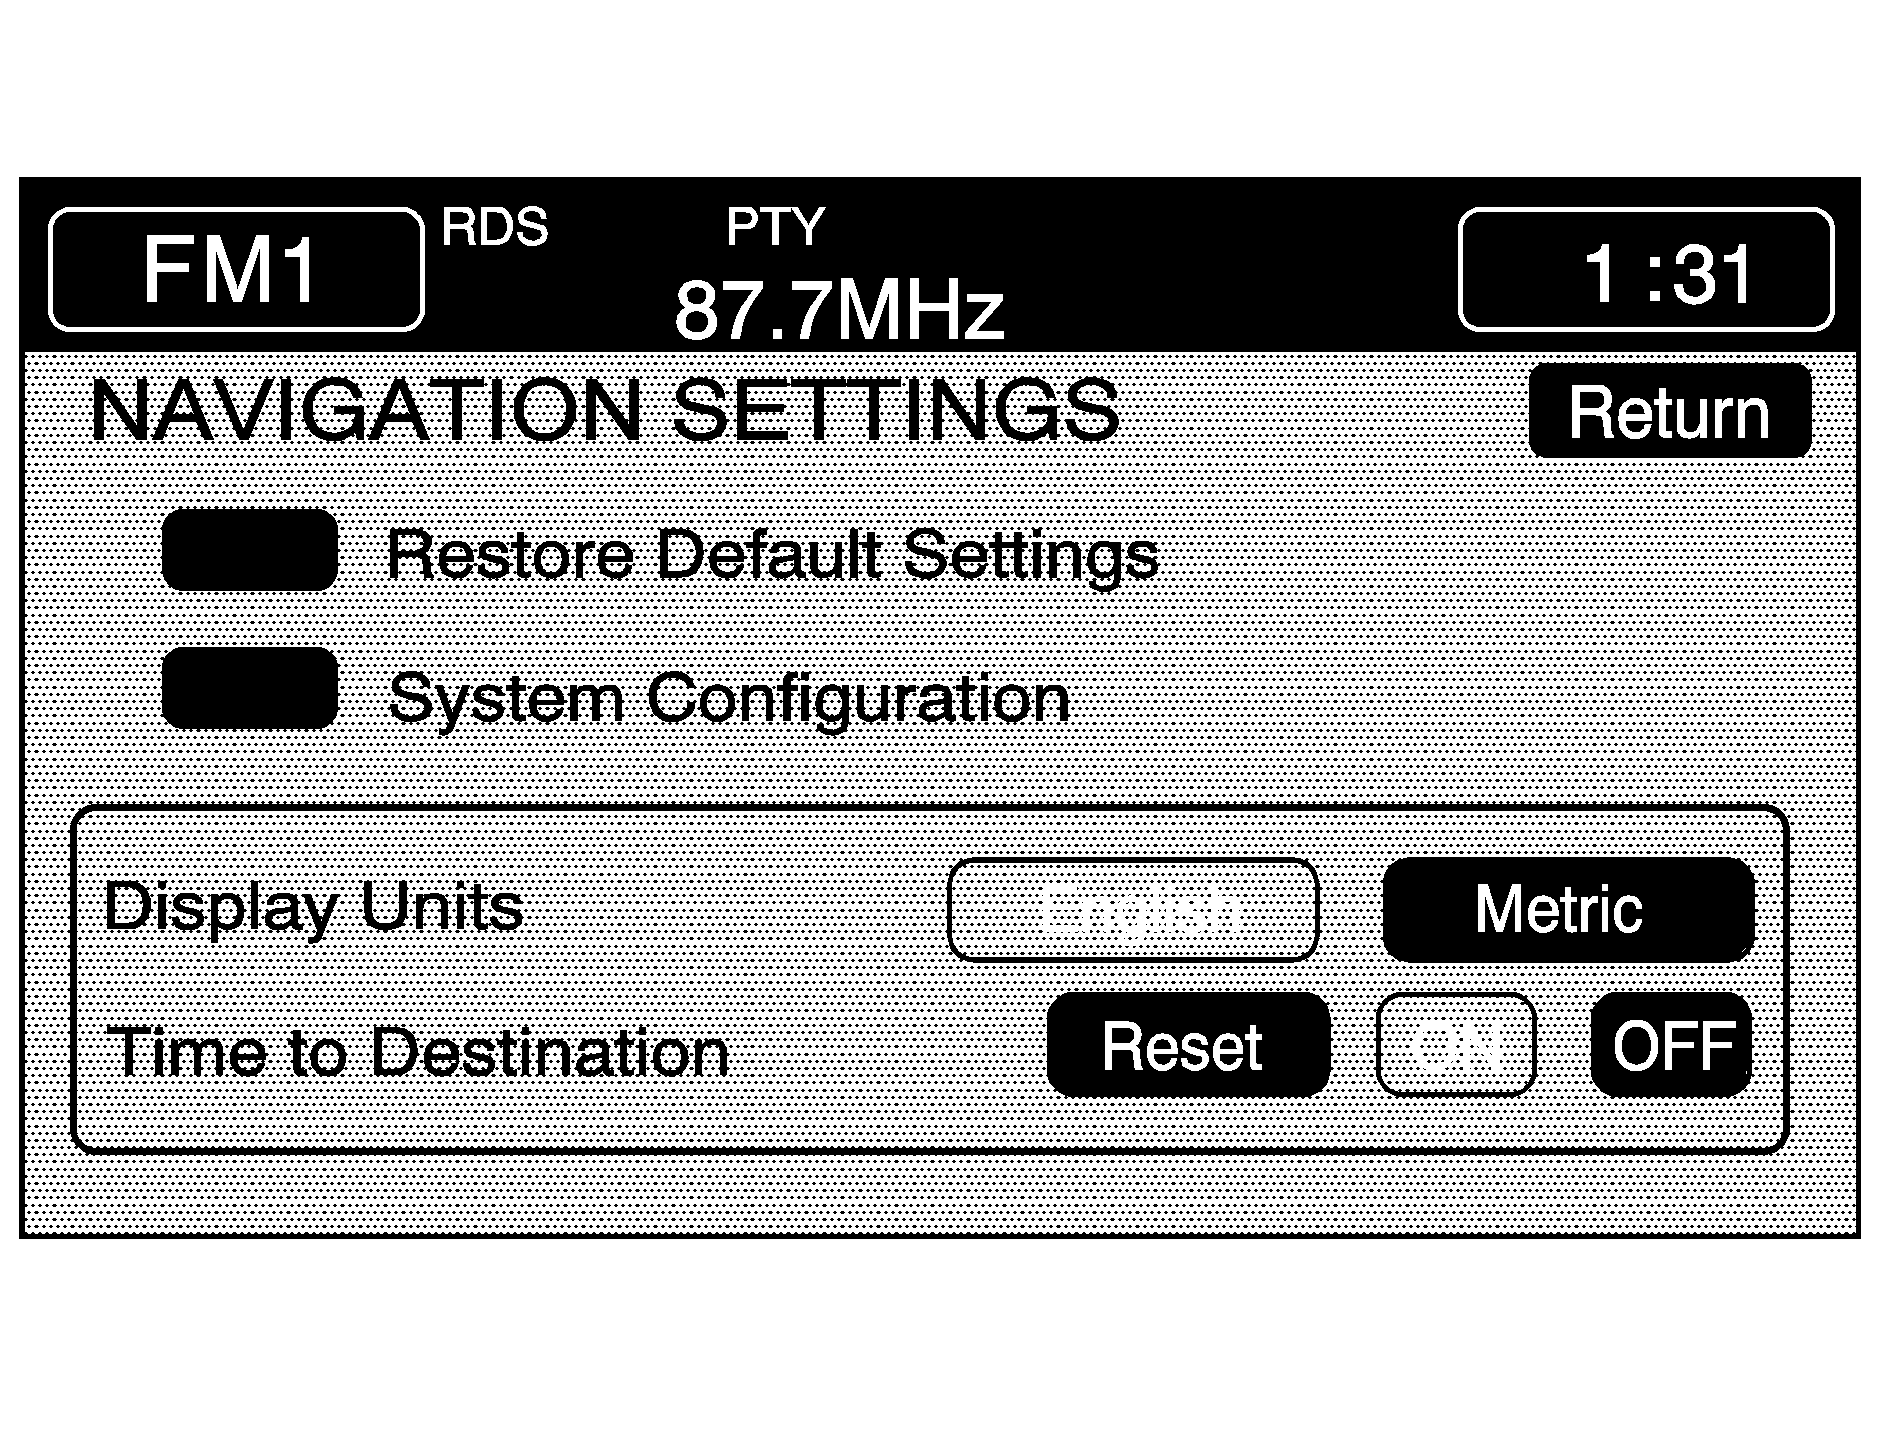
This menu allows you to change the following options for the navigation system:
Restore Default Settings
This feature will automatically reset the system to the default values. The default settings are:
Distance Unit | Mile |
Minimize Time/Dist | Time |
Use Major Roads | Yes |
Use Toll Roads | Yes |
Use Ferries | No |
Detour Distance on Freeway | 20 mi. ( 32 km ) |
Detour Distance not on Freeway | 4 mi. ( 6 km ) |
Voice Guidance | ON |
Guidance Appearance | Auto, Arrow, 2 D |
Map Appearance | 2 D |
Quick POI Selection | Gas, All Restaurant, Supermarket, ATM, Park, Hotel |
Search Area | Region 9 |
To restore the default settings, do the following:
- Touch the RESTORE DEFAULT SETTINGS button.
- Touch ENTER.
- Touch RETURN to exit this feature.
System Configuration
Once you touch the SYSTEM CONFIGURATION button, you will have the following choices:
Adjust Vehicle Position: To correct the position of your vehicle on the map (if your vehicle has been shipped, for example) or to change to the correct position, do the following:- Touch the ADJUST VEH POSITION button. The system will display POSITION ADJUSTMENT. The vehicle position icon and the scroll symbol will appear on the map.
- Use the scroll symbol and the zoom in/zoom out feature to locate the vehicle position on the map.
- Touch the ENTER button to set the correct vehicle position. The system will display POSITION ADJUSTMENT and two arrows will appear on the map screen.
- Touch the arrows to adjust the direction of the vehicle icon counterclockwise or clockwise. When you touch one of the arrows, you will see the vehicle icon direction changing.
- When you have completed setting the vehicle to the correct direction, touch the ENTER button. The system will display RELOCATION COMPLETE.
- Touch the RETURN button to exit out of this menu.
The correct vehicle position and direction is now set.
If you begin to drive your vehicle during this procedure, the system will not be able to adjust the position or direction of your vehicle.
- Touch START to begin calibration.
- Touch RETURN to exit this menu.
Display Units
You can select either the English or metric measurements to appear for distances on the map. Touch the ENGLISH or METRIC button to change between English and metric units.
Time to Destination
This feature allows you to reset or turn on or off the estimated time to travel from your current position to the destination. The estimated travel time is based on the calculated route information and the vehicle's average speed. When on, the time to destination will display along with the distance to destination.
RESET: Touch this button if you want to reset the average speed to the default values.ON: Touch this button to display the estimated travel time on the map screen along with the distance to destination.
OFF: Touch this button to turn the estimated travel time feature off. The time to destination will no longer be displayed along with the distance to destination.
Quick POI (Point of Interest) Selection
This feature allows you to choose a point of interest, such as gas stations, restaurants, hotels, etc. to be displayed on the map screen. You can also set a destination to a specific point of interest.
The six Quick POI default settings are GAS, ALL REST, SUPERMKT., ATM, PARK and HOTEL.
To access the QUICK POI SELECTION menu, do the following:
- Press the SETUP hard key.
- Touch QUICK POI.
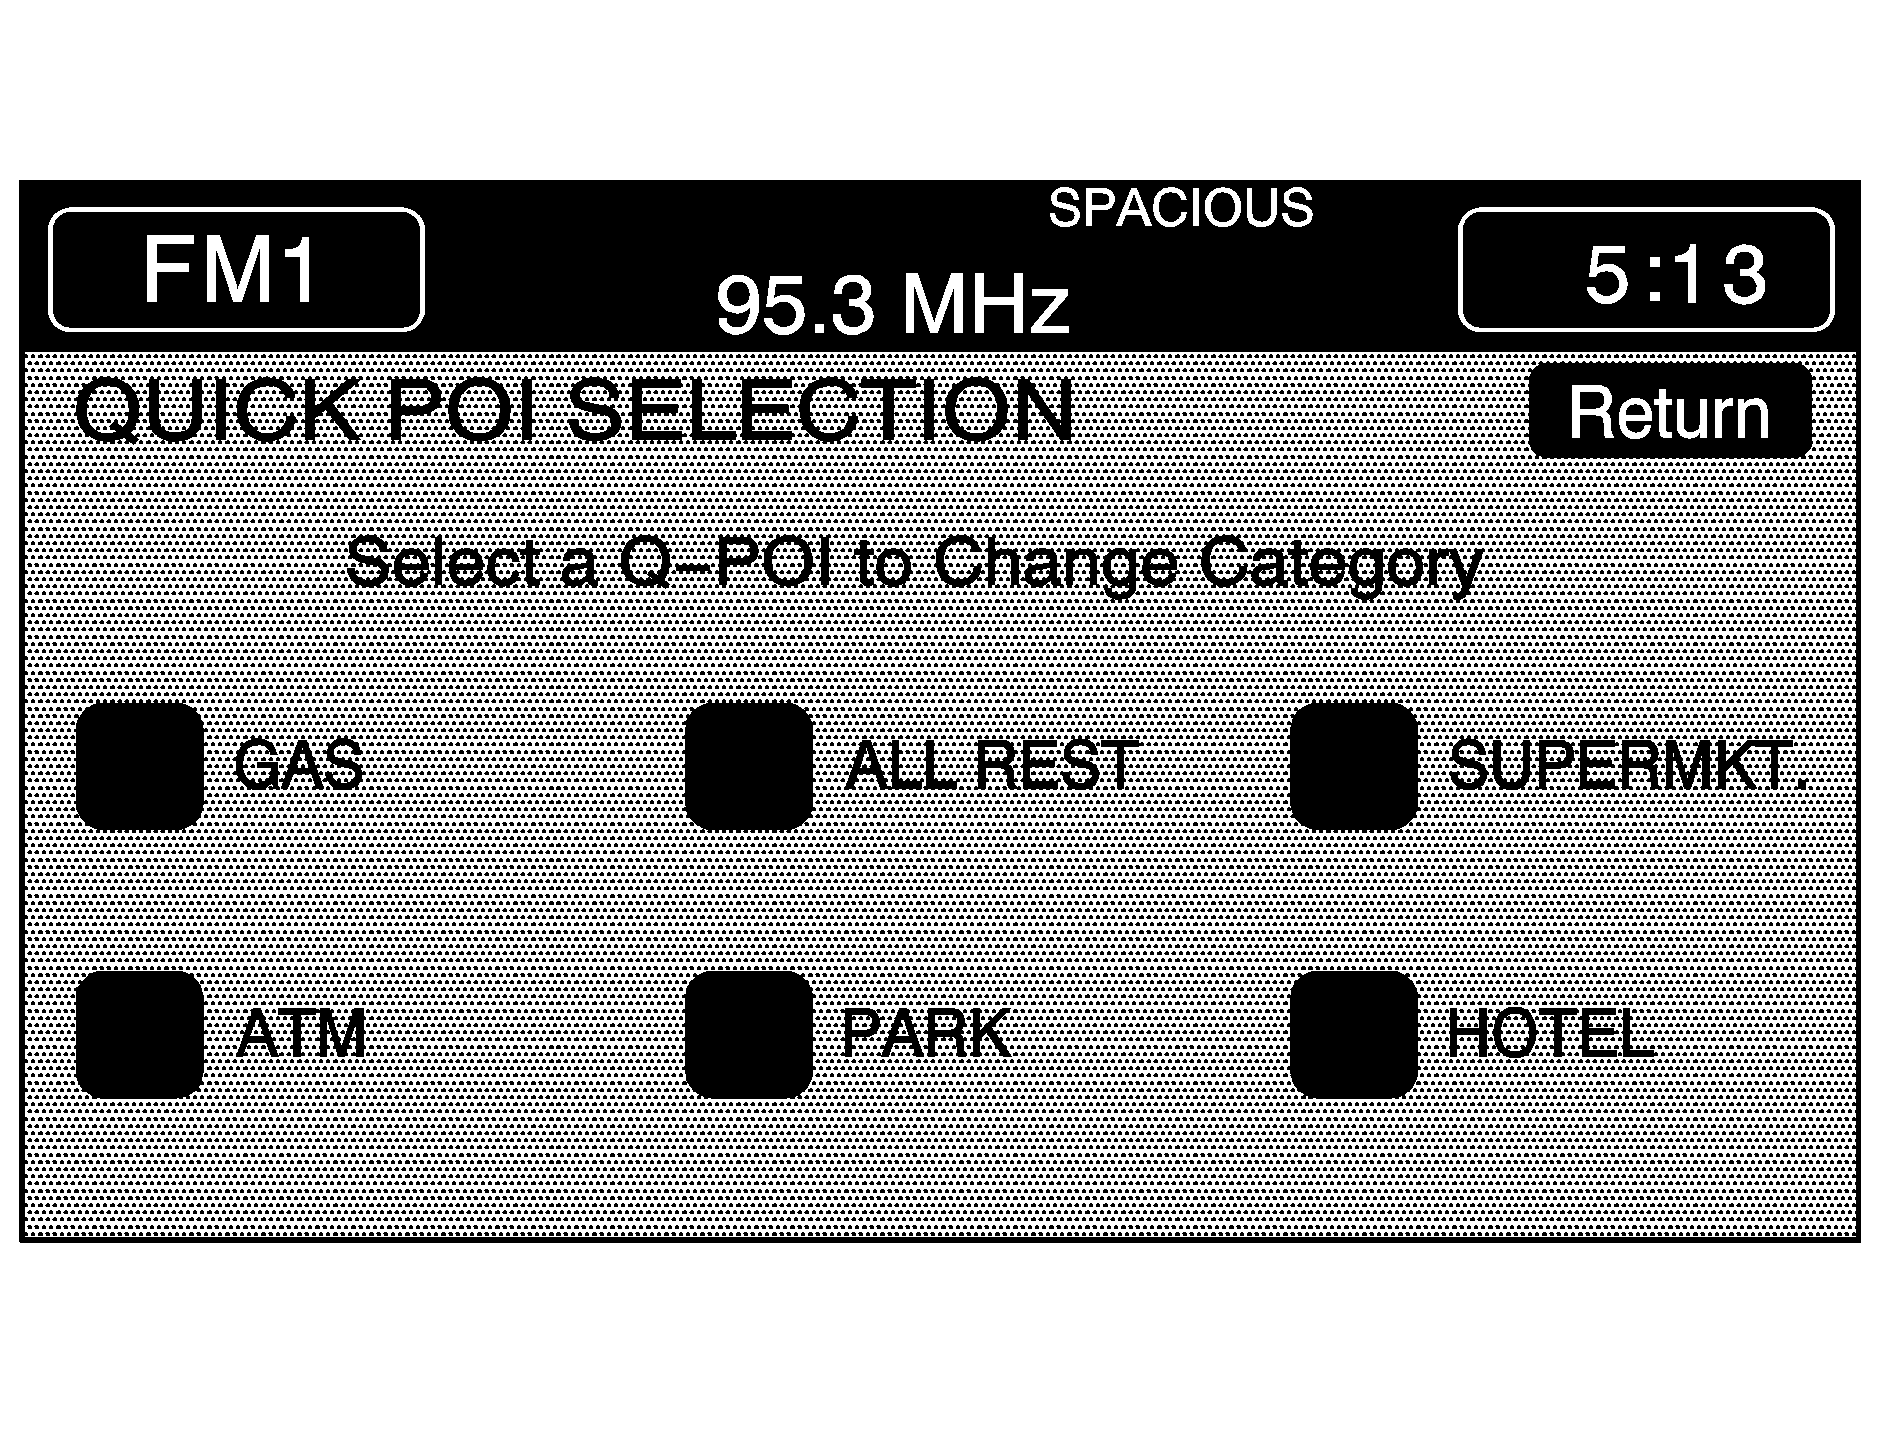
Setting the Quick POI menu
To set the Quick POI list displayed on the map screen, do the following:
- Select the category you would like to replace.
- Select a Quick POI category from the Quick POI selection menu list. The system will return to the Quick POI selection screen when a POI is selected.
- Touch RETURN to save the setting and the system will take you back to the previous menu.
Displaying Quick POI Icons
To display the icons of a category in its location on the map screen, do the following:
- Touch the map screen once.
- Touch the POI button. The QUICK POI SELECTION list will be displayed.
- Select a category type or touch LIST CATEGORIES OR ALL LOCAL POIs to display the icon of the selected category in their locations on the map screen.
Removing Quick POI Icons
To remove the POI icons from the map screen do the following:
- Touch the map screen once.
- Touch the POI OFF button. The current POI icons will be removed from the map screen.
Setting a Destination Using Quick POI
This feature will allow you to plan a destination to a point of interest from the map screen. To plan a route using a POI icon do the following:
- Touch the POI icon on the map screen that you wish to set a destination to.
- The selected icon will be surrounded with a blinking box. The name of the selected icon will be displayed on the map screen. Touch the INFO button to view the POI name, address, city and phone number (if available).
- Touch the ENT DEST button.
- Touch the ENTER button to start planning your route.
- To start route guidance, touch the START button or begin driving the vehicle. Route guidance will automatically begin after a short distance.
If a final destination is already entered, you can add the POI as a waypoint.
If available, the system will display up to three routes in a pop-up window indicating the total mileage and time to destination for the planned route which can be selected by using the NEXT button. The map will display the difference between the three routes by displaying them each in different colors. The selected route is highlighted in red.
If you touch the CHG ROUTE button before the START button you will be able to change your route preferences if desired. See "Route Preference" later in this section for more information.
When your route guidance has been planned, it will be highlighted and a bulls-eye symbol will appear on the map to show your final destination. A waypoint symbol will also appear on the map if a waypoint is set.
If you wish to cancel the route you have just set, do the following:
- Press the ROUTE hard key.
- Touch the ROUTE PREFERENCES button.
- Touch the CANCEL ROUTE button.
- Select YES to cancel or NO to continue.
See "Cancel Route" under Easy Planning Route for more information.
Guidance Appearance
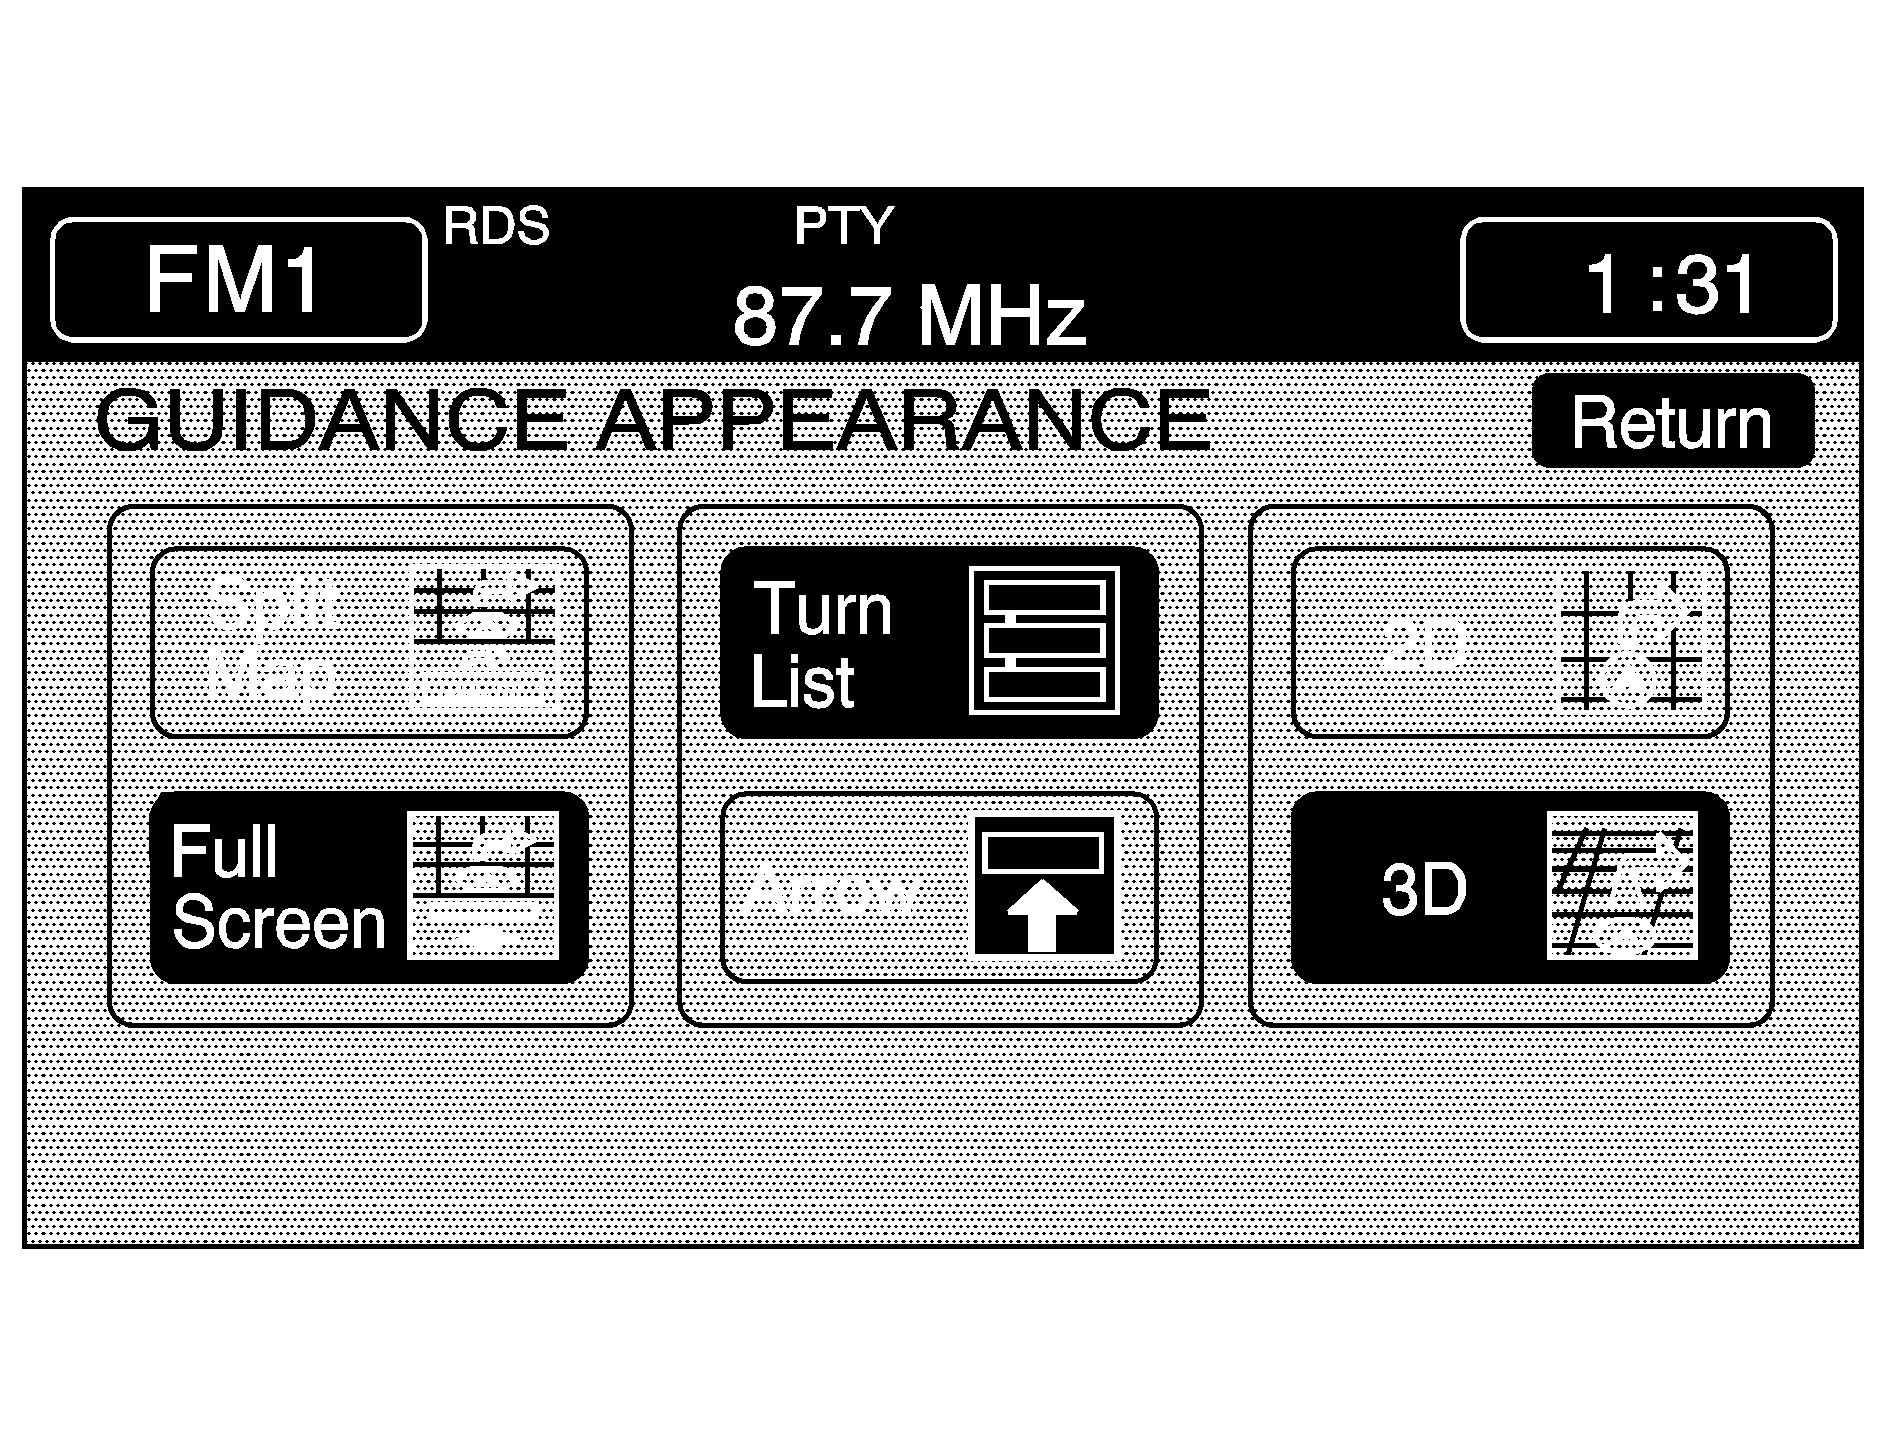
This menu allows you to set up the following three options for the guidance appearance screen which is displayed on the map while on a planned route. The current setting will appear as light blue.
Split Map: Touch this button to have the guidance screen displayed on the map at all times.Full Screen: Touch this button to have the guidance screen displayed on the map when approaching a maneuver.
Turn List Guidance
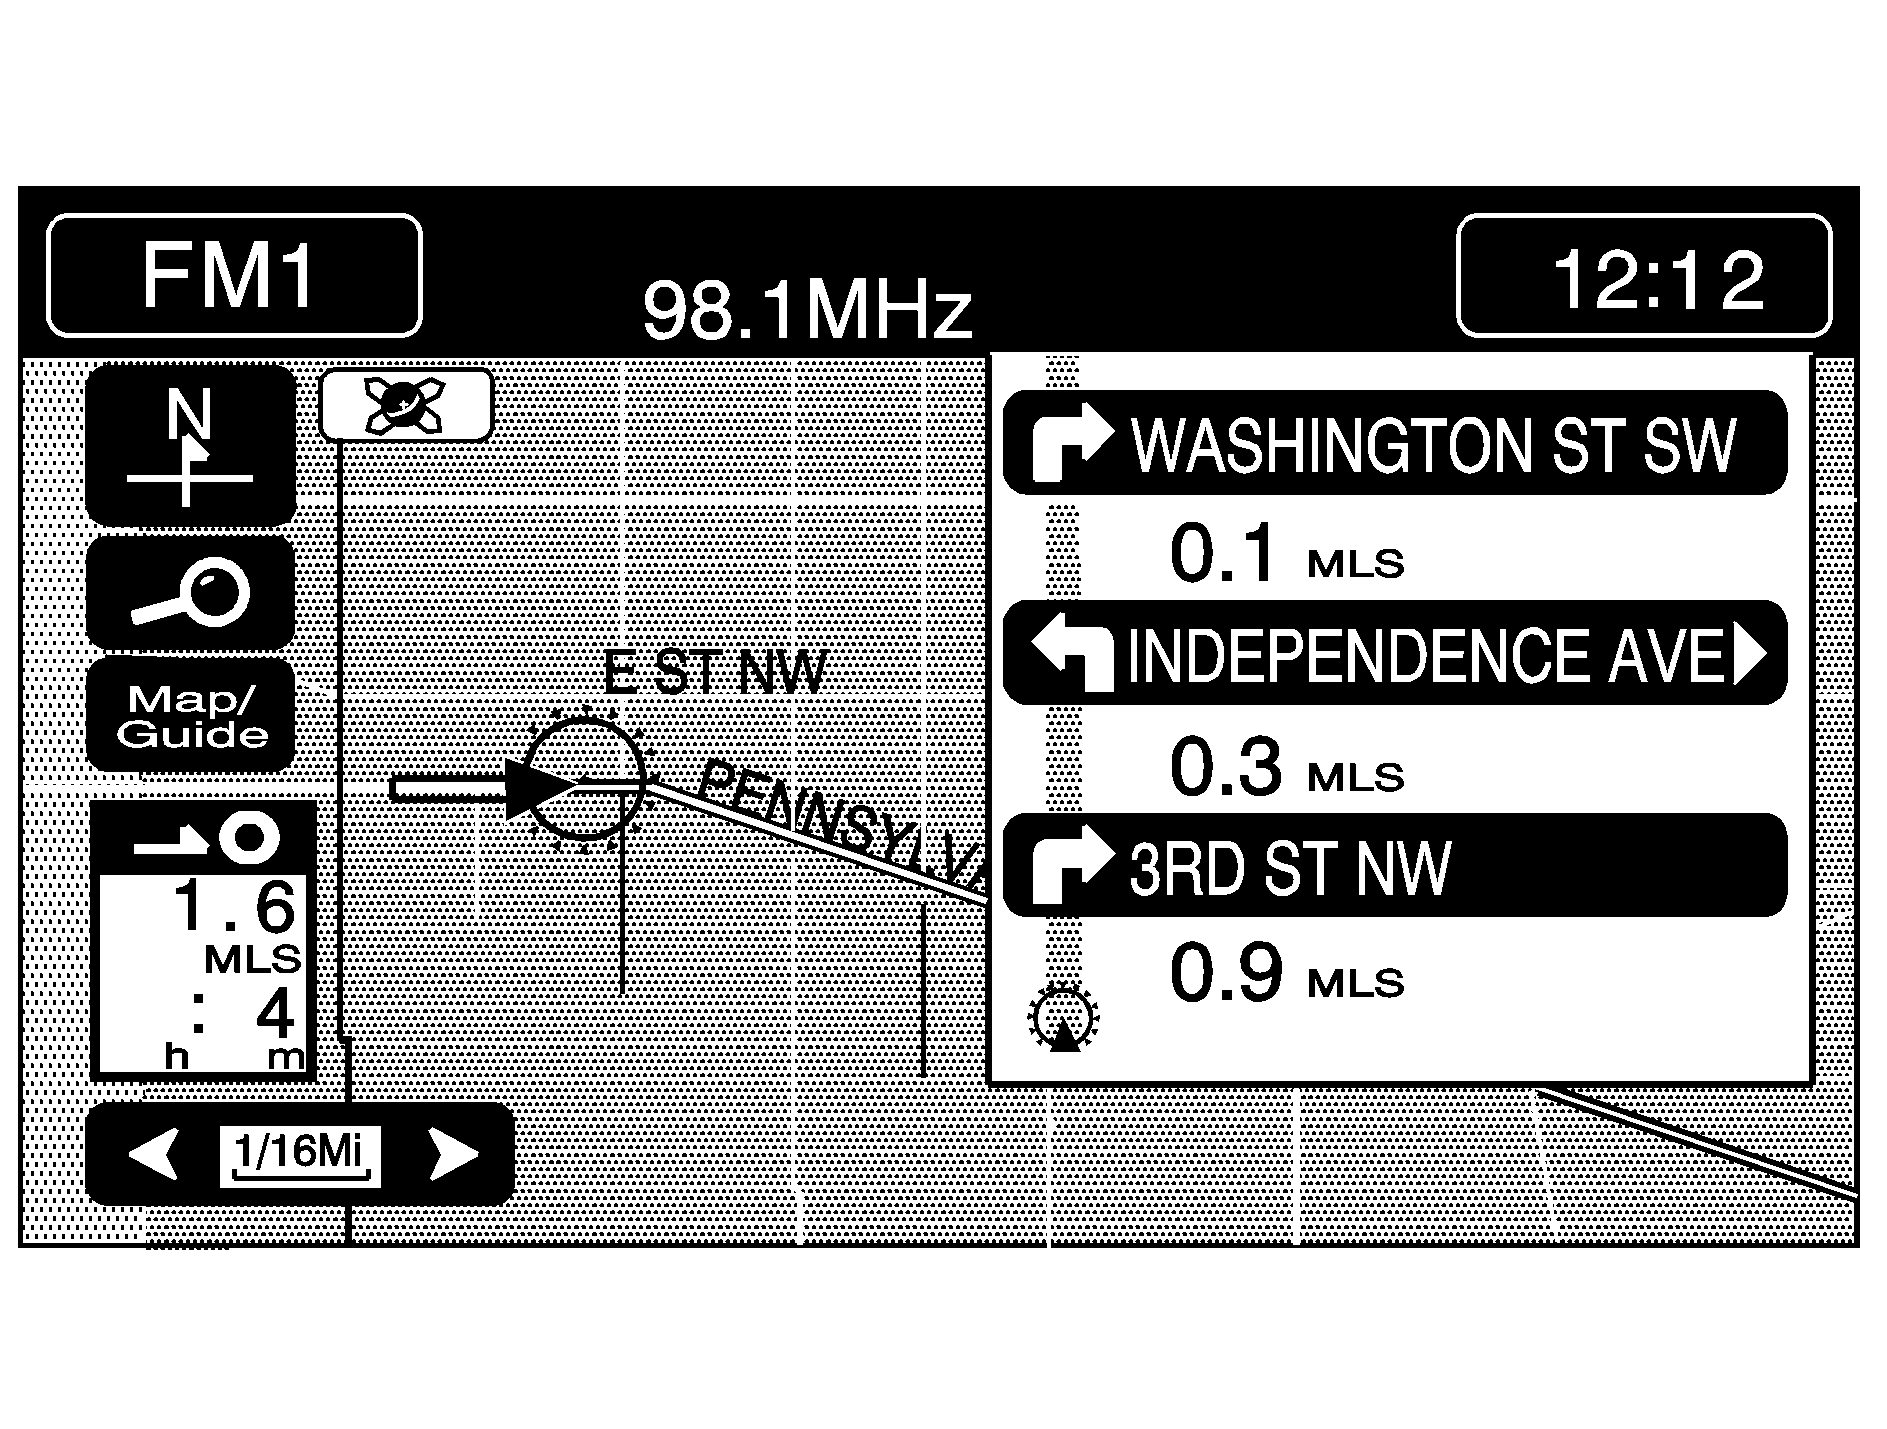
TURN LIST: Touch this button to have the guidance screen display several upcoming turns. Directional arrows, street name and distance to the next turn will also be displayed. As you approach the next turn, the system will automatically display a zoomed-in view of the upcoming maneuver.
ARROW: Touch this button to have the guidance screen display the next turn. A directional arrow, street name and distance to the turn will also be displayed. As you approach the turn, the system will automatically display a zoomed-in view of the upcoming maneuver.
Arrow Guidance
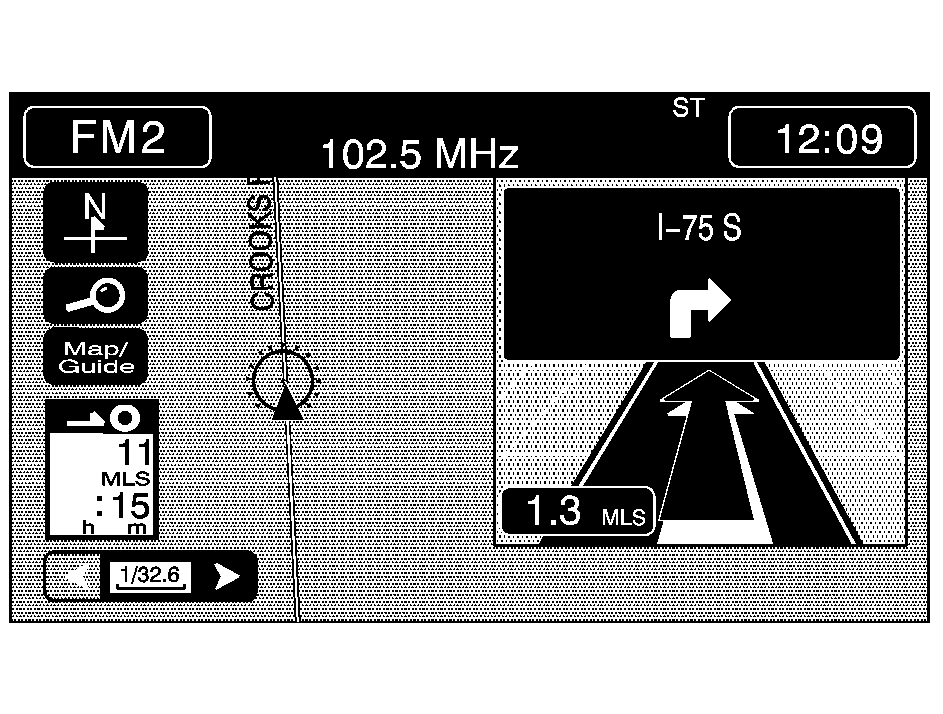
2D: Touch this button to have the guidance screen display as a two-dimensional view.
3D: Touch this button to have the guidance screen display as a three-dimensional view.
Map Appearance
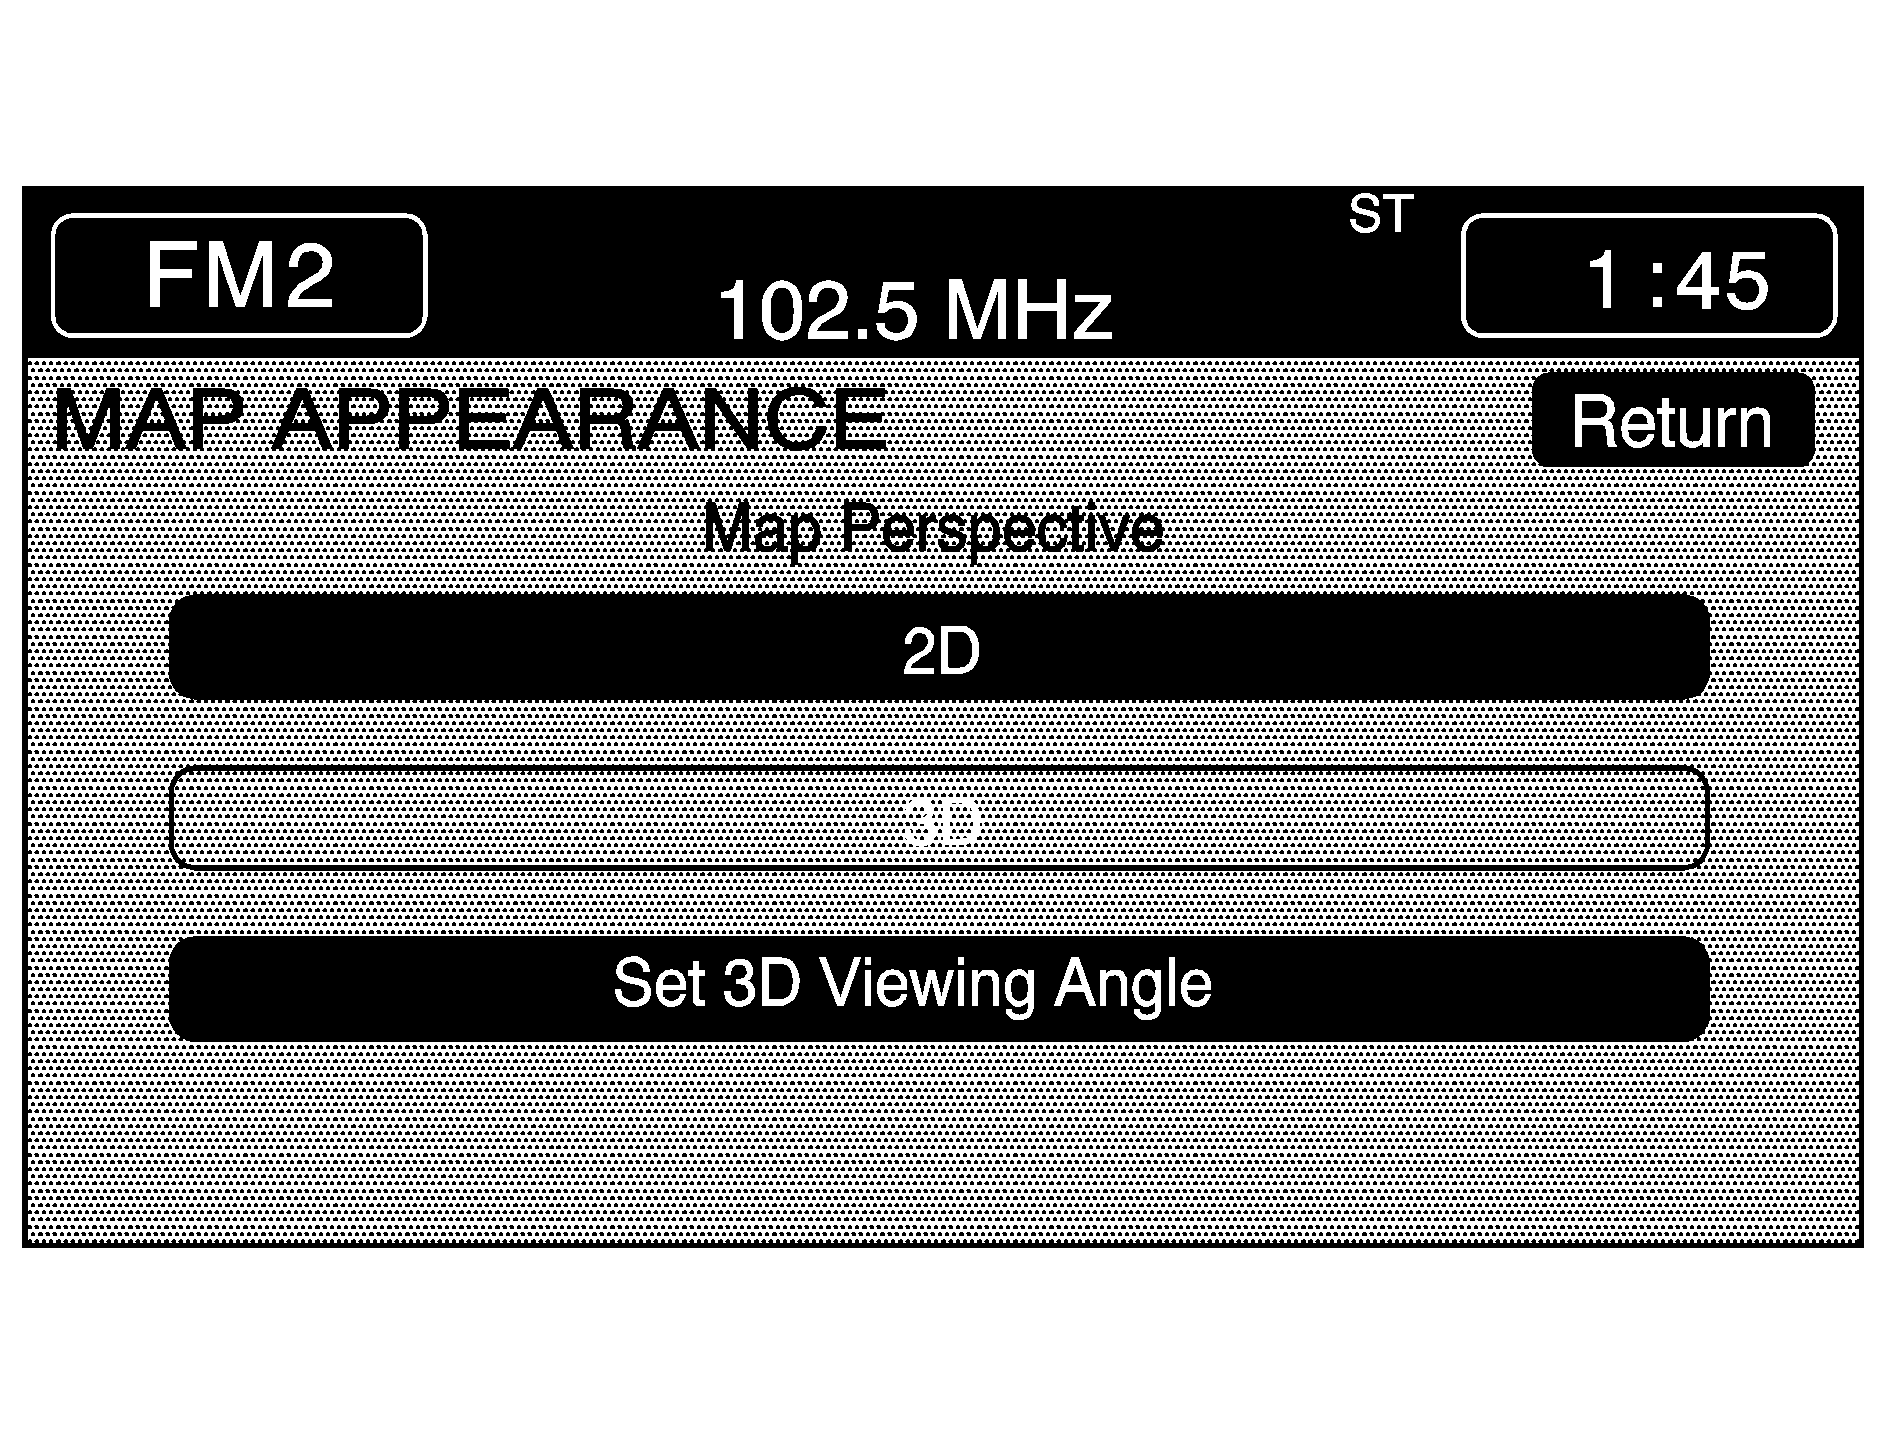
This menu allows you to set up one of the following options for the map appearance screen. The current setting will appear as light blue.
2D: Touch this button to have the map screen display as a two-dimensional view.3D: Touch this button to have the map screen display as a three-dimensional view.
SET 3D VIEWING ANGLE: This allows you to adjust the 3D viewing angle. To adjust the viewing angle, do the following:
- Select 3D from the MAP APPEARANCE menu.
- Touch the SET 3D VIEWING ANGLE button.
- Touch the vertical scroll up or down arrows to set your preferred viewing angle.
- Touch RETURN to save your settings and to exit this menu or touch RESET to restore the viewing angle to the default settings.
The map screen with 3D viewing angle bar will be displayed.
Voice Guidance Volume Settings
This feature allows you to set the voice prompt volume level or to turn the voice prompts on or off. The voice prompts will not be heard while using voice recognition and while using the factory-installed phone system. The last voice prompt can be repeated by using the REPEAT hard key. See Map and Repeat .
Set the voice prompt volume level by touching the numbered (one to six) buttons to increase or decrease the volume level with one being the lowest volume level and six being the highest.
Voice prompts can be turned on or off by touching the ON or OFF button.
If a voice prompt is active while the audio system is on, the audio system volume will decrease and will fade to the rear speakers and the voice prompt will be heard through the left front speaker.
Touch the RETURN button to go back to the SETUP main menu.
