HARD TOP/SOFT TOP-PHASE II ELECTRICAL SERVICE INFORMATION

This bulletin includes Service Information Manual Section 8A-121 for the 1990 Allante Phase II hard top and convertible top (RPO V4J). It should be used until the Final Edition 1990 Allante Service Information Manual is available. Each dealership's mailing includes two copies of this information. All others will receive one copy. For body service procedures relating to the Phase II top refer to DSIB 90-1-37, Group 10.
TROUBLESHOOTING HINTS
A short circuit to ground in the Soft Top Header Motors' power feeds will cause Circuit Breaker 24 to "trip". To help isolate the short, observe under what conditions Circuit Breaker 24 "trips".
Circuit Breaker 24 Possible Shorted trips... CKT(S)
continuously CKT 560 CKT 76 when Soft Top CKT 903 Motor Switch is CKT 899 held in CLOSE CKT 163
when Soft Top CKT 904 Motor Switch is CKT 899 held in OPEN CKT 905 CKT 162
If the Soft Top unlatches when the gear selector is out of PARK, check CKT 275 for a short to ground.
SYSTEM DIAGNOSIS
With the gear selector in " P" press the Soft Top Motor Switch to CLOSE or OPEN. Observe operation of Header Motors.
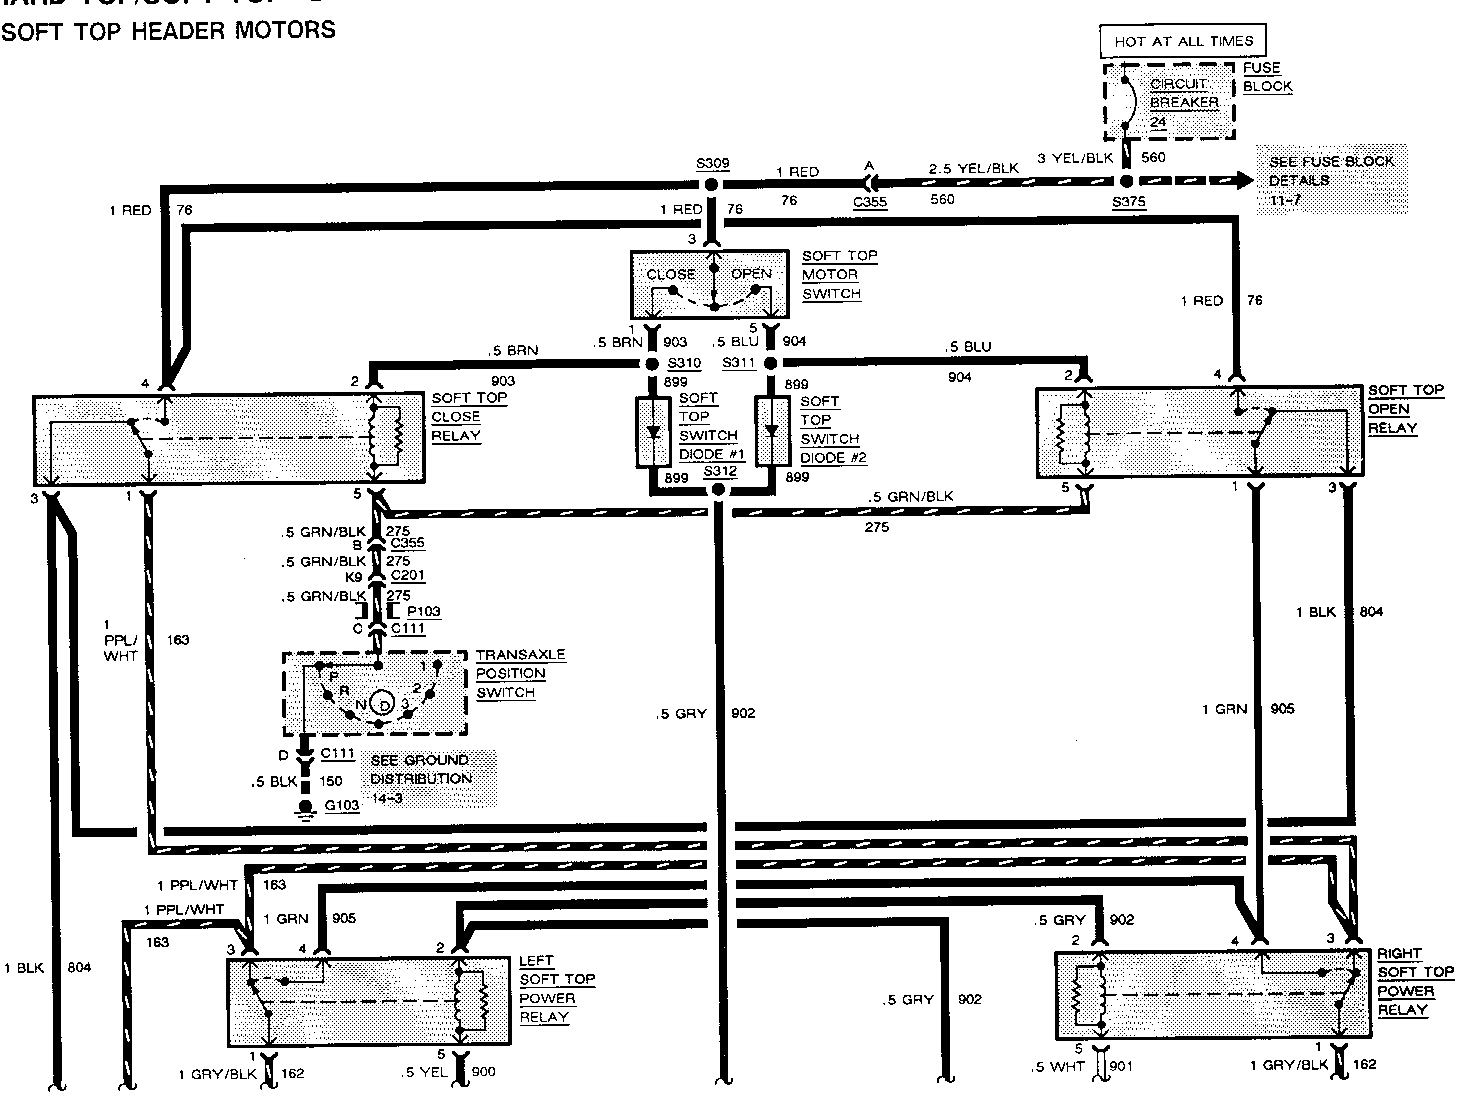
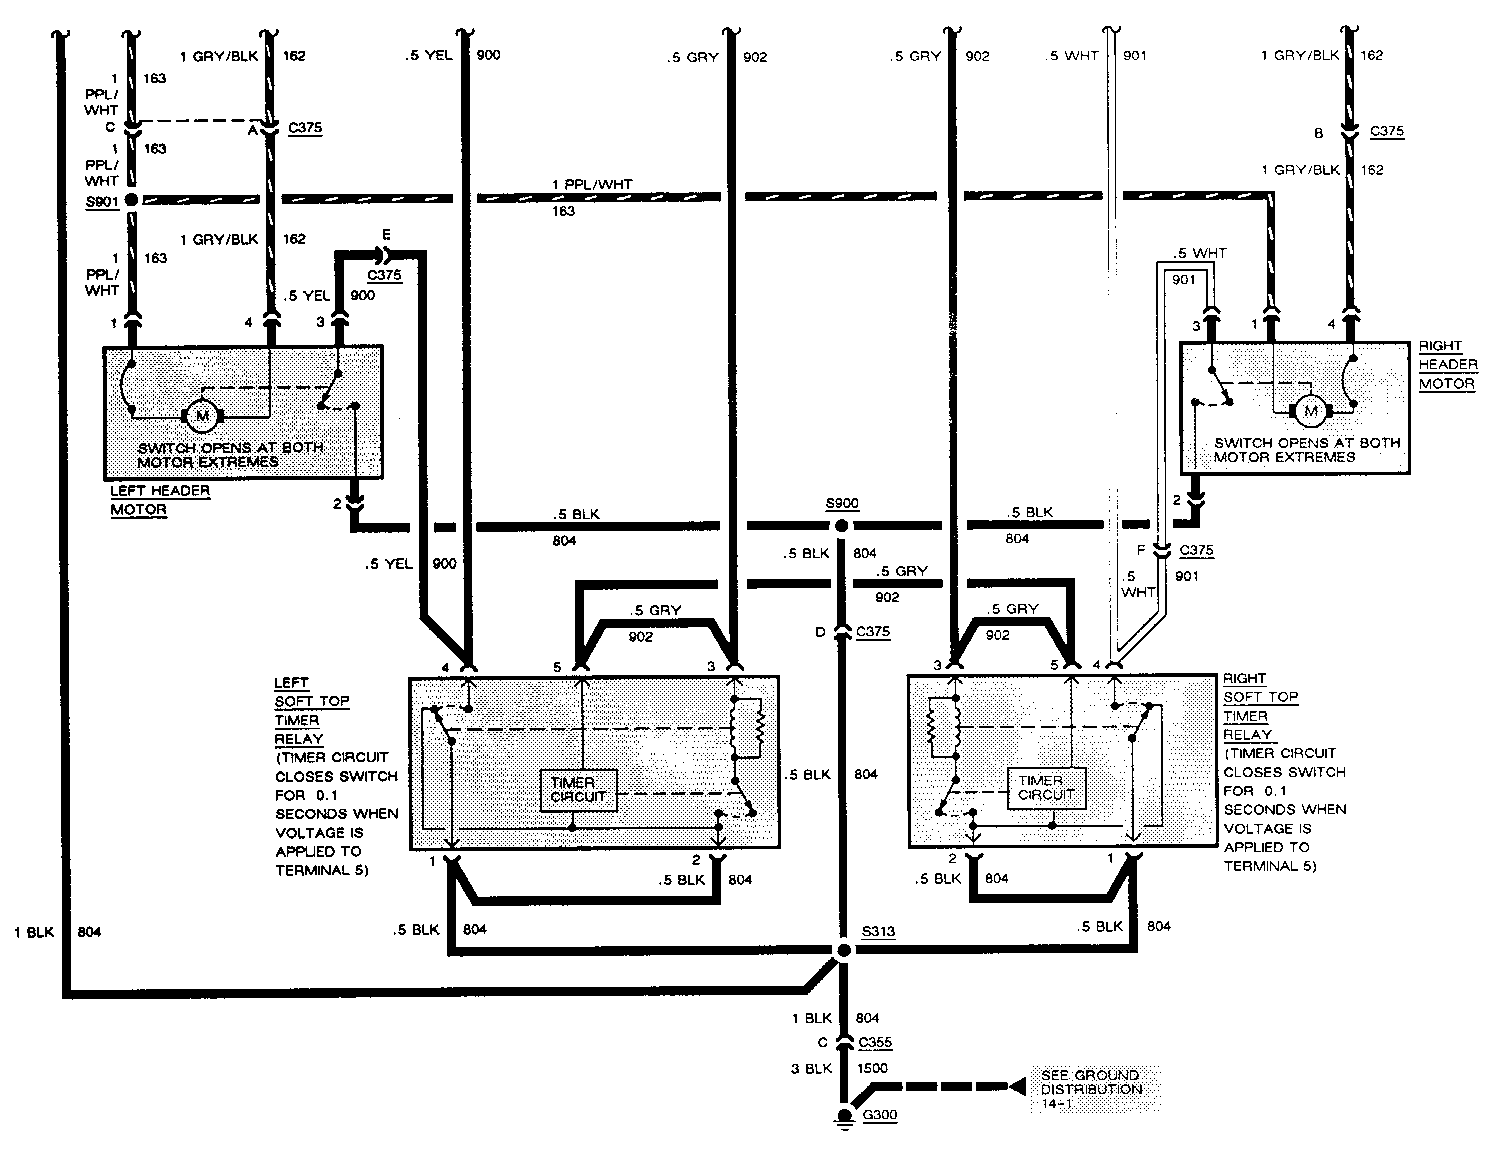
COMPONENT LOCATION Page-Figure ------------------ ----------- Fuse Block..............In center console, under ashtray............201-12-B Left Header Motor.......LH front of soft top Left Soft Top Power.... Behind LH seat, behind access panel, Relay on relay bracket.............................201-23-A Left Soft Top Timer.... Behind LH seat, behind access panel, Relay taped to harness.............................201-23-A Right Header Motor......RH front of soft top Right Soft Top Power....Behind LH seat, behind access panel, Relay on relay bracket.............................201-23-A Right Soft Top Timer....Behind LH seat, behind access panel, Relay taped to harness.............................201-23-A Soft Top Close Relay....Behind LH seat, behind access panel, on relay bracket.............................201-23-A Soft Top Open Relay.....Behind LH seat, behind access panel, on relay bracket.............................201-23-A Soft Top Switch Diode...Behind LH seat, behind access panel, #1 in harness 10 inches from soft top motor.....201-23-A switch Soft Top Switch Diode...Behind LH seat, behind access panel, #2 in harness 10 inches from soft top motor switch.......................................201-23-A
Transaxle Position......Lower LH rear of engine, mounted on..........201-1-C Switch transaxle C111 (7 cavities).......Lower LH rear of engine......................201-1-C C201 (56 cavities)......Behind RH side of I/P, near shroud...........201-14-D C355 (3 cavities)......Behind LH seat, behind access panel..........201-23-A C375 (6 cavities)......Behind LH seat, behind access panel..........201-23-A G103....................Lower LH front of engine, near Starter Solenoid ....................................201-0-C G300....................Behind RH seat, behind Battery...............201-19-A P103....................Engine harness grommet, RH front of dash.... 201-14-D S309....................Soft top switch harness, behind LH seat, behind access panel, by Left Soft Top Timer Relay breakout.........................201-23-A S310....................Soft top switch harness, behind LH seat, behind access panel, 10 inches from soft top motor switch ............................201-23-A S311....................Soft top switch harness, behind LH seat, behind access panel, 10 inches from soft top motor switch ............................201-23-A
SYMPTOM TABLE
SYMPTOM FOR DIAGNOSIS
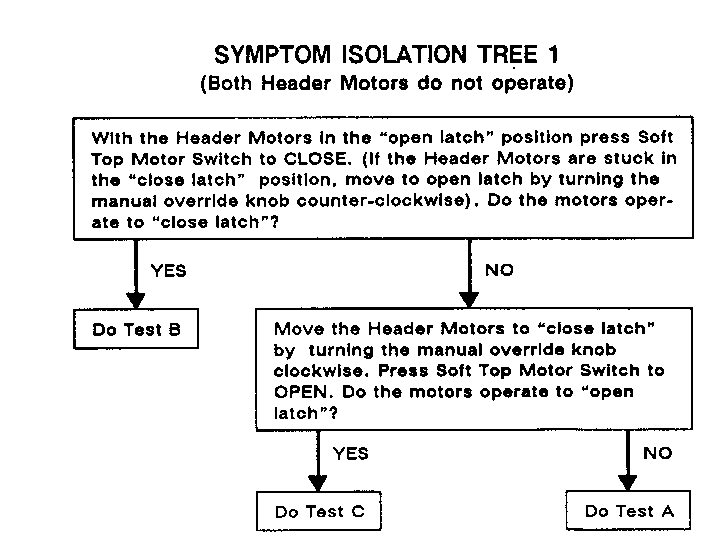
Both Header Motors See Symptom do not operate Isolation Tree 1
Both Header Motors Repair open in CKT operate for an 804 between splice instant (0.1 second) S313 and splice each time the Soft S900 Top Motor Switch is pressed
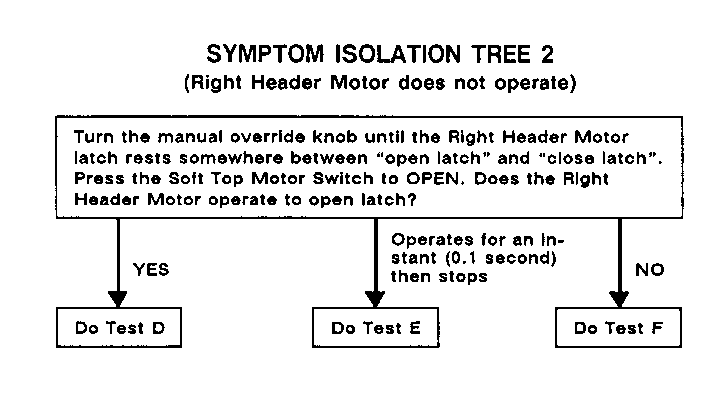
Right Header Motor See Symptom does not operate Isolation Tree 2
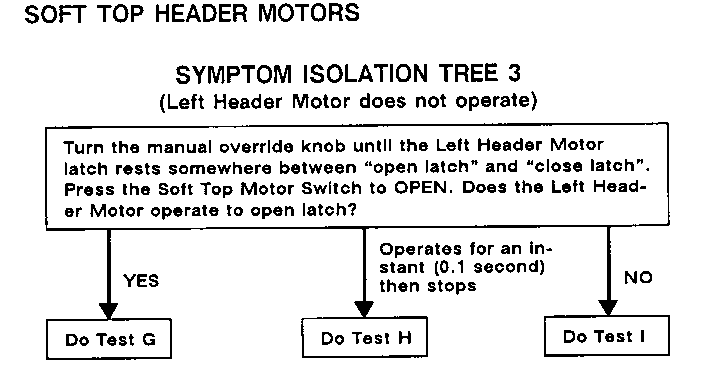
Left Header Motor See Symptom does not operate Isolation Tree 3
COMPONENT LOCATION Page-Figure ------------------ ----------- S312.................Soft top switch harness, behind LH seat, behind access panel, 10 inches from soft top motor switch ..................................201-23-A S313.................Soft top switch harness, behind LH seat, behind access panel, by Left Soft Top Timer Relay breakout ...............................201-23-A S375.................Main harness, behind LH seat, behind access panel .........................................201-18-A S900.................Soft top header motor harness, 20 inches from Right Header Motor S901.................Soft top header motor harness, 18 inches from Right Header Motor
A: BOTH HEADER MOTORS WILL NOT OPERATE TO OPEN LATCH AND CLOSE LATCH
The following may cause this symptom.
1 Open in CKT 76 or CKT 560
2 Open in CKT 804
3 Open in CKT 275, CKT 150, or defective Transaxle Position Switch
4 5 6 Defective Soft Top Motor Switch
7 Open in CKT 902
8 Open in CKT 163 or defective Soft Top Close Relay
9 Open in CKT 905 or defective Soft Top Open Relay
B: BOTH HEADER MOTORS WILL NOT OPERATE TO OPEN LATCH
The following may cause this symptom.
1 Defective Soft top Open Relay
2 Open in CKT 275
3 Open in CKT 76
4 Open in CKT 904 or defective Soft Top Motor Switch
5 Open in CKT 899 or defecitve Soft top Switch Diode #2
6 Short across Soft Top Switch Diode #1
IF MEASUREMENTS IN STEPS 2 THROUGH 4 ARE CORRECT, CHECK:
5 Soft Top Switch Diode #2 for an open and CKT 899 for an open between splice S311 and splice S312.
6 for short across Soft Top Switch Diode #1
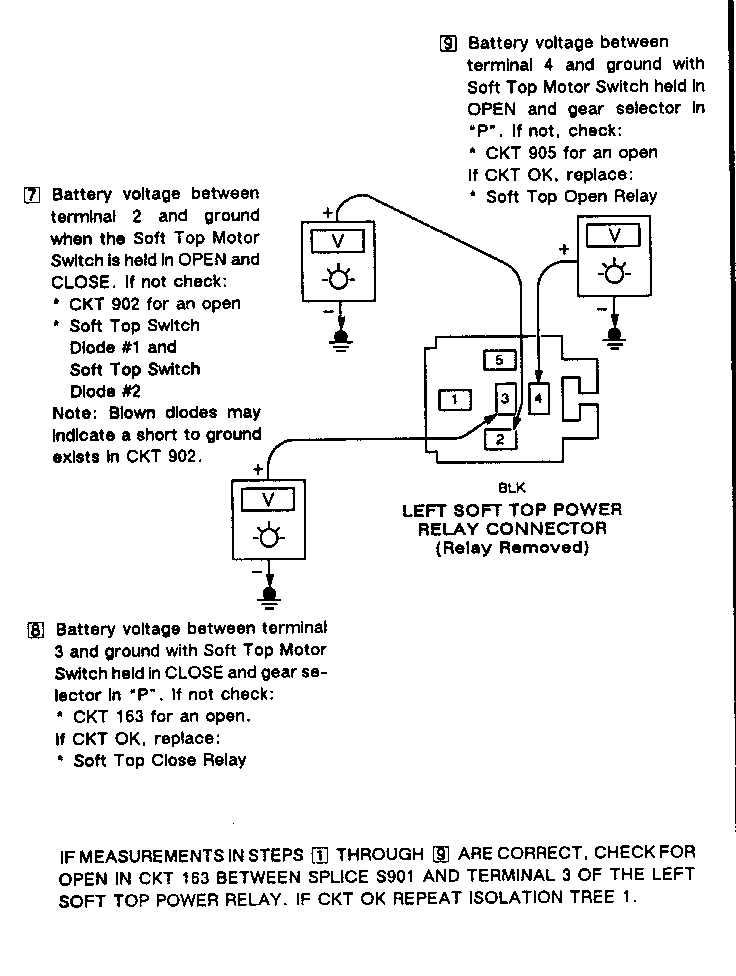
C: BOTH HEADER MOTORS WILL NOT OPERATE TO CLOSE LATCH
The following may cause this symptom.
1 Defective Soft Top Close Relay.
2 Open in CKT 903 or defective Soft Top Motor Switch.
3 Open In CKT 899 or defective Soft Top Switch Diode #1.
4 Short across Soft Top Switch Diode #2.
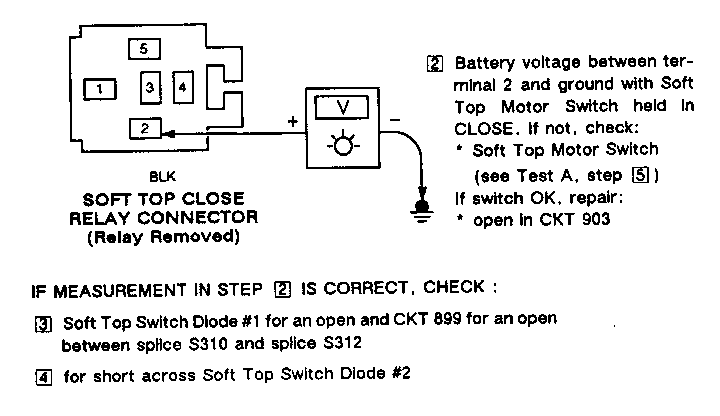
Perform the following steps in numerical order. (For CKT wire colors, see schematic)
1 Quick Check.
Insert Left Soft Top Power Relay into Soft Top Close Relay connector. With gear selector in 'P', press Soft Top Motor Switch to CLOSE. If the Right Header Motor moves to close latch, the Soft Top Close Relay is defective.
If Measurement in Step 2 is correct, check:
2 Battery voltage between terminal 2 and ground with Soft Top Motor Switch held in CLOSE. If not check:
Soft top Motor Switch (see Test A, step 5)
If switch OK, repair: open in CKT 903
3 Soft Top Swtich Diode #1 for an open and CKT 899 for an open between splice S310 and Splice S312
4 for short across Soft Top Switch Diode #2
D: RIGHT HEADER MOTOR WILL NOT OPERATE FROM THE EXTREME OPEN LATCH OR CLOSE LATCH POSITIONS
The following may cause this symptom.
1 Defective Right Soft Top Timer Relay
2 Open in CKT 804
Perform the following steps in numerical order. (For CKT wire colors, see schematic)
1 Quick Check.
Insert Left Soft Top Timer Relay into Right Soft Top Timer Relay connector. With gear selector in 'P', press Soft Top Motor Switch to CLOSE, then to OPEN. If right Header Motor operates to close latch and open latch, the Right Soft Top Timer Relay is defective.
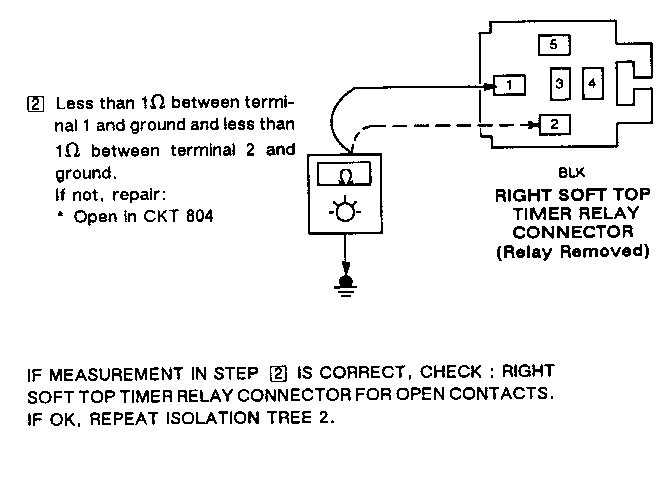
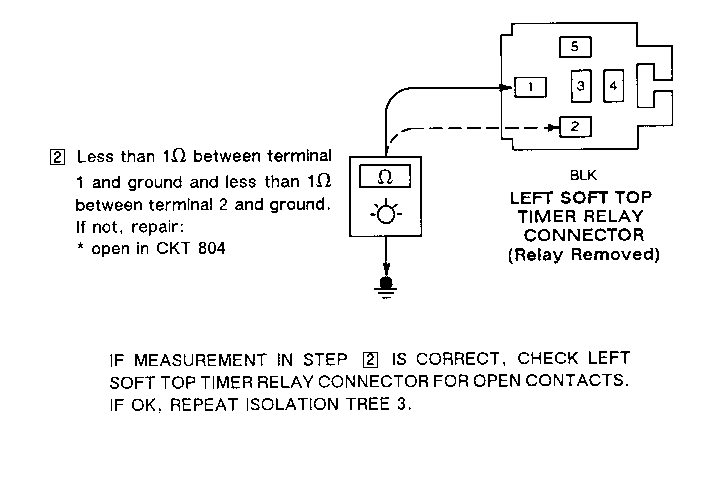
2 Less than 1 between terminal 1 and ground and less than 1 between termianl 2 and ground.
If not repair: Open in CKT 804
IF MEASUREMENT IN STEP 2 IS CORRECT, CHECK: RIGHT SOFT TOP TIMER RELAY CONNECTOR FOR OPEN CONTACTS. IF OK, REPEAT ISOLATION TREE 2.
E: RIGHT HEADER MOTOR OPERATES FOR AN INSTANT (0.1 SECOND) THEN STOPS
The following may cause this symptom.
1 Open in CKT 804
2 Open in CKT 901
3 Defective Right Header Motor limit switch
Perform the following steps in numerical order. (For CKT wire colors, see schematic.)
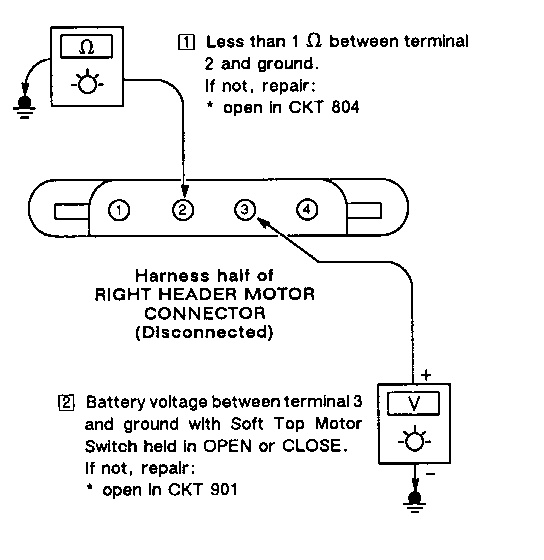
1 Less than 1 between terminal 2 and ground.
If not repair: open in CKT 804
2 Battery voltage between terminal 3 and gorund with Soft Top Motor Switch held in OPEN or CLOSE.
If not repair: *open in CKT 901
3 Turn manual override knob to move Right Header Motor latch to the following positions. Measure resistance between terminals 3 & 2 (motor half of connector).
IF MEASUREMENTS IN STEPS 1 THROUGH 3 ARE CORRECT, CHECK RIGHT HEADER MOTOR CONNECTOR FOR OPEN CONTACTS. IF OK, REPEAT ISOLATION TREE 2
F: RIGHT HEADER MOTOR DOES NOT OPERATE
The following may cause this symptom.
1 Defective Right Soft Top Power Relay.
2 Open in CKT 901
3 Open in CKT 902
4 Open in CKT 162
5 Open in CKT 163
6 Defective Right Header Motor
Perform the following steps in numerical order. (For CKT wire colors, see schematic)
1 Quick Check.
Insert Left Soft Top Power Relay into Right Soft Top Power Relay connector. With gear selector in 'P', press Soft Top Motor Switch to OPEN and CLOSE. If the Right Header Motor operates to open latch and close latch, the Right Soft Top Power Relay is defective.
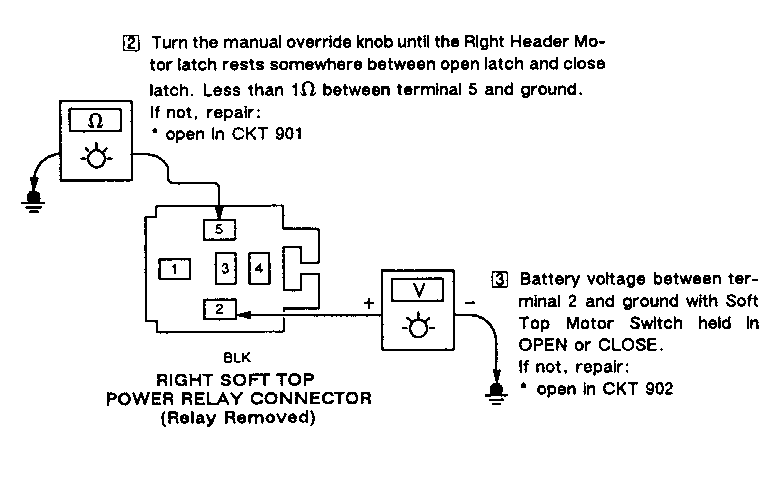
2 Turn the manual override knob until the Right Header Motor latch rests somewhere between open latch and close latch. Less than 1 between terminal 5 and ground.
If not, repair: * open in CKT 901
3 Battery voltage between terminal 2 and ground with Soft Top Motor Switch held in OPEN or CLOSE.
If not, repair: * open in CKT 902
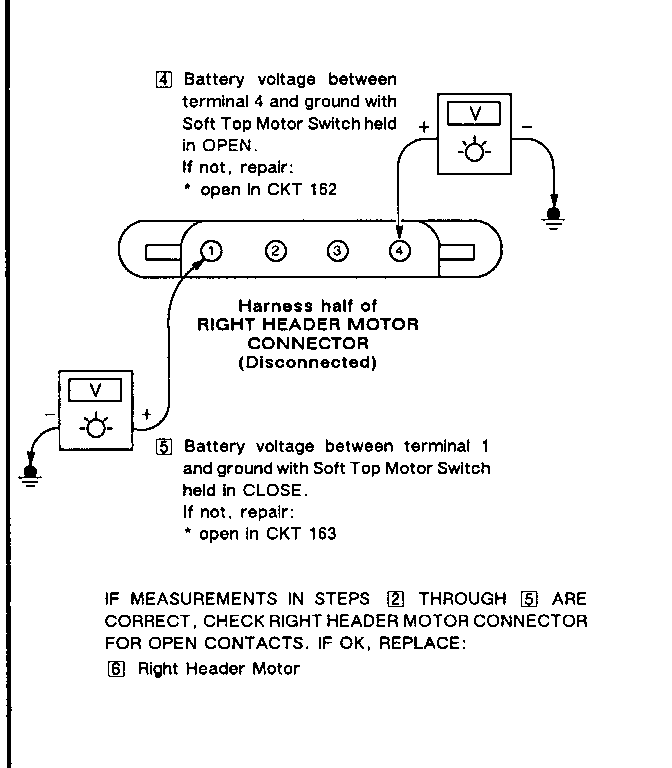
4 Battery voltage between terminal 4 and ground with Soft Top Motor Switch held in OPEN.
If not repair: * open in CKT 162
5 Battery voltage between terminal 1 and ground with Soft Top Motor Switch held in CLOSE.
If not repair: *open in CKT 163
G: LEFT HEADER MOTOR WILL NOT OPERATE FROM THE EXTREME OPEN LATCH OR CLOSE LATCH POSITIONS
The following may cause this symptom.
1 Defective Left Soft Top Timer Relay.
2 open in CKT 804
Perform the following steps in numerical order. (For CKT wire colors, see schematic)
1 Quick Check.
Insert Right Soft Top Timer Relay into Left Soft Top Timer Relay connector. With gear selector in 'P', press Soft Top Motor Switch to CLOSE, then to OPEN. If Left Header Motor operates to close latch and open latch, the Left Soft Top Timer Relay is defective.
2 Less than 1 betweem terminal 1 and ground and less than 1 between terminal 2 and ground.
If not repair: * open in CKT 804
IF MEASUREMENT IN STEP 2 IS CORRECT, CHECK LEFT SOFT TOP TIMER RELAY CONNECTOR FOR OPEN CONTACTS. IF OK, REPEAT ISOLATION TREE 3.
H: LEFT HEADER MOTOR OPERATES FOR AN INSTANT (0.1 SECOND) THEN STOPS
The following may cause this symptom.
1 Open in CKT 804
2 Open in CKT 900
3 Defective Left Header Motor limit switch
Perform the following steps in numerical order. (For CKT wire colors, see schematic)
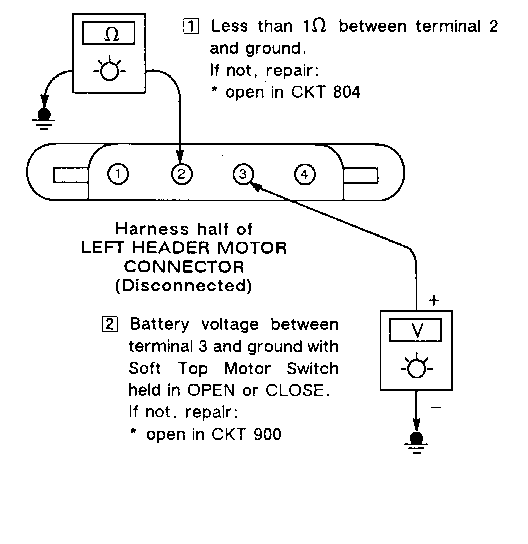
1 Less than 1 between terminal 2 and ground.
If not, repair: *open in CKT 804
2 Battery voltage between terminal 3 and ground with Soft Top Motor Switch held in OPEN or CLOSE.
If not, repair: * open in CKT 900
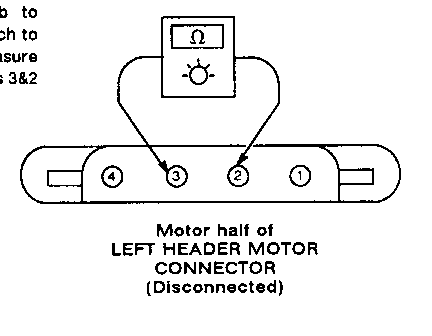
3 Turn manual override knob to move Left Header Motor latch to the following positions. Measure resistance between terminals 3&2 (motor half of connector).
IF MEASUREMENTS IN STEPS 1 THROUGH 3 ARE CORRECT, CHECK LEFT HEADER MOTOR CONNECTOR FOR OPEN CONTACTS. IF OK, REPEAT ISOLATION TREE 3.
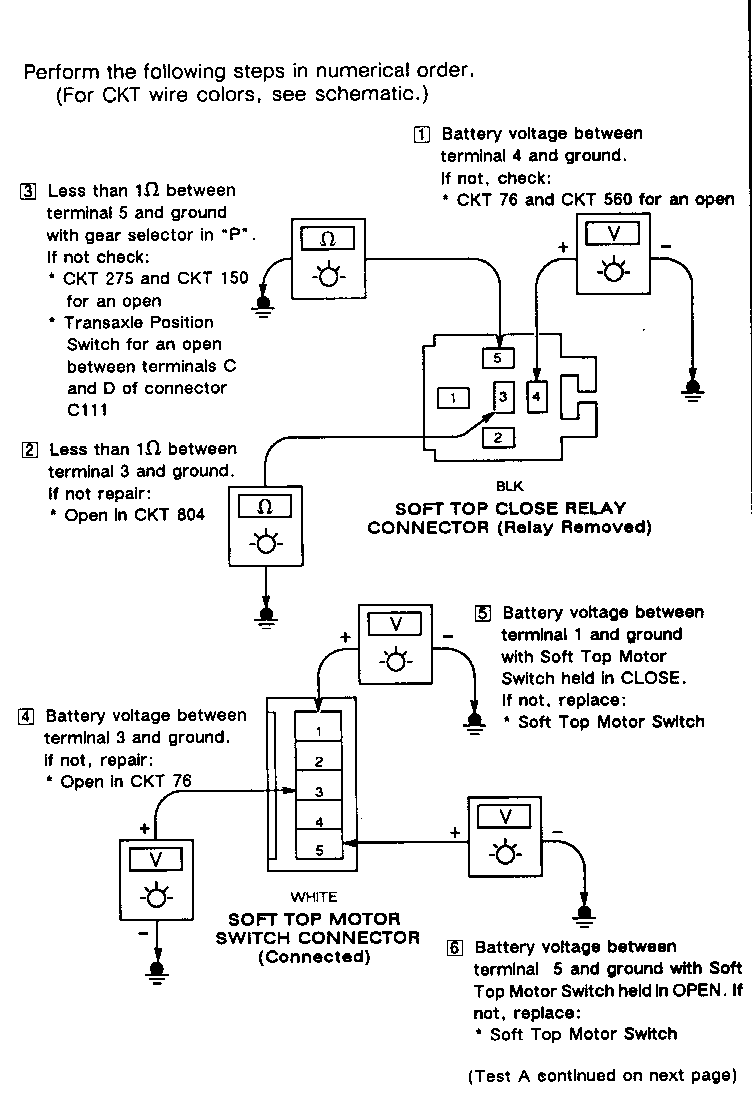
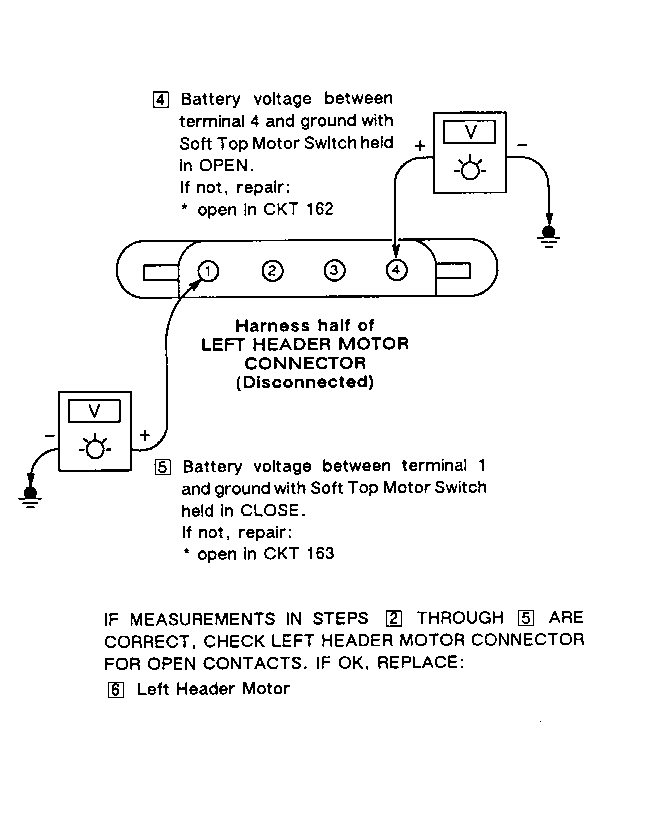
I: LEFT HEADER MOTOR DOES NOT OPERATE
The following may cause this symptom.
1 Defective Left Soft Top Power Relay
2 Open in CKT 900
3 Open in CKT 905
4 Open in CKT 162
5 Open in CKT 163
6 Defective Left Header Motor
Perform the following steps in numerical order. (for CKT wire colors, see schematic)
1 Quick Check.
Insert Right Soft Top Power Relay into Left Soft Top Power Relay connector. With gear selector in 'P', press Soft Top Motor Switch to OPEN and CLOSE. If the Left Header Motor operates to open latch and close latch, the Left Soft Top Power Relay is defective.
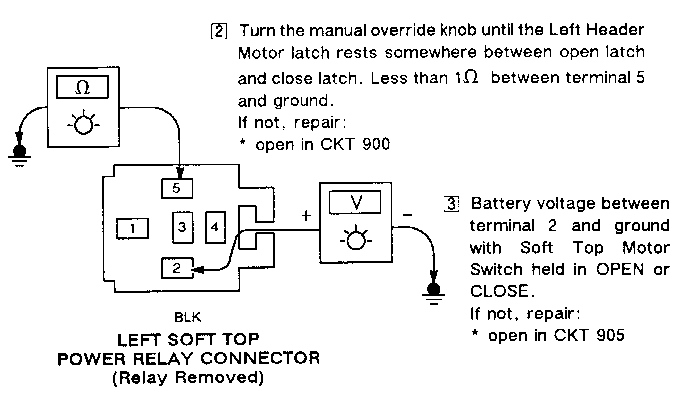
2 Turn the manual override knob until the Left Header Motor latch rests somewhere between open latch and close latch. Less than 1 between terminal 5 and ground.
If not, repair: * open in CKT 900
3 Battery voltage between terminal 2 and ground with Soft Top Motor Switch held in OPEN or CLOSE.
If not repair: * open in CKT 905
4 Battery voltage between terminal 4 and ground with Soft top Motor Switch held in OPEN.
If not, repair: * open in CKT 162
5 Battery voltage between terminal 1 and ground with Soft Top Motor Switch held in CLOSE.
If not, repair: * open in CKT 163
CIRCUIT OPERATION
Battery power is applied to the 560 circuit and the 76 circuit through Circuit Breaker 24. When the Soft Top Motor Switch is pressed CLOSE, power is applied to the coil of the Soft Top Close Relay and to circuit 902 through the Soft Top Switch Diode #1. When energized, the Soft Top Close Relay switches circuit 163 (terminal 1 of both header motors) from ground to battery power. Soft Top Switch Diode #2 prevents power from also being applied to the coil of the Soft Top Open Relay. Similarly, when the Soft Top Motor Switch is pressed OPEN, power is applied to the coil of the Soft Top Open Relay and to circuit 902 through Soft Top Switch Diode #2. The Soft Top Open Relay switches circuit 905 (terminal 4 of both header motors when the Soft Top Power Relays are energized) from ground to battery power. Soft Top Switch Diode #1 prevents power from also being applied to the coil of the Soft Top Close Relay. The coils of both the Soft Top Open Relay and the Soft Top Close Relay are grounded through the transaxle position switch when the gear shift is in Park.
The 902 circuit provides power to the coils of the Soft Top Power Relays and to the Soft Top Timer Relays whenever the Soft Top Motor Switch is in OPEN or CLOSE. Ground for the coils of the Soft Top Power Relays, circuits 900 and 901, can be provided through two paths. The header motor extreme switches provides a ground path whenever that motor is not fully open or fully closed. The Soft Top Timer Relays also provide a ground path for a one tenth of a second at the instant the 902 circuit is energized. The Soft Top Timer Relays do not reset until power is removed from the 902 circuit.
When the Soft Top Power Relays are energized, circuit 162 is switched from circuit 163 to circuit 905, completing the connection of circuit 905 to terminal 4 of both Header Motors, and allowing the motors to run.


General Motors bulletins are intended for use by professional technicians, not a "do-it-yourselfer". They are written to inform those technicians of conditions that may occur on some vehicles, or to provide information that could assist in the proper service of a vehicle. Properly trained technicians have the equipment, tools, safety instructions and know-how to do a job properly and safely. If a condition is described, do not assume that the bulletin applies to your vehicle, or that your vehicle will have that condition. See a General Motors dealer servicing your brand of General Motors vehicle for information on whether your vehicle may benefit from the information.
