SOFT TOP CABLE BREAKAGE OR FRAYING

MODELS AFFECTED: 1987 ALLANTE
Some 1987 Allantes may experience a condition of soft top cable breakage or severe fraying. This condition may be caused by missing or broken nylon bushings resulting in contact between the cable and the tension adjustment bore. This condition can be repaired by the installation of brass bushings inserted into the tension adjustment bores prior to adjustment.
If cable replacement is required, replace the cables in pairs. For example, if the right rear cable must be replaced, the left rear cable must also be replaced.
The part numbers for the cables, bushing kit, and set screws are listed below:
Description P/N
Right Front Cable 1639919 Left Front Cable 1639919 Right Rear Cable 1639741 Left Rear Cable 1639741 Bushing Kit 3634726 Set Screw (4 per car) 1645366
Procedure for Front Cable Replacement and Bushing Installation:
1. Remove hard top and place on a protected surface.
2. With the convertible top assembly in the stowed position and the top boot cover raised, remove the screws that secure the front header weatherstrip.
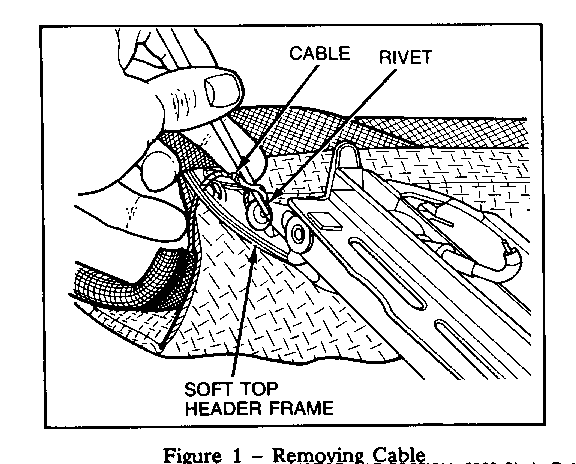
3. Peel the soft top material back at the front corner of header frame to expose the rivet and washer assembly where the loop of the cable attaches. Pull the loop of the cable off of the rivet and washer assembly (refer to Figure 1). 4. Raise the soft top up and lower it onto a 2" x 4" block of wood positioned on the windshield header. Cut the loop off of the old cable.
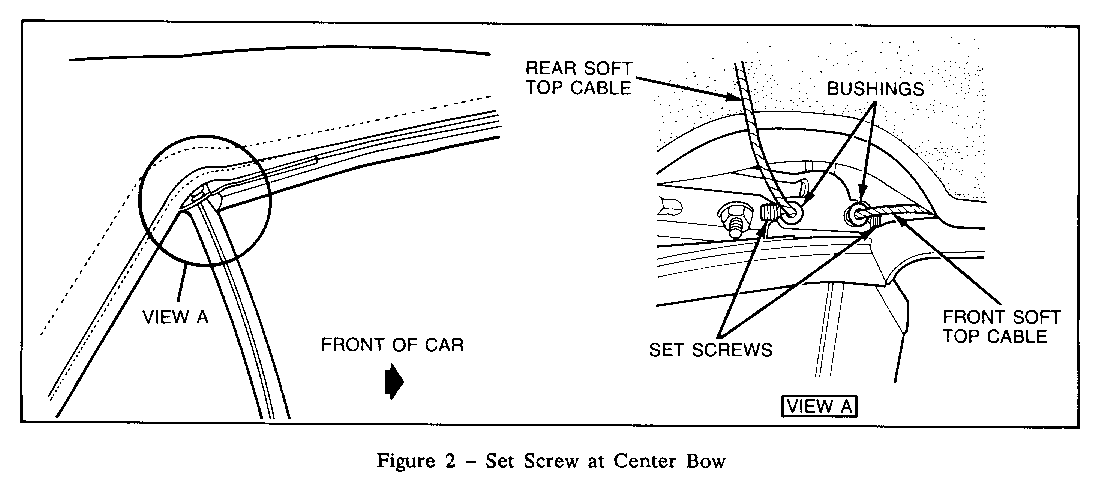
5. Loosen the set screw retaining the front cable in the center bow and remove the cable from the center bow bore (refer to Figure 2). Do not remove the cable from soft top material at this time.
6. Feed the straight end of the new cable through the hole in the convertible top header frame. Tape the ends of the new and old cables together and pull the cables through the soft top material toward the rear of the car. Remove the tape and discard old cable.
7. Fold the soft top into the stowed position.
8. Attach the loop of the new cable over the rivet and washer assembly at the front corner of the header. Re-adhere the soft top material in place with "Super Trim Adhesive", 3M P/N 08090 or equivalent.
9. Reinstall front header weatherstrip.
10. There are two different size bushings included in the bushing kit. The bushing that fits snugly in the bore should be used (refer to Figure 2).
NOTE:Early Allantes may require drilling to accept the smaller bushing. Use a 1/8" drill bit and carefully drill out the bore to accept the bushing.
11. Raise the soft top and again place a 2" x 4" block of wood between the windshield header and the soft top frame.
12. Install the bushing into the center bow bore and tighten the set screw just enough to hold the bushing in position.
13. Insert the free end of the new cable into the bushing.
14. Pull by hand on the rear of the cable to remove the slack in the cable.
15. Put a mark on the cable 6 to 7mm in front of the point where the cable enters the new bushing. With this position marked, partially fold the front portion of the soft top. Pull the cable until the mark is just inside of the bushing and compress the bushing with the set screw (refer to Figure 2).
16. Fold the soft top to its stowed position and reinstall the hard top.
Procedure for Rear Cable Replacement and Bushing Installation:
1. Remove hard top and place on a protected surface.
2. Raise the soft top and latch it to the windshield header. Leave the rear window in the up and locked position.
3. Loosen the rear set screw in the center bow and remove that portion of the cable from the center bow bore (refer to Figure 2).
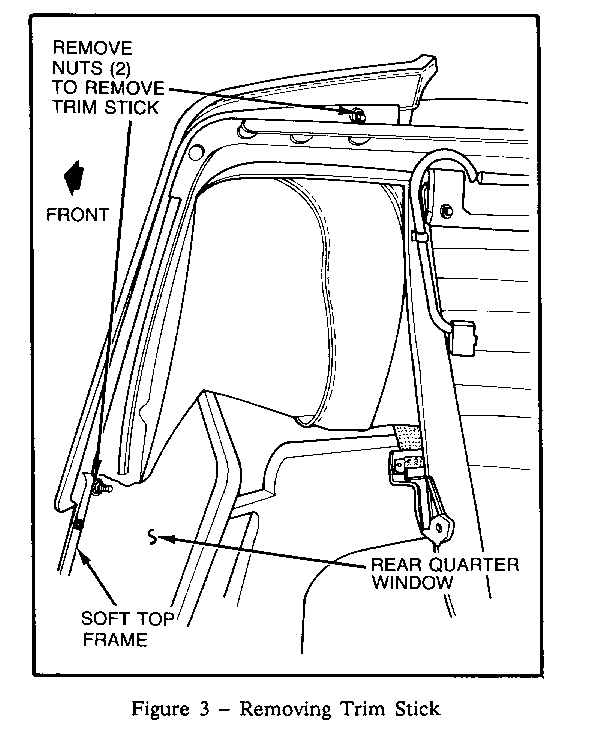
4. On the inboard side of the rear trim stick are two nuts that attach the soft top trim stick to the folding top frame. Remove the two attaching nuts and pull upward and outboard to release the trim stick from the folding top frame (refer to Figure 3). 5. With the soft top trim stick released from the frame, flip the trim stick up to expose the underside.
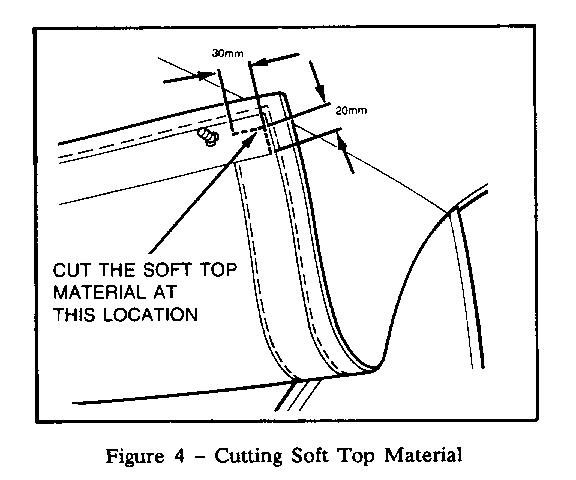
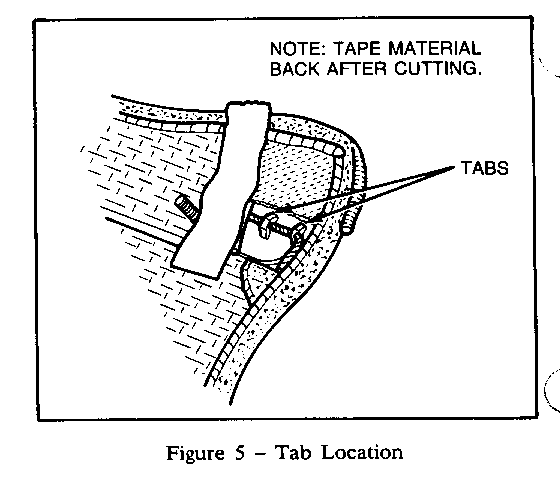
6. Using a razor blade, make a small cut in the under side trim material at the outboard corner to expose the tab location for the rear of the rear cable (refer to Figures 4 and 5).
7. Open the tabs to release the cable using an awl or other appropriate tool. Do not remove the cable from the soft top at this time.
8. Insert the end of the new cable through the tabs and secure by crimping the tabs onto the cable.
9. Tape the ends of the new and old cables together and draw the cables through the soft top material toward the front of the car. Remove the tape and discard old cable.
10. Re-adhere the soft top material to the trim stick with "Super Trim Adhesive", 3M P/N 08090 or equivalent.
11. There are two different size bushings included in the bushing kit. The bushing that fits snugly in the bore should be used.
NOTE: Early Allantes may require drilling to accept the smaller bushing. Use a 1/8" drill bit and carefully drill out the bore to accept the bushing.
12. Install the bushing into the center bow bore and retighten the set screw just enough to hold the bushing in position.
13. Install the trim stick onto the folding top frame and install two attaching nuts (refer to Figure 3).
14. Latch the rear window in its down position.
15. Insert the free end of the new cable into the bushing.
16. To tension the rear cable, pull the front end of the cable to remove all of the slack in the cable.
17. Put a mark on the cable 6 to 7mm to the rear of the point where the cable enters the new bushing. With this position marked, release the rear window and lock it in the up position. Draw the cable through the new bushing to the point where the mark is just inside the bushing and compress the bushing with the set screw (refer to Figure 2).
18. Fold soft top into the stowed position and reinstall the hard top.
For warranty purposes, use the following Labor Operation(s):
B3730 - Front Right Cable Replacement at .6 hour. B3731 - Front Left Cable Replacement at .6 hour. B3734 - Rear Right Cable Replacement at .8 hour. B3735 - Rear Left Cable Replacement at .8 hour.
General Motors bulletins are intended for use by professional technicians, not a "do-it-yourselfer". They are written to inform those technicians of conditions that may occur on some vehicles, or to provide information that could assist in the proper service of a vehicle. Properly trained technicians have the equipment, tools, safety instructions and know-how to do a job properly and safely. If a condition is described, do not assume that the bulletin applies to your vehicle, or that your vehicle will have that condition. See a General Motors dealer servicing your brand of General Motors vehicle for information on whether your vehicle may benefit from the information.
