Headlamp Aiming Oldsmobile

| • | Properly aim the headlamps in order to obtain the maximum road
illumination and safety that has been built into the headlamp system. Proper
aiming is important with composite headlamps. |
| • | Composite headlamps increase the range and the power of the headlamps.
Slight variations from the recommended aiming may be hazardous to approaching
motorists. |
| • | After the bulb has been replaced, aiming the headlamp is not
required with composite headlamps. |
| • | When you inspect the headlamp aim, the vehicle must be at the
normal weight, with regard to the following items : |
| • | Inflate the tires uniformly to the specified pressure. |
| • | If the vehicle regularly pulls a trailer or carries an unusual
load in the rear compartment, inspect the headlamps with the load on the vehicle. |
| | Important: Some state and local laws specify the requirements for the headlamp
aim. Follow all state and local laws.
|
| • | All states have requirements for headlamp aiming. Follow all individual
state requirements. |
| • | Inspect the headlamp aim when installing a new headlamp assembly.
Inspect the headlamp aim if service or repairs to the front end may have
disturbed the headlamps or the mountings. |
| • | The headlamp focus was set when the unit was made. You cannot
readjust the focus. |

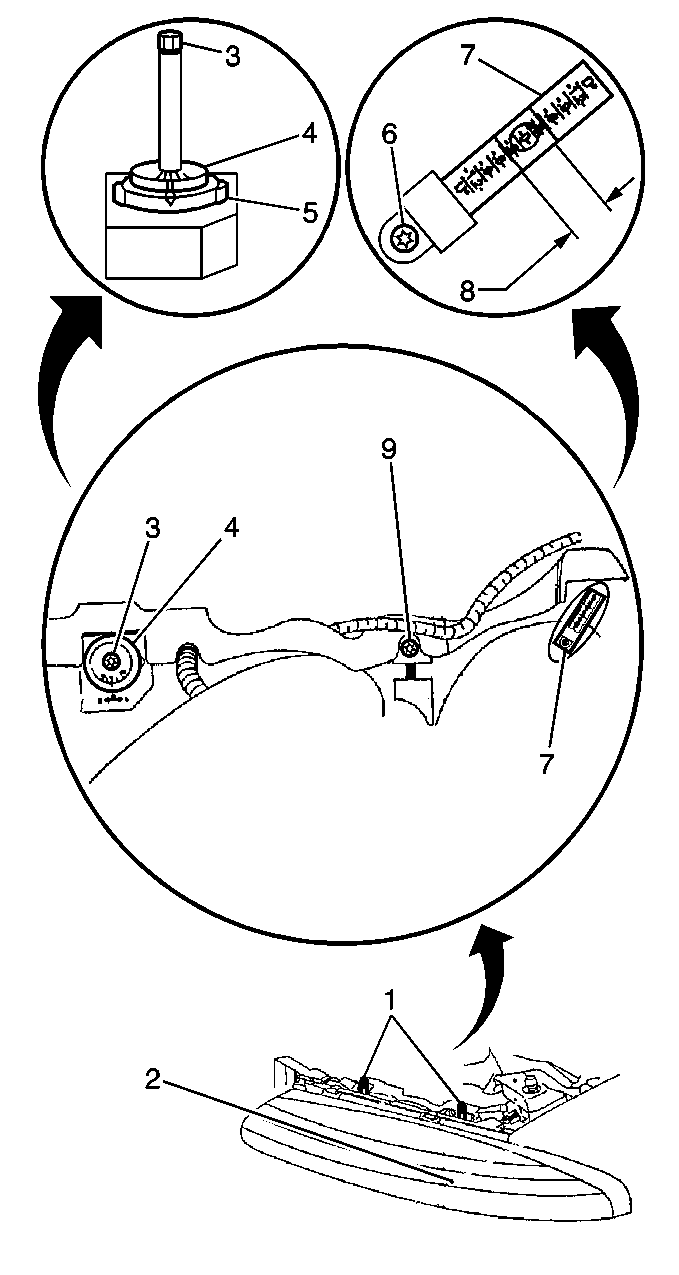
| • | Adjust the screw on the outer side of the headlamp assembly (3)
in order to adjust the horizontal aim. |
| • | Adjust the screw on the top center of the headlamp assembly (9)
in order to adjust the vertical aim. |
| • | Follow the manufacturer's instructions when using the mechanical
aimers. |
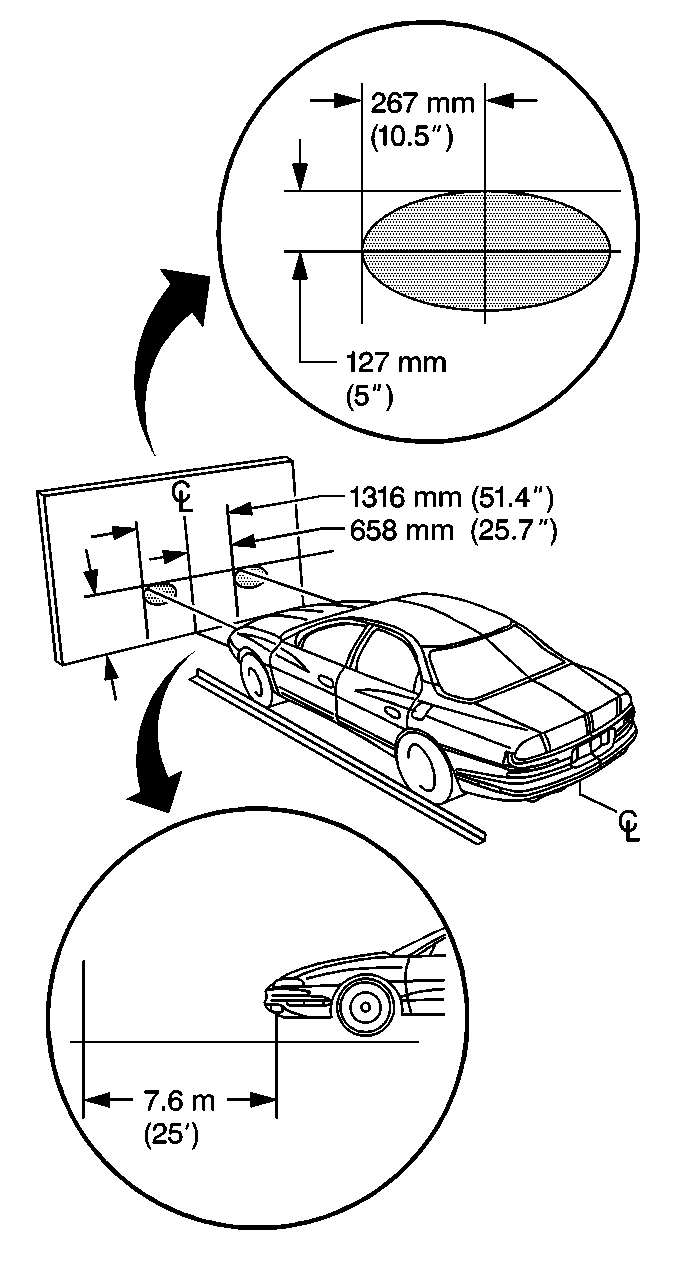
| • | Perform the following steps in order to prepare the vehicle for
aiming the headlamps: |
| 1. | Completely assemble all of the components. |
| 2. | Place the vehicle on a level pad or surface. |
| 3. | Stop all unnecessary operations or work on the vehicle that affects
the vehicle trim. |
| 5. | Stabilize the suspension. |
| 6. | Verify that the fuel level is at a 1/2 tank or less. |
| 7. | Verify that the tires are inflated to the proper pressure. |
Horizontal and Vertical Levelers

- Perform the following
steps in order to prepare the vehicle for inspecting the aim of the headlamp
beam:
| 1.1. | Assemble all of the components on the vehicle. |
| 1.2. | Position the vehicle on a level surface. |
| 1.3. | Stop all other work on the vehicle. |
| 1.5. | Rock the vehicle sideways in order to stabilize the suspension. |
Notice: Horizontal aiming of the headlamps must be performed before vertical
aiming to obtain the correct headlamp aim.
- Set the horizontal adjuster (3) to zero by turning the horizontal
aiming adjustment screw until the pointer is aligned with zero.
- Adjust the vertical aim by turning the vertical aiming screw (9)
in the vertical level gauge until the bubble in the level is centered at
zero. If the fuel tank is near empty to ¼ full, adjust
the aim to the center bubble at -4 degrees. This reduces
the chance of raising the headlamp beam into oncoming drivers' eyes
when the fuel tank is full.
Headlamp Aiming Buick

| • | Properly aim the headlamps in order to obtain the maximum road
illumination and safety that has been built into the headlamp system. Proper
aiming is important with composite headlamps. |
| • | Composite headlamps increase the range and the power of the headlamps.
Slight variations from the recommended aiming may be hazardous to approaching
motorists. |
| • | After the bulb has been replaced, aiming the headlamp is not
required with composite headlamps. |
| • | When you inspect the headlamp aim, the vehicle must be at the
normal weight, with regard to the following items : |
| • | Inflate the tires uniformly to the specified pressure. |
| • | If the vehicle regularly pulls a trailer or carries an unusual
load in the rear compartment, inspect the headlamps with the load on the vehicle. |
| | Important: Some state and local laws specify the requirements for the headlamp
aim. Follow all state and local laws.
|
| • | All states have requirements for headlamp aiming. Follow all individual
state requirements. |
| • | Inspect the headlamp aim when installing a new headlamp assembly.
Inspect the headlamp aim if service or repairs to the front end area may have
disturbed the headlamps or the mountings. |
| • | The headlamp focus was set when the unit was made. You cannot
readjust the focus. |

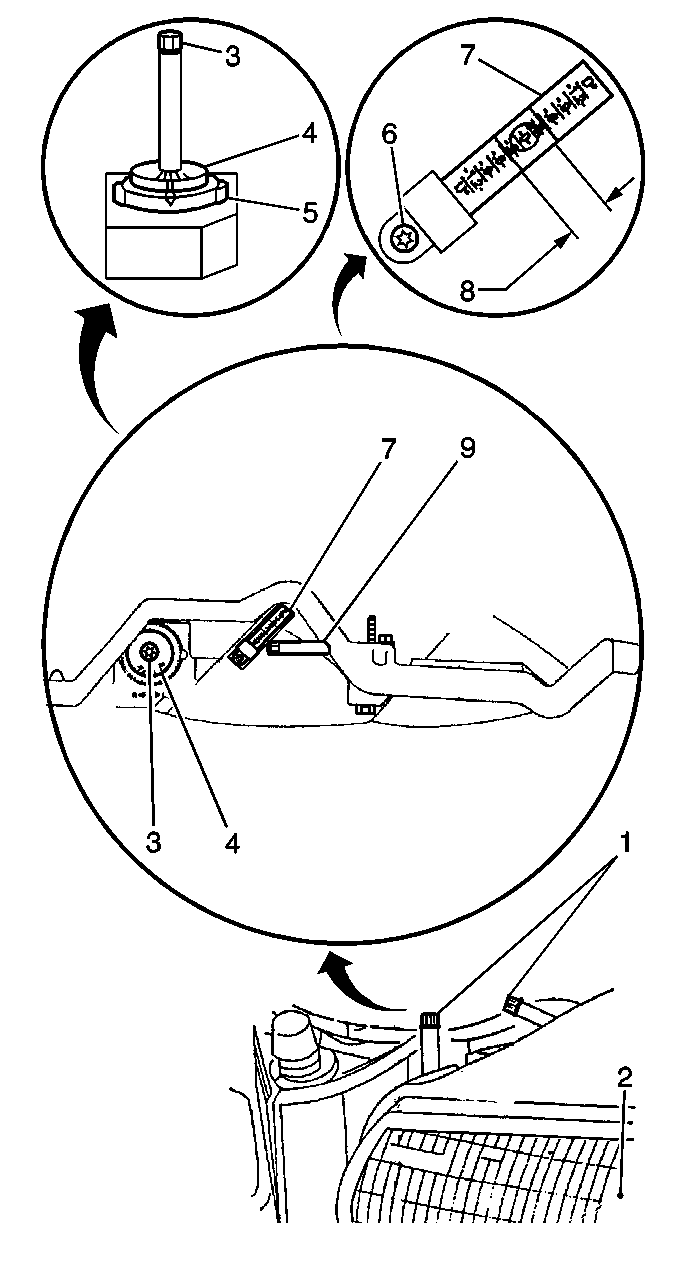
| • | Adjust the screw on the outer side of the headlamp assembly (3)
in order to adjust the horizontal aim. |
| • | Adjust the screw on the top center of the headlamp assembly (9)
in order to adjust the vertical aim. |
| • | Follow the manufacturer's instructions when using the mechanical
aimers. |
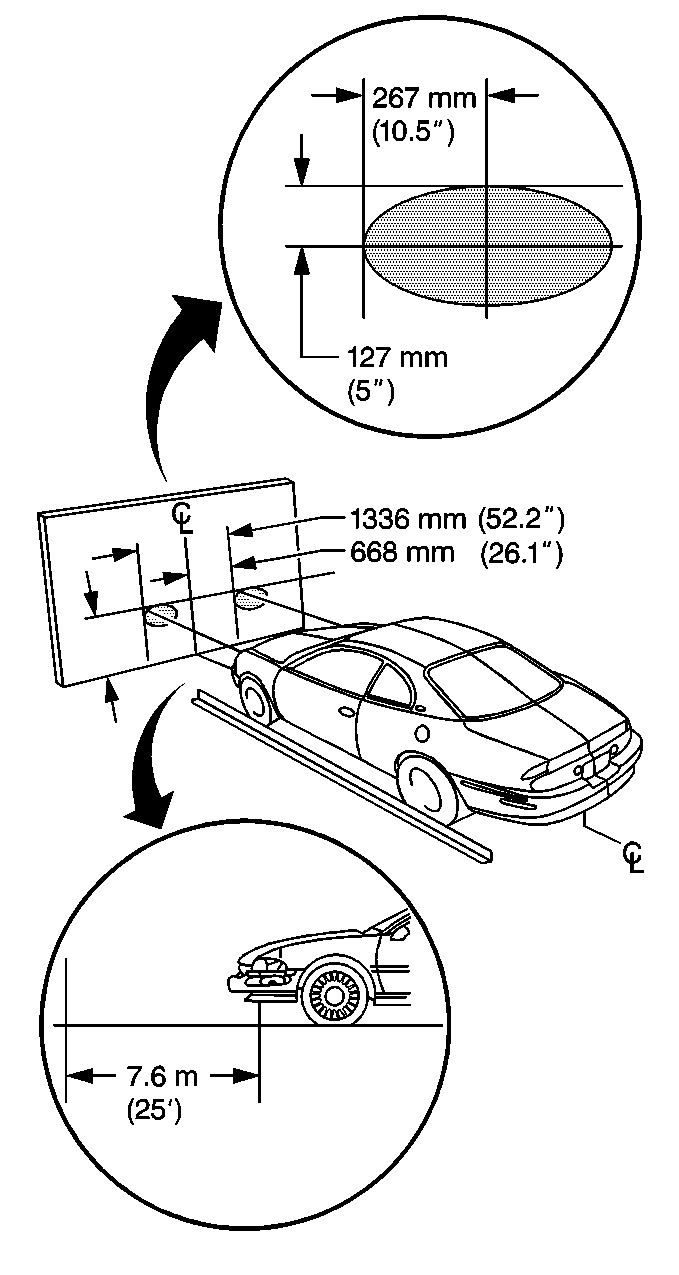
| • | Perform the following steps in order to prepare the vehicle for
aiming the headlamps: |
| 1. | Completely assemble all of the components. |
| 2. | Place the vehicle on a level pad or surface. |
| 3. | Stop all unnecessary operations or work on the vehicle that affects
the vehicle trim. |
| 5. | Stabilize the suspension. |
| 6. | Verify that the fuel level is at a 1/2 tank or less. |
| 7. | Verify that the tires are inflated to the proper pressure. |
Horizontal and Vertical Levelers

- Perform the following
steps in order to prepare the vehicle for inspecting the aim of the headlamp
beam:
| 1.1. | Assemble all of the components on the vehicle. |
| 1.2. | Position the vehicle on a level surface. |
| 1.3. | Stop all other work on the vehicle. |
| 1.5. | Rock the vehicle sideways in order to stabilize the suspension. |
Notice: Horizontal aiming of the headlamps must be performed before vertical
aiming to obtain the correct headlamp aim.
- Set the horizontal adjuster (3) to zero by turning the horizontal
aiming adjustment screw until the pointer is aligned with zero.
- Adjust the vertical aim by turning the vertical aiming screw (9)
in the vertical level gauge until the bubble in the level is centered at
zero. If the fuel tank is near empty to ¼ full, adjust
the aim to the center bubble at -4 degrees. This reduces
the chance of raising the headlamp beam into oncoming drivers' eyes
when the fuel tank is full.


