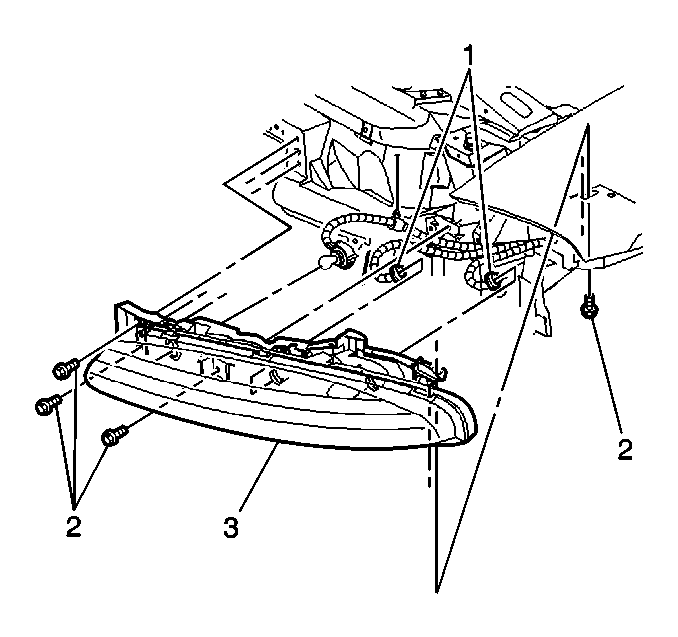
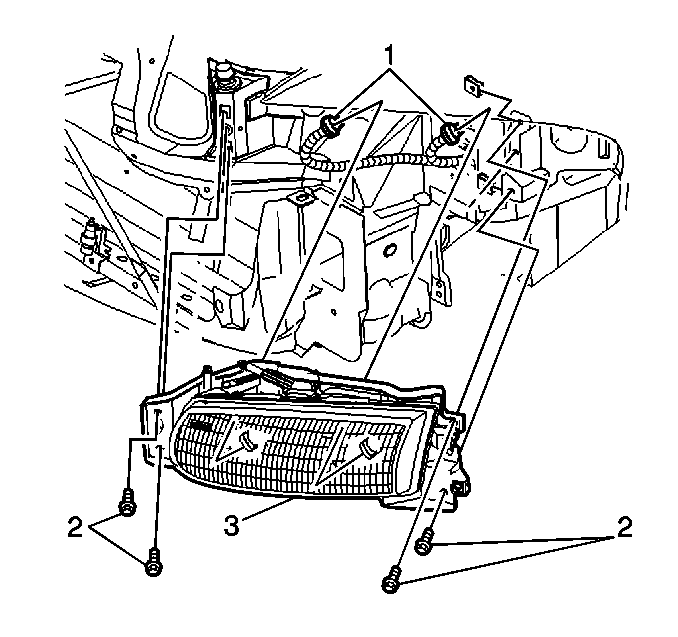
Headlamp Bulb Replacement Oldsmobile
Removal Procedure

| • | For the low beam (right side), perform the following steps: |
| 1. | Remove the MaxiFuse® center cover. |
| 2. | Remove the low beam socket from the headlamp through the engine
compartment behind the upper tie bar. |
| 3. | Turn the socket counterclockwise in order to remove the socket. |
| 4. | Disconnect the connector (1) from the bulb. |
| • | For the low beam (left side), perform the following steps: |
| 1. | Remove the air cleaner. |
| 2. | Remove the low beam socket from the headlamp through the engine
compartment behind the upper tie bar. |
| 3. | Turn the socket counterclockwise in order to remove the socket. |
| 4. | Disconnect the connector (1) from the bulb. |
| • | For the high beam (both sides), perform the following steps: |
| 1. | Remove the sockets by reaching through the opening at the top
of the headlamp assembly. |
| 2. | Turn the sockets counterclockwise in order to remove the socket. |
Installation Procedure

| • | For the low beam (right side), perform the following steps: |
| 1. | Connect the connector (1) to the bulb. |
| 2. | Turn the socket clockwise in order to retain the socket. |
| 3. | Install the low beam socket into the headlamp through the engine
compartment behind the upper tie bar. |
| 4. | Install the MaxiFuse® center cover. |
| • | For the low beam (left side), perform the following steps: |
| 1. | Connect the connector (1) to the bulb. |
| 2. | Turn the socket clockwise in order to retain the socket. |
| 3. | Install the low beam socket to the headlamp through the engine
compartment behind the upper tie bar. |
| 4. | Install the air cleaner. |
| • | For the high beam (both sides), perform the following steps: |
| 1. | Install the sockets by reaching through the opening at the top
of the headlamp assembly. |
| 2. | Turn the sockets clockwise. |
Headlamp Bulb Replacement Buick
Removal Procedure

| • | For the low beam (right side), perform the following steps: |
| 1. | Remove the low beam socket from the headlamp through the engine
compartment behind the upper tie bar. |
| 2. | Turn the socket counterclockwise in order to remove the socket. |
| 3. | Disconnect the connector (1) from the bulb. |
| • | For the low beam (left side), perform the following steps: |
| 1. | Remove the air cleaner. |
| 2. | Remove the low beam socket from the headlamp through the engine
compartment behind the upper tie bar. |
| 3. | Turn the socket counterclockwise in order to remove the socket. |
| 4. | Disconnect the connector (1) from the bulb. |
| • | For the high beam (both sides), perform the following steps: |
| 1. | Remove the 2 headlamp mounting bolts (2) at the inboard
edge of the headlamp in order to allow access to the high beam sockets. |
| 2. | Remove the sockets by reaching through the opening at the top
of the headlamp assembly. |
| 3. | Turn the sockets counterclockwise. |
Installation Procedure

| • | For the low beam (right side), perform the following steps: |
| 1. | Connect the connector (1) to the bulb. |
| 2. | Turn the socket clockwise in order to install the socket. |
| 3. | Install the low beam socket into the headlamp through the engine
compartment behind the upper tie bar. |
| • | For the low beam (left side), perform the following steps: |
| 1. | Connect the connector (1) to the bulb. |
| 2. | Turn the socket clockwise in order to install the socket. |
| 3. | Install the low beam socket to the headlamp through the engine
compartment behind the upper tie bar. |
| 4. | Install the air cleaner. |
| • | For the high beam (both sides), perform the following steps: |
| 1. | Install the sockets by reaching through the opening at the top
of the headlamp assembly. |
| 2. | Turn the sockets clockwise in order to retain the sockets. |
| 3. | Install the 2 headlamp mounting bolts (2) at the inboard
edge of the headlamp. |


