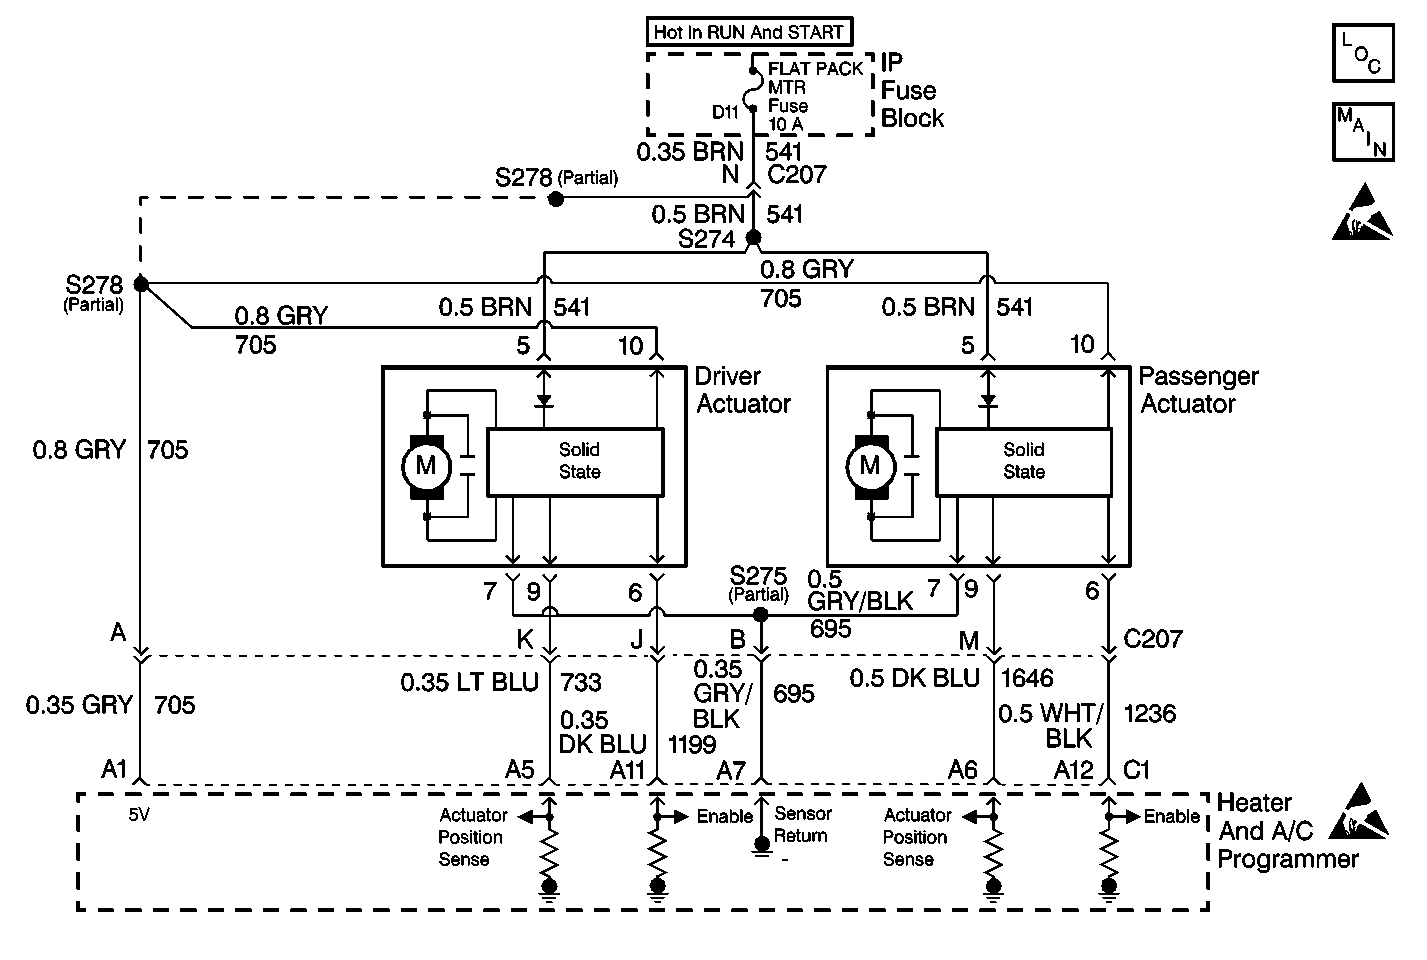
Circuit Description
The HVAC programmer commands the actuator to move by suppling battery voltage. The feedback supplied to the HVAC programmer is a regulated 5 volts. The feedback voltage is a function of the motor position with a high voltage of 4-5 volts indicating full cold door position. A low voltage of less than 1 volt indicates the full hot position. Operation of the air mix door actuator can be evaluated through the Scan Tool .
Conditions for Setting the DTC
The ignition is ON.
Action Taken When the DTC Sets
Only the full hot or full cold may be used by the system.
Conditions for Clearing the DTC
| • | Using a Scan Tool . |
| • | A history DTC will clear when 50 consecutive ignition cycles have occurred without a malfunction. |
| • | HVAC programmer battery voltage is interrupted. |
Test Description
-
This test allows the Scan Tool to command the actuators in order to determine that proper movement is being achieved.
Step | Action | Value(s) | Yes | No | ||||||||||||
|---|---|---|---|---|---|---|---|---|---|---|---|---|---|---|---|---|
1 | Did you perform the Diagnostic System Check? | -- | Go to Step 2 | Go to Diagnostic System Check | ||||||||||||
Exercise the air mix #2 actuator to COM High and to COM Low. Are the values within the specified ranges? | COM High 245 COM Low 10 | Go to Step 4 | Go to Step 3 | |||||||||||||
3 | Replace the heater and A/C programmer. Refer to Programmer Replacement . Did you complete the repair? | -- | Go to Step 22 | -- | ||||||||||||
4 |
Are the values within the specified ranges? | ACT High 198-212 ACT Low 48-57 | Go to Step 3 | Go to Step 5 | ||||||||||||
5 |
Does the air mix #2 actuator respond correctly? | -- | Go to Step 7 | Go to Step 12 | ||||||||||||
6 | Test the air mix #2 actuator to programmer sense circuit for the following conditions:
Did you find and correct the condition? | -- | Go to Step 22 | Go to Step 9 | ||||||||||||
7 |
Does the voltage measure near the specified value? | 5 V | Go to Step 6 | Go to Step 8 | ||||||||||||
8 | Test CKT 705 (GRY) between the air mix #2 actuator connector pin 10 and the programmer connector C1 terminal A1 for the following conditions:
Did you find and correct the condition? | -- | Go to Step 22 | Go to Step 3 | ||||||||||||
9 | Use a J 39200 DMM in order to measure the resistance between the air mix #2 actuator connector pin 7 and pin 10. Refer to Testing for Continuity in Wiring Systems. Does the resistance measure near the specified value? | 8.5 ohms | Go to Step 10 | Go to Step 11 | ||||||||||||
10 | Use a J 39200 DMM in order to measure the resistance between the air mix #2 actuator connector pin 7 and pin 9. Refer to Testing for Continuity in Wiring Systems. Does the resistance measure within the specified range? | 1.7-7.5 ohms | Go to Step 3 | Go to Step 11 | ||||||||||||
11 | Replace the air mix #2 actuator. Refer to Air Mix Actuator Replacement - Passenger . Did you complete the repair? | -- | Go to Step 22 | -- | ||||||||||||
12 |
Does the voltage measure within the specified range? | 10-15 V | Go to Step 15 | Go to Step 13 | ||||||||||||
13 | Test CKT 541 (BRN) between the IP fuse block flat pack MTR fuse and air mix #2 actuator connector pin 5 for the following conditions:
Did you find and correct the condition? | -- | Go to Step 22 | Go to Step 14 | ||||||||||||
14 | Test CKT 695 (GRY/BLK) between the programmer connector C1 terminal A7 and the air mix #2 actuator connector terminal 7 for the following conditions:
Did you find and correct the condition? | -- | Go to Step 22 | -- | ||||||||||||
15 | Use a J 39200 DMM in order to test for voltage between the air mix #2 connector terminal 7 and terminal 10. Refer to Measuring Voltage in Wiring Systems. Does the voltage measure near the specified value? | 5 V | Go to Step 17 | Go to Step 16 | ||||||||||||
16 | Test CKT 705 between the programmer connector C1 terminal A1 and the air mix #2 actuator connector terminal 10 for the following conditions:
Did you find and correct the condition? | -- | Go to Step 22 | -- | ||||||||||||
17 |
Does the voltage measure near the specified value? | 2.5 V | Go to Step 19 | Go to Step 18 | ||||||||||||
18 | Test the enable circuit between the programmer and the air mix #2 actuator connector for the following conditions:
Did you find and correct the condition? | -- | Go to Step 22 | Go to Step 3 | ||||||||||||
19 |
Does the voltage measure near the specified values when the proper function is exercised? | 0 V 5 V | Go to Step 20 | Go to Step 3 | ||||||||||||
20 |
Does the door move freely through the full range of travel? | -- | Go to Step 11 | Go to Step 21 | ||||||||||||
21 | Repair the door of the air mix #2 actuator as needed. Did you complete the repair? | -- | Go to Step 22 | -- | ||||||||||||
22 | Using the scan tool, clear all of the DTCs. Does the DTC reset? | -- | Go to Step 2 | Go to Diagnostic System Check |
