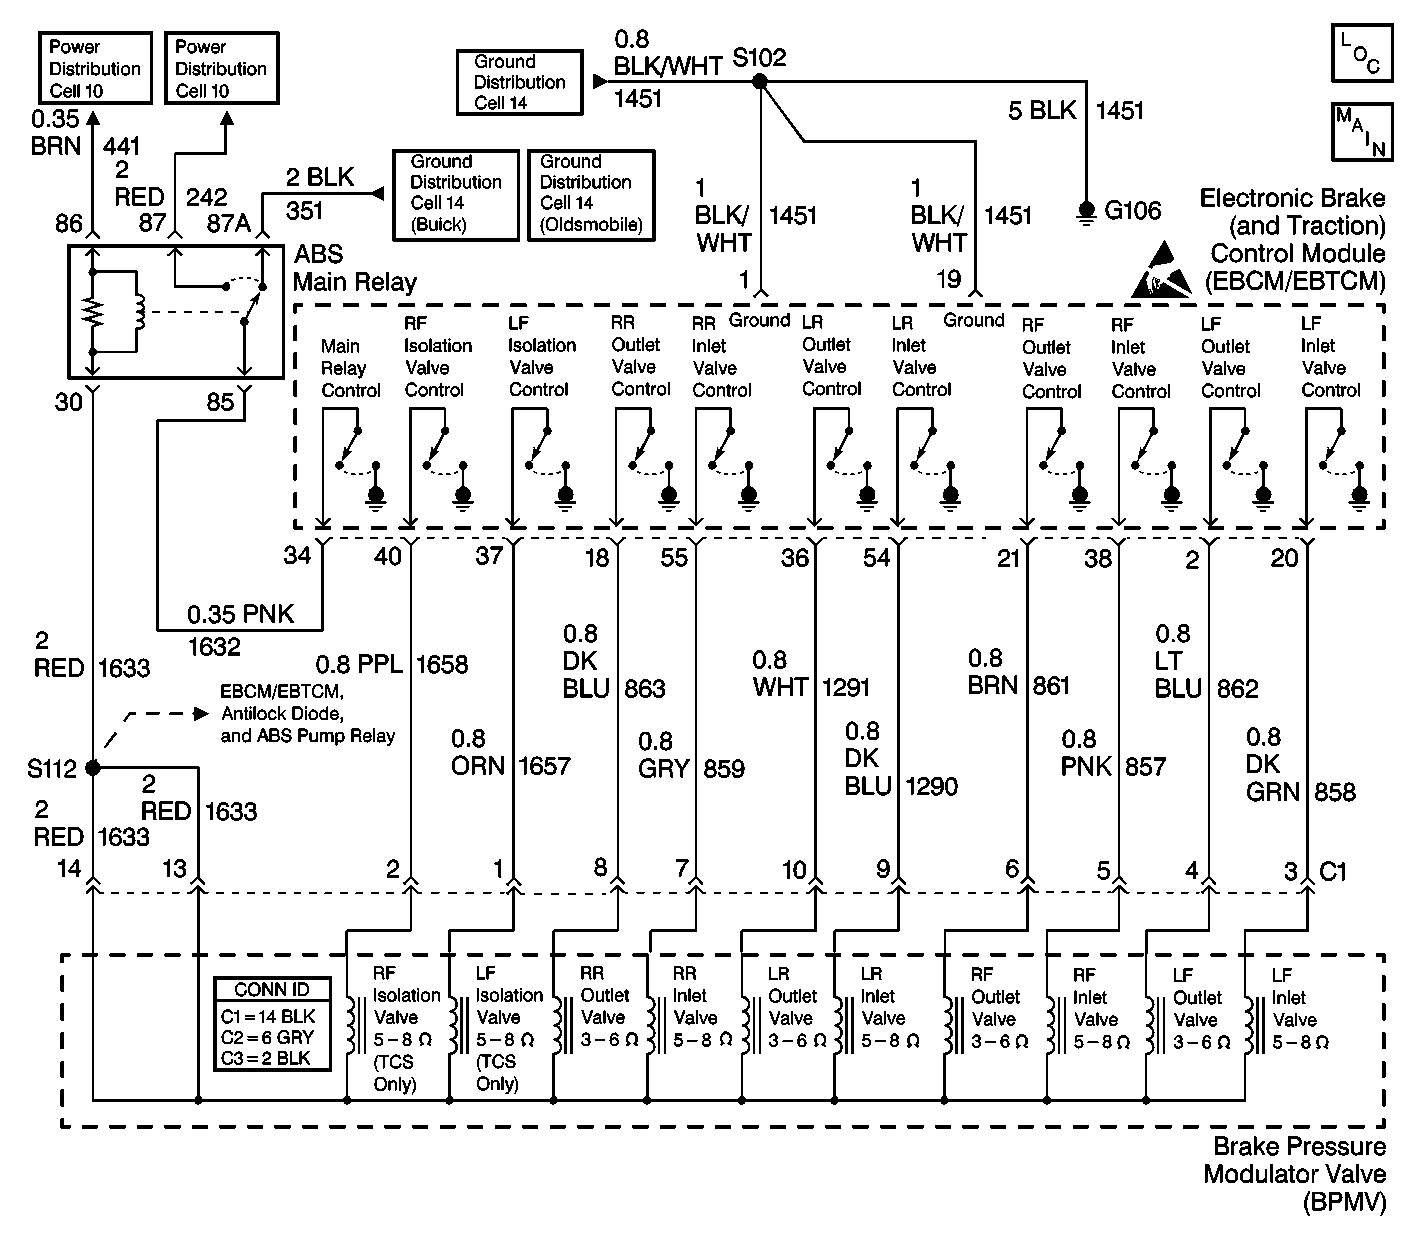
Circuit Description
Voltage is applied to the normally open isolation valves whenever the main relay is energized.
An isolation valve closes when the EBTCM supplies a ground path at the isolation valve control terminal.
The isolation valves are closed only during traction control operations. The isolation valves are not used during antilock or normal braking conditions.
The isolation valves separate (isolate) the front brake hydraulic circuits from the master cylinder and rear brake hydraulic circuits. Once the front brake hydraulic circuits are isolated, pressure may be applied to the front wheels without affecting any other brake hydraulic circuit.
The EBTCM turns ON the BPMV pump motor in order to take the following actions:
| • | Apply pressure. |
| • | Begin cycling the BPMV inlet and outlet valves in order to modulate the pressure. |
Conditions for Setting the DTC
The DTC sets when the EBCM/EBTCM detects an open or short to ground in the left front isolation valve circuit.
Action Taken When the DTC Sets
The following actions are taken when the DTC sets:
| • | A malfunction DTC is stored. |
| • | The ABS is disabled. |
| • | The ANTILOCK indicator lamp is turned ON. |
Conditions for Clearing the DTC
The DTC will be cleared under following conditions:
| • | Conditions for the malfunction are no longer present. Use the scan tool clear DTCs function. |
| • | 100 ignition switch key cycles have passed with no malfunctions detected. |
Diagnostic Aids
Perform a thorough inspection of the wiring and the connectors.
Failure to carefully inspect wiring may result in misdiagnosis. Misdiagnosis may result in part replacement with reappearance of the malfunction.
Step | Action | Value(s) | Yes | No |
|---|---|---|---|---|
1 | Was the Diagnostic System Check performed? | -- | Go to Diagnostic System Check | |
2 |
Is the resistance less than the specified value? | 2 ohms | ||
3 | Measure the resistance between the BPMV connector C1 terminal 14 and the BPMV assembly block. Is the resistance equal to the specified value? | OL (Infinite) | ||
4 | Measure the resistance between the BPMV connector C1 terminal 14 and terminal 1. Is the resistance within the specified range? | 5-8 ohms | ||
5 |
Is the resistance less than the specified value? | 2 ohms | ||
6 |
Is the resistance within the specified range? | 2 ohms | ||
7 |
Is the resistance less than the specified value? | OL (Infinite) | ||
8 |
Is the voltage greater than the specified value? | 1 V | ||
9 | Repair the open or high resistance in CKT 1657. Refer to Wiring Repairs in Wiring Systems. Is the repair complete? | -- | Go to Diagnostic System Check | -- |
10 | Repair the open or high resistance in CKT 1451. Refer to Wiring Repairs in Wiring Systems. Is the repair complete? | -- | Go to Diagnostic System Check | -- |
11 | Repair the short to ground in CKT 1657. Refer to Wiring Repairs in Wiring Systems. Is the repair complete? | -- | Go to Diagnostic System Check | -- |
12 | Repair the short to voltage in CKT 1657. Refer to Wiring Repairs in Wiring Systems. Is the repair complete? | -- | Go to Diagnostic System Check | -- |
13 | Replace the BPMV. Refer to Brake Pressure Modulator Valve Replacement . Is the repair complete? | -- | Go to Diagnostic System Check | -- |
14 | Replace the EBTCM. Refer to Electronic Brake and Traction Control Module Replacement . Is the repair complete? | -- | Go to Diagnostic System Check | -- |
