For 1990-2009 cars only
Sunshade Removal Procedure
Caution: When working with any type of glass or sheet metal with exposed or rough edges, wear approved safety glasses and gloves in order to reduce the chance of personal injury.
- Remove the glass panel. Refer to Sunroof Glass Panel Replacement .
- Cycle the unit to the vent position.
- Slide the trough and shield forward.
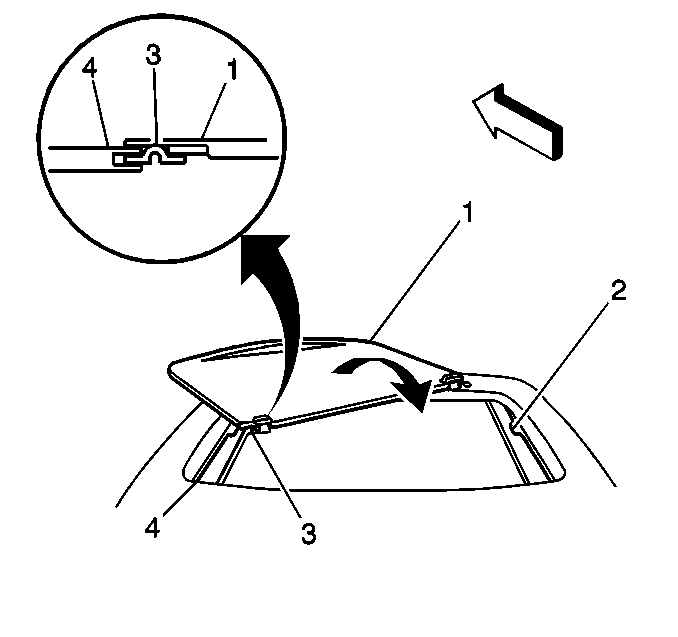
- Slide the sunshade (1) forward.
- Lift and turn the front edge of the sunshade (1) in order to disengage the clips (3).

Sunshade Installation Procedure
- Slide the trough and shield forward.
- Flex the sunshade (1) in order to clear the stops.
- Keep the unit centered and slide the sunshade (1) to the rear.
- Slide the sunshade (1) forward.
- Install the glass panel. Refer to Sunroof Glass Panel Replacement .

Lifter Arm Replacement Procedure
- Remove the glass panel. Refer to Sunroof Glass Panel Replacement .
- Cycle the unit to the rear until the lift pin is clear.
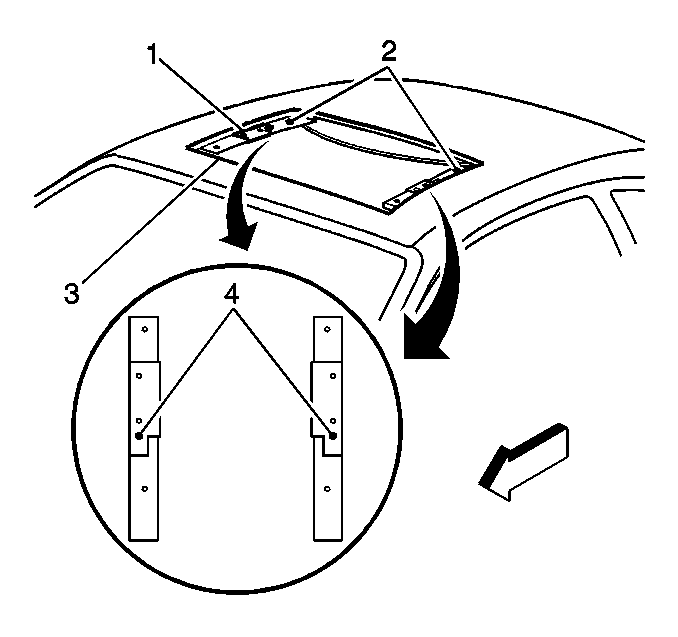
- Remove the 3 screws and the cover plates (1) on each side.
- Cycle the unit rearward in order to expose the openings (2) in the track (4).
- Remove the front lifter guides (3) from the track (4).
- Cycle the unit forward in order to release the lifter arm from the trolley.


Lifter Arm Installation Procedure
- Install the lifter arms (3).
- Install the cover plates (1).
- Cycle the trough and shield assembly to the full rear travel position.
- Install the glass panel. Refer to Sunroof Glass Panel Replacement .


Important: Install the machine screws (4) in the same location as before the removal.
Trough and Shield Replacement Procedure
- Remove the glass panel. Refer to Sunroof Glass Panel Replacement .
- Cycle the unit to the rear until the lift pin is clear.
- Remove the cover plates (1).
- Cycle the unit forward in order to expose the openings (2) in the track (4).
- Slide the lifter arms to the rear.
- Lift out the arms through the openings (2) in the track.
- Cycle the trolley forward. Do not disengage the cable from the transmission.
- Pull the trough and shield assembly forward.
- Lift out the trough and shield assembly through the opening (2) in the track (4).


Trough and Shield Installation Procedure
- Install the guide shoes (3) of the trough and shield assembly into the opening (2) in the track (4).
- Engage the guide shoes of the trough and shield assembly in the slot on the track (4).
- Center the trough and shield assembly.
- Push the trough and shield assembly into the housing until the assembly is seated.
- Install the lifter arms and the cover plates (1).
- Cycle the trough and shield assembly to full rear travel.
- Install the glass panel. Refer to Sunroof Glass Panel Replacement .


Important: Install the machine screws (4) in the same location as before the removal.
