Sunroof Window Height and Opening Fit Adjustment Procedure
Before you perform any adjustment, read the following information
regarding the inspection of the sunroof assembly and the descriptions of the
adjustment procedures.
You may perform one of the 3 following adjustment procedures
on the sunroof module:
| • | Synchronization of the sunroof track and motor |
| • | Up/down adjustment of the sliding glass panel |
| • | Fore/aft adjustment of the sliding glass panel |
Proper Retention of Glass Panel and Module
Before you inspect or adjust the sunroof, inspect the sunroof module
for general tightness of the following components:
| • | The sliding glass panel-to-lifter arm screws |
| • | The sunroof track-to-roof panel screws |
Inspect the sliding glass panel for looseness in several different positions
by attempting to rattle or move the panel using your hand.
| • | If the panel is loose in all positions, tighten the sliding glass
panel fasteners and the track retaining screws as described in Sliding Glass
Panel Fasteners and Track Retaining Screws below. |
Sliding Glass Panel Fasteners
- Raise the glass panel to the vent position by pushing the switch
upward. Ensure that the rear of the panel is in the UP position.
- Remove the 3 screws retaining the shield ring.
Slide the shield ring rearward.
Notice: Use the correct fastener in the correct location. Replacement fasteners
must be the correct part number for that application. Fasteners requiring
replacement or fasteners requiring the use of thread locking compound or sealant
are identified in the service procedure. Do not use paints, lubricants, or
corrosion inhibitors on fasteners or fastener joint surfaces unless specified.
These coatings affect fastener torque and joint clamping force and may damage
the fastener. Use the correct tightening sequence and specifications when
installing fasteners in order to avoid damage to parts and systems.
- Install the 6 screws.
Tighten
Tighten the 6 screws (3 on each side) that attach the
glass panel to the lifter arms to 3 N·m (27 lb in).
Track Retaining Screws
- Open the sunroof to the fully open position.
- Inspect the 12 sunroof track retaining screws for the proper
torque.
- Tighten the screws as required.
Adjustment Procedure

- Cycle the glass panel
to the flush position.
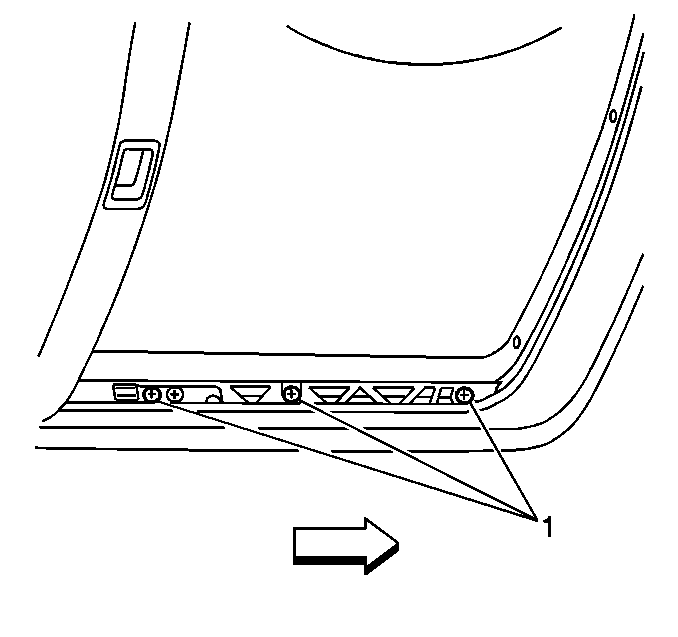
- Remove the 3 screws at the front of the trough and shield
assembly.
- Push the sunshade and the trough and shield assembly fully to
the rear position in order to expose the adjustment screws (1). There
are 3 screws per side.

- Loosen the center screws
and the front screws to adjust the front.
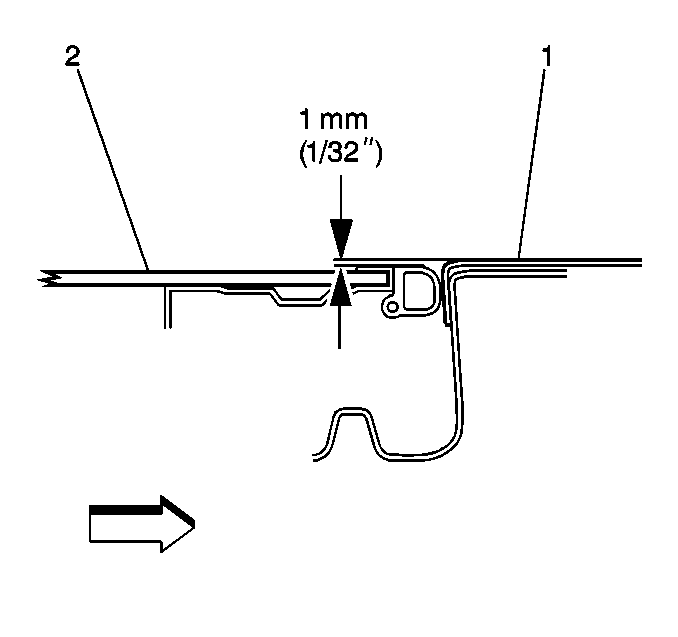
- Align the front edge of the glass panel (2) with the roof (1).
The glass panel should be flush with the roof and no more than 1 mm
(0.31 in) low.
- Tighten the front screw.
- Tighten the center screw.
- Tighten the front screw on the opposite side.
- Tighten the center screw on the opposite side.

- Loosen the following components
in order to adjust the rear:
- Align the rear edge of the glass panel (2) with the roof (1).
The glass panel should be flush with the roof and no more than 1 mm
(0.031 in) high .
- Tighten the rear screws.
- Tighten the center screws.
Notice: Use the correct fastener in the correct location. Replacement fasteners
must be the correct part number for that application. Fasteners requiring
replacement or fasteners requiring the use of thread locking compound or sealant
are identified in the service procedure. Do not use paints, lubricants, or
corrosion inhibitors on fasteners or fastener joint surfaces unless specified.
These coatings affect fastener torque and joint clamping force and may damage
the fastener. Use the correct tightening sequence and specifications when
installing fasteners in order to avoid damage to parts and systems.
- Install the 3 screws
at the front of the opening.
Tighten
Tighten the screws to 3 N·m (27 lb in).
Important: If the glass panel touches the roof when opening or closing, the roof
panel may be damaged.
- Loosen the 3 adjustment screws on each side located in each cover
plate. The reference marks on the cover plates are in 1 mm (0.031 in)
increments.
- Slide the cover plates in the desired direction in order to adjust
the gap. Moving the cover plates back moves the glass panel to the rear.
- Tighten the 3 screws on each side.
- Cycle the glass panel to the flush position.
- Inspect the gap.


