Headlamp Aiming Buick
Properly aim the headlamps in order to obtain the maximum road illumination and safety built into the headlamp system. Proper aiming is important with composite headlamps. Composite headlamps increase the range and the power of the headlamps. Slight variations from the recommended aiming may be hazardous to approaching motorists. Aiming after the bulb has been replaced is not required with composite headlamps.
Ensure that the vehicle is at the normal weight regarding the following items when you inspect the headlamp aim:
| • | The fuel |
| • | The oil |
| • | The water |
| • | The spare tire |
Inflate the tires uniformly to the specified pressure.
If the vehicle carries an unusual load in the rear compartment or a trailer, ensure that the load is on the vehicle when you inspect the headlamps.
Follow all of the individual state requirements for headlamp aiming.
Inspect the headlamp aim when installing a new headlamp assembly. Inspect the headlamp aim if service or repairs to the front end area may have disturbed the headlamps or the mountings.
The headlamp focus is set during the construction of the unit. Do not attempt to readjust the focus.
Follow all of the state laws and local laws for the proper requirements for the headlamp aim.
Adjust the horizontal aim using an adjusting screw on the outer side of the headlamp assembly. Adjust the vertical aim using an adjusting screw in the top center of the assembly.
Perform the following steps in order to prepare the vehicle for aiming the headlamps:
- Completely assemble all of the components.
- Place the vehicle on a level pad or surface.
- Stop all unnecessary operations or work on the vehicle that affects the vehicle trim.
- Close the doors.
- Stabilize the suspension.
- Ensure that the fuel level is at a 1/2 tank or less.
- Ensure that the tires are inflated to the proper pressure.
Adjustment Procedure
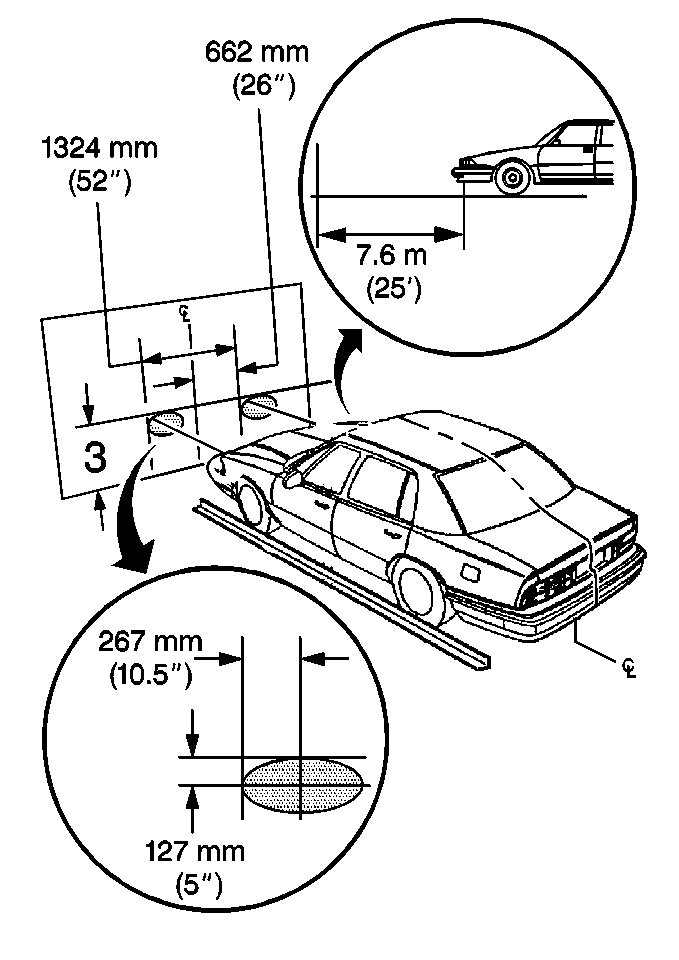
Complete the following steps and refer to the accompanying illustrations in order to adjust the headlamp aim:
- Ensure that the headlamps are a distance of 7.6 m (25 ft) away from the wall.
- Mark a vertical line on the wall. Align the vertical line with the center line of the vehicle.
- Mark a horizontal line on the wall. Ensure that the distance of the line to the floor is equal to the distance from the center of the headlamp aim dot to the floor.
- Using the following components, ensure that the following specifications match the specifications in the illustrations:


| • | The headlamp aim adjusters (1). |
| • | The zero set access hole (10). |
| • | The zero set meter (11). |
Headlamp Aiming 88/LSS
Properly aim the headlamps in order to obtain the maximum road illumination and safety built into the headlamp system. Proper aiming is important with composite headlamps. Composite headlamps increase the range and the power of the headlamps. Slight variations from the recommended aiming may be hazardous to approaching motorists. Aiming after the bulb has been replaced is not required with composite headlamps.
Ensure that the vehicle is at the normal weight regarding the following items when you inspect the headlamp aim:
| • | The fuel |
| • | The oil |
| • | The water |
| • | The spare tire |
Inflate the tires uniformly to the specified pressure.
If the vehicle carries an unusual load in the rear compartment or a trailer, ensure that the load is on the vehicle when you inspect the headlamps.
Follow all of the individual state requirements for headlamp aiming.
Inspect the headlamp aim when installing a new headlamp assembly. Inspect the headlamp aim if service or repairs to the front end area may have disturbed the headlamps or the mountings.
The headlamp focus is set during the construction of the unit. Do not attempt to readjust the focus.
Follow all of the state laws and local laws for the proper requirements for the headlamp aim.
Adjust the horizontal aim using an adjusting screw on the outer side of the headlamp assembly. Adjust the vertical aim using an adjusting screw in the top center of the assembly.
Perform the following steps in order to prepare the vehicle for aiming the headlamps:
- Completely assemble all of the components.
- Place the vehicle on a level pad or surface.
- Stop all unnecessary operations or work on the vehicle that affects the vehicle trim.
- Close the doors.
- Stabilize the suspension.
- Ensure that the fuel level is at a 1/2 tank or less.
- Ensure that the tires are inflated to the proper pressure.
Adjustment Procedure
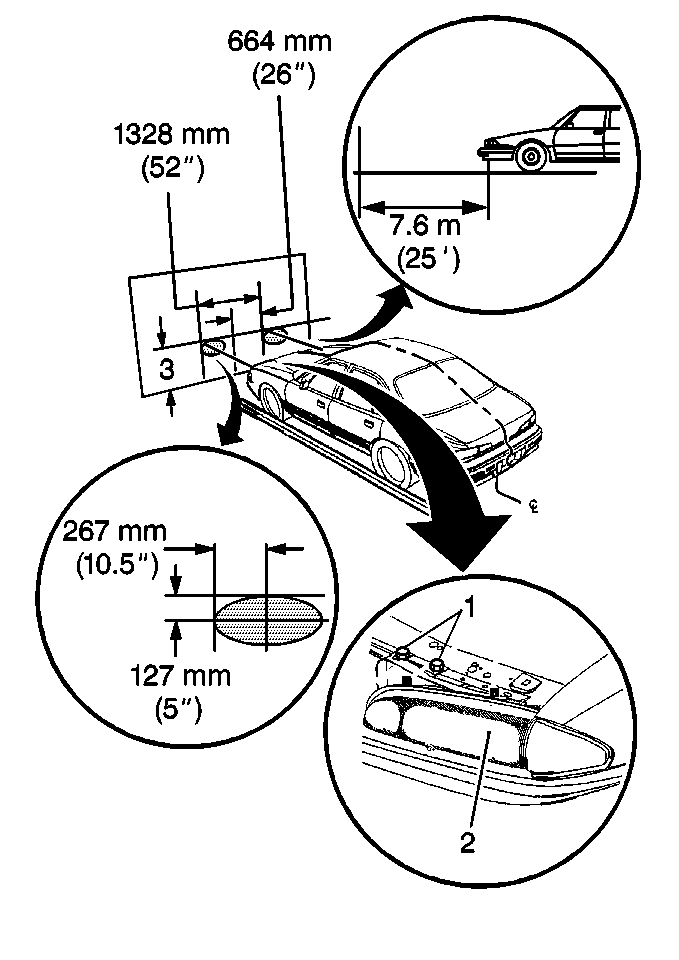
Complete the following steps and refer to the accompanying illustrations in order to adjust the headlamp aim:
- Ensure that the headlamps are a distance of 7.6 m (25 ft) away from the wall.
- Mark a vertical line on the wall. Align the vertical line with the center line of the vehicle.
- Mark a horizontal line on the wall. Ensure that the distance (3) of the line to the floor is equal to the distance from the center of the headlamp aim dot (2) to the floor.
- Using the headlamp aim adjusters (1), ensure that the following specifications match the specifications in the illustrations.


Headlamp Aiming Pontiac
Properly aim the headlamps in order to obtain the maximum road illumination and safety built into the headlamp system. Proper aiming is important with composite headlamps. Composite headlamps increase the range and the power of the headlamps. Slight variations from the recommended aiming may be hazardous to approaching motorists. Aiming after the bulb has been replaced is not required with composite headlamps.
Ensure that the vehicle is at the normal weight regarding the following items when you inspect the headlamp aim:
| • | The fuel |
| • | The oil |
| • | The water |
| • | The spare tire |
Inflate the tires uniformly to the specified pressure.
If the vehicle carries an unusual load in the rear compartment or a trailer, ensure that the load is on the vehicle when you inspect the headlamps.
Follow all of the individual state requirements for headlamp aiming.
Inspect the headlamp aim when installing a new headlamp assembly. Inspect the headlamp aim if service or repairs to the front end area may have disturbed the headlamps or the mountings.
The headlamp focus is set during the construction of the unit. Do not attempt to readjust the focus.
Follow all of the state laws and local laws for the proper requirements for the headlamp aim.
Adjust the horizontal aim using an adjusting screw on the outer side of the headlamp assembly. Adjust the vertical aim using an adjusting screw in the top center of the assembly.
Perform the following steps in order to prepare the vehicle for aiming the headlamps:
- Completely assemble all of the components.
- Place the vehicle on a level pad or surface.
- Stop all unnecessary operations or work on the vehicle that affects the vehicle trim.
- Close the doors.
- Stabilize the suspension.
- Ensure that the fuel level is at a 1/2 tank or less.
- Ensure that the tires are inflated to the proper pressure.
Complete the following steps and refer to the accompanying illustrations in order to adjust the headlamp aim:
- Ensure that the headlamps are a distance of 7.6 m (25 ft) away from the wall.
- Mark a vertical line on the wall. Align the vertical line with the center line of the vehicle.
- Mark a horizontal line on the wall. Ensure that the distance (3) of the line to the floor is equal to the distance from the center of the headlamp aim dot (2) to the floor.
- Using the headlamp aim adjusters (1), ensure that the following specifications match the specifications in the illustrations.


