REPAIR/REPLACE LAUDAU TOP PROCEDURE TO R/R TOP

MODELS AFFECTED: 1984 BUICK CENTURYS CUSTOM AND LIMITED 2-DOOR COUPE
LANDAU TOP CAP ASSEMBLY
1. To prevent paint damage, mask completely around top, side and rear edges of cap. Lay protective cover over roof and rear compartment lid surfaces.
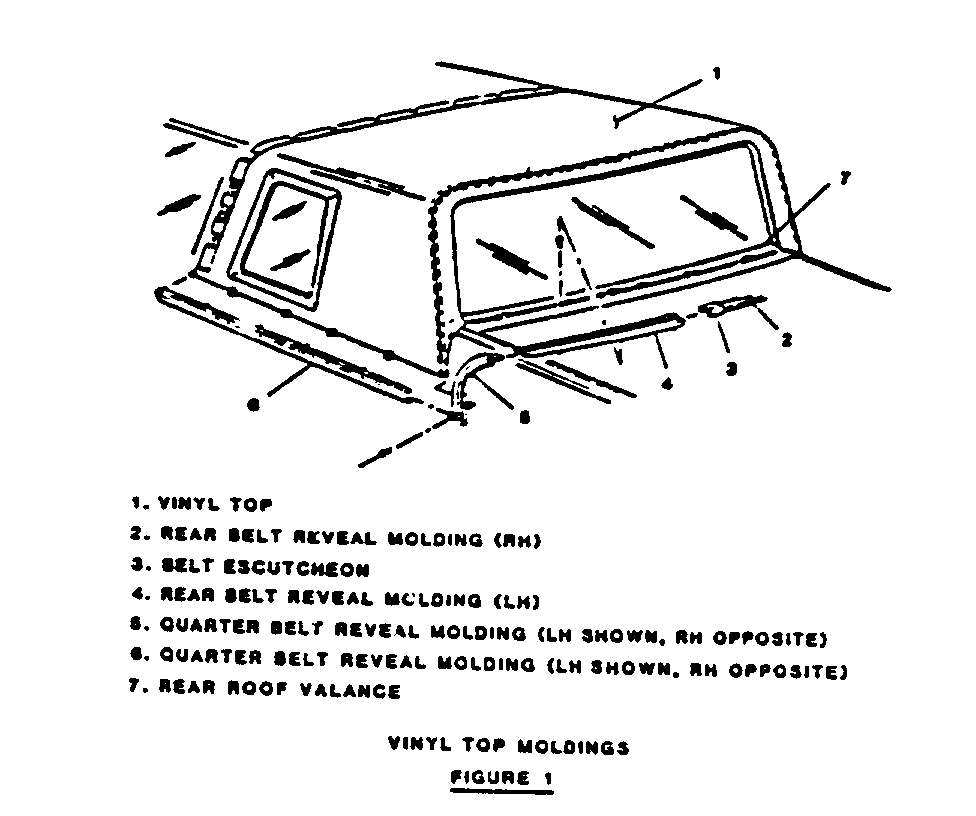
2. Using a suitable pry tool such as a tack puller, work left and right quarter belt reveal and rear belt reveal moldings out of barrel nuts (2, 4 and 6, Fig. 1).
3. Using a 3.5 mm, (9/64") drill with a 9.5 mm (3/8") drill stop, drill out two rivets holding a left and right quarter belt corner moldings (5, Fig. 1) and remove moldings.
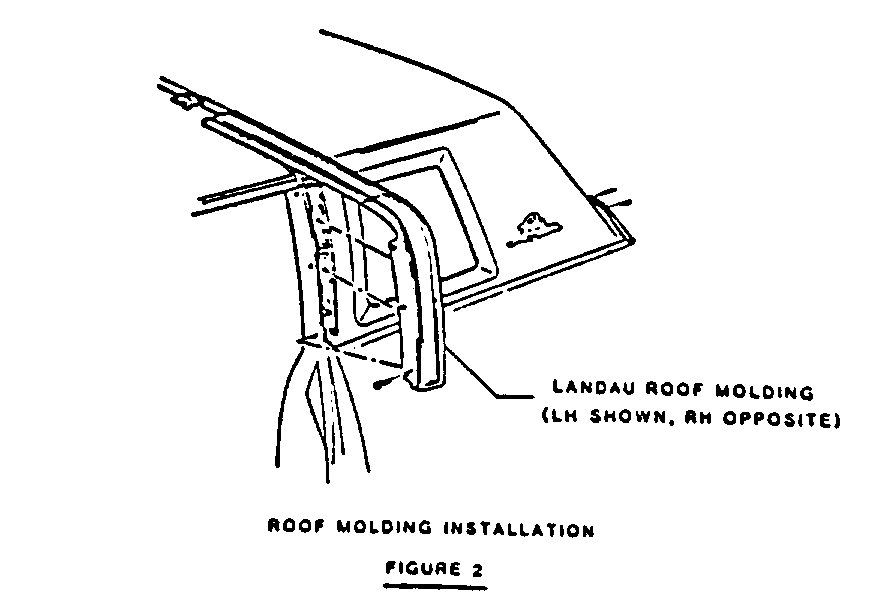
4. Remove screws securing left and right roof molding (Fig. 2) to door pillar and pull molding straiffit out from clips on roof panel.
5. Peel vinyl back along front edge of cap to expose attaching rivets.
6. Using a 3.5 m (9/64") drill with a 9.5 m (3/8") drill stop, drill out rivets along front of cap.
7. Using a pry type tool, work front of cap free as mich as possible from cement bond. Loosen approximately 150 mm (6").
8. With the assistance of a helper, work rear of cap free from roof sail panels by lifting upward to free rear of cap from roof.
9. Lift cap off.
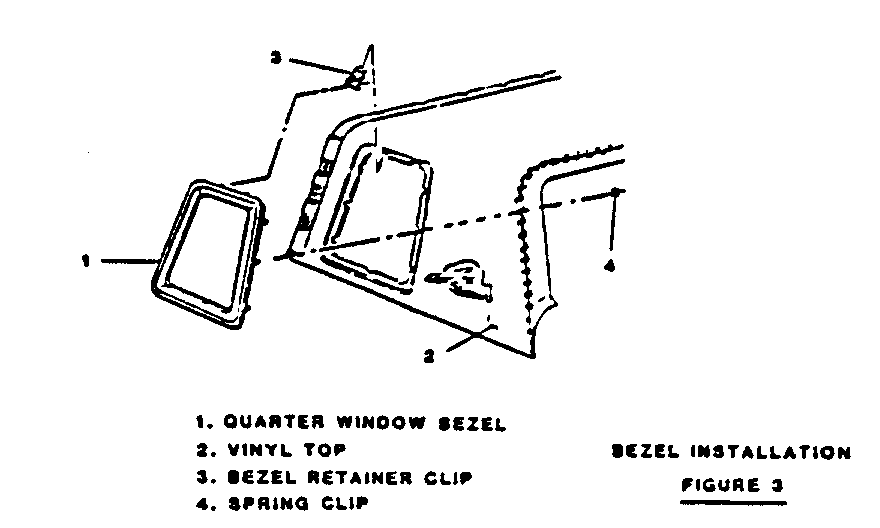
10. Disassemble spring clips (4, Fig. 3) from pins on quarter window bezel (1).
Notice: Do not pull on inside of bezel frame as plastic is easily cracked. Pins may break off upon removal of clips.
11. Pull bezel out and downward at bottom to free retainer clips (3, Fig. 3) at top of bezel.
12. Remove speednuts from studs and emblems.
13. Clean off butyl tape or caulking across front of roof and beltline area. If cap is reused, clean tape from underside of cap.
IMPORTANT: Butyl caulking may be easily removed by pressing body tape onto it and lifting it off.
14. Clean rivet holes and barrel nuts.
IMPORTANT: It is not necessary to remve all red roof caulking, only remove high spots. Installation: ------------ 1. Assemble emblem and speednuts.
2. Install quarter window bezels up into place and secure with clips.
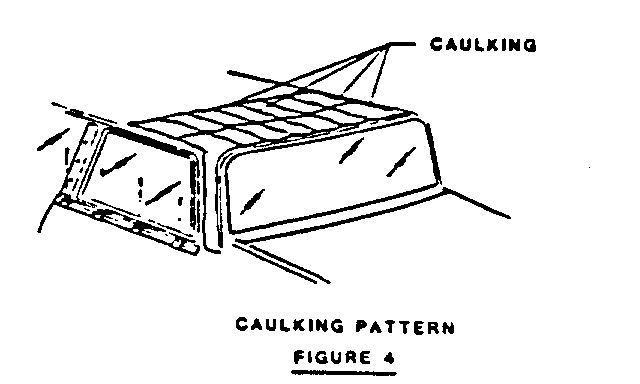
3. Apply new bead of caulking next to old caulking using Automotive Bedding and Glazing compound 3M 08509 or equivalent (Fig. 4).
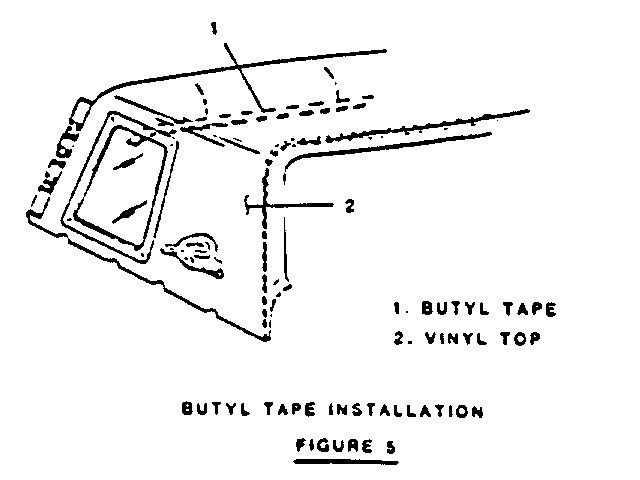
4. Install 25 mm x 1.5 mm thick (1: x 1/16") double sided butyl or equivalent tape to front edge of cap (1, Fig. 5).
5. With the aid of a helper, Position cap onto roof and align to old rivet holes.
6. Install one rivet at each corner and at center front to locate cap before installing balance of rivets.
IMPORTANT: New rivets must be of the aluminum closed-end type to prevent waterleaks. In addition, rivet heads must be flush with cap surface. File as required.
7. Apply Vinyl Trim Adhesive (13M-8064 or equivalent) to front edge of cap and roof panel out to centerline of molding studs.
8. Stretch and secure vinyl to roof panel.
9. Rivet quarter belt corner moldings to body using closed-end rivets.
IMPORTANT: Corner belt moldings require longer rivets.
10. Apply noncorrosive type silicone sealer such as 3M-8660 or General Electric R.V.P. Sealant or equivalent into barrel nut holes and install quarter and rear end belt reveal moldings.
11. Remove protective coverings and clean up car as required.
VALANCE
REMOVAL
1. Lay protective cover over rear compartment lid surface to prevent paint damage.
2. Using suitable pry type tool, work left and right rear belt reveal molding out of barrel nuts (2 and 4, Fig. 1).
3. Remove rear belt reveal moldings and belt escutcheon (2, 3 and 4, Fig. 1).
4. Pull vinyl material up approximately 50 mm (2") to expose rivets at rear roof valance (7, Fig. 1).
5. Using a 3.5 mm (9/64") drill with a 3/8" drill stop, drill out rivets and remove valance.
Installation
1. Align valance with previous attaching holes and secure with closed-end rivets. Be sure that rivet heads are flush with surface of valarice panel to avoid highlighting of rivets when covered.
2. Apply 3M Vinyl Trim Adhesive (#3M-8064 or equivalent) to vinyl flaps of valance and to valance above centerline of rivet holes. Stretch and secure vinyl to valance.
3. Apply noncorrosive type silicone sealer such as 3M-8660 or General Electric R.V.P. Sealant or equivalent into rivet and barrel nut holes and install corner, rear quarter and rear end belt reveal moldings.
4. Remove protective coverings and clean-up car as required.
LANDAU ROOF MOLDING (LEFT OR RIGHT)
Removal
1. Tape protective covering to adjacent painted surfaces to prevent paint damage.
2. Remove screws securing left or right roof molding to door pillar and pull molding straight out from clips on roof panel (Fig. 2).
Installation
1. Slide molding onto clips on roof panel.
2. Install scrows securing roof molding to pillar.
QUARTER BELT CORNER MOLDING - (LEFT OR RIGHT)
Removal
1. Tape protective covering to adjacent painted surface to prevent paint damage.
2. Using pry tool, work quarter belt reveal molding (6, Fig. 1) from barrel nuts in panel.
3. Using pry tool, work rear belt reveal molding (2 or 4, Fig. 1) from barrel nuts in panel.
4. Using a 3.5 am (9/64") drill with a 9.5 mm (3/8") drill stop, drill out rivets in quarter belt cornerr moldings (5, Fig. 1).
5. Quarter belt corner moldings.
Installation
1. Align quarter belt corner mlding with previous attaching holes and secure with closed-end rivets.
2. Align rear belt reveal molding clips with barrel nuts in panel and secure by lightly tapping molding into place with rubber mallet.
3. Align quarter belt reveal molding clips with barrel nuts in panel. Secure by lightly tapping molding with rubber mallet.
REAR BELT REVEAL MOLDING (LEFT OR RIGHT)
Removal
1. Tape protective covering to adjacent painted surfaces to prevent paint damage.
2. Using pry tool, work rear belt reveal molding (2 or 4, Fig. 1) from barrel nuts.
3. Remove rear belt reveal molding and molding clips.
Installation
1. Install clips to molding.
2. Align molding clips with barrel nuts in panel and secure by lightly tapping molding into place with rubber mallet.
QUARTER BELT REVEAL MOLDING (LEFT OR RIGHT)
Removal
1. Tape protective covering to adjacent painted surfaces to prevent paint damage.
2. Using pry tool, work quarter belt reveal molding (6, Fig. 1) from barrel nuts.
3. Remove quarter belt reveal molding and molding clips.
Installation
1. Install clips to molding.
2. Align molding clips with barrel nuts in panel and secure by lightly tapping molding into place with rubber mallet.
General Motors bulletins are intended for use by professional technicians, not a "do-it-yourselfer". They are written to inform those technicians of conditions that may occur on some vehicles, or to provide information that could assist in the proper service of a vehicle. Properly trained technicians have the equipment, tools, safety instructions and know-how to do a job properly and safely. If a condition is described, do not assume that the bulletin applies to your vehicle, or that your vehicle will have that condition. See a General Motors dealer servicing your brand of General Motors vehicle for information on whether your vehicle may benefit from the information.
